These are some of the most frequently asked questions about skibikes. Check out these other pages for more good info:
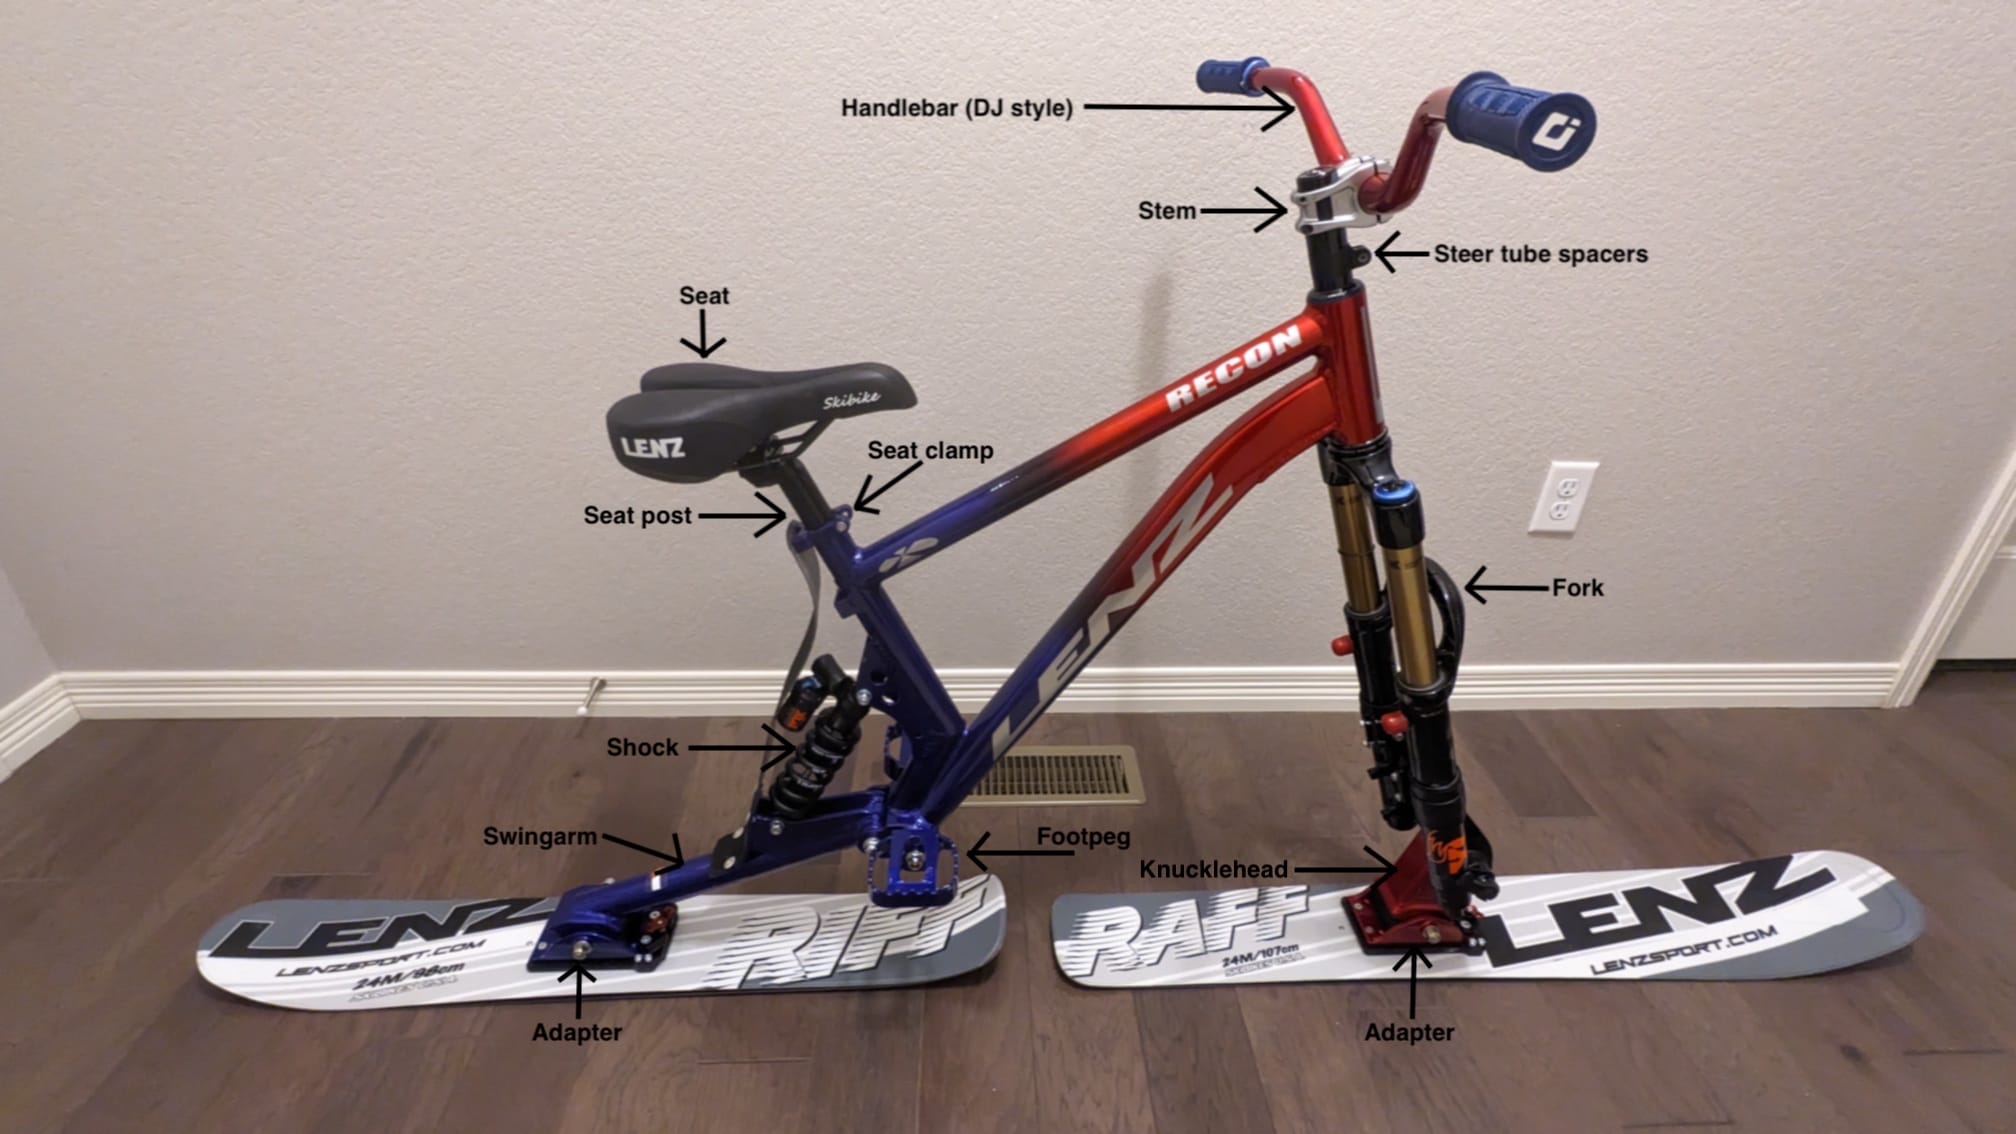
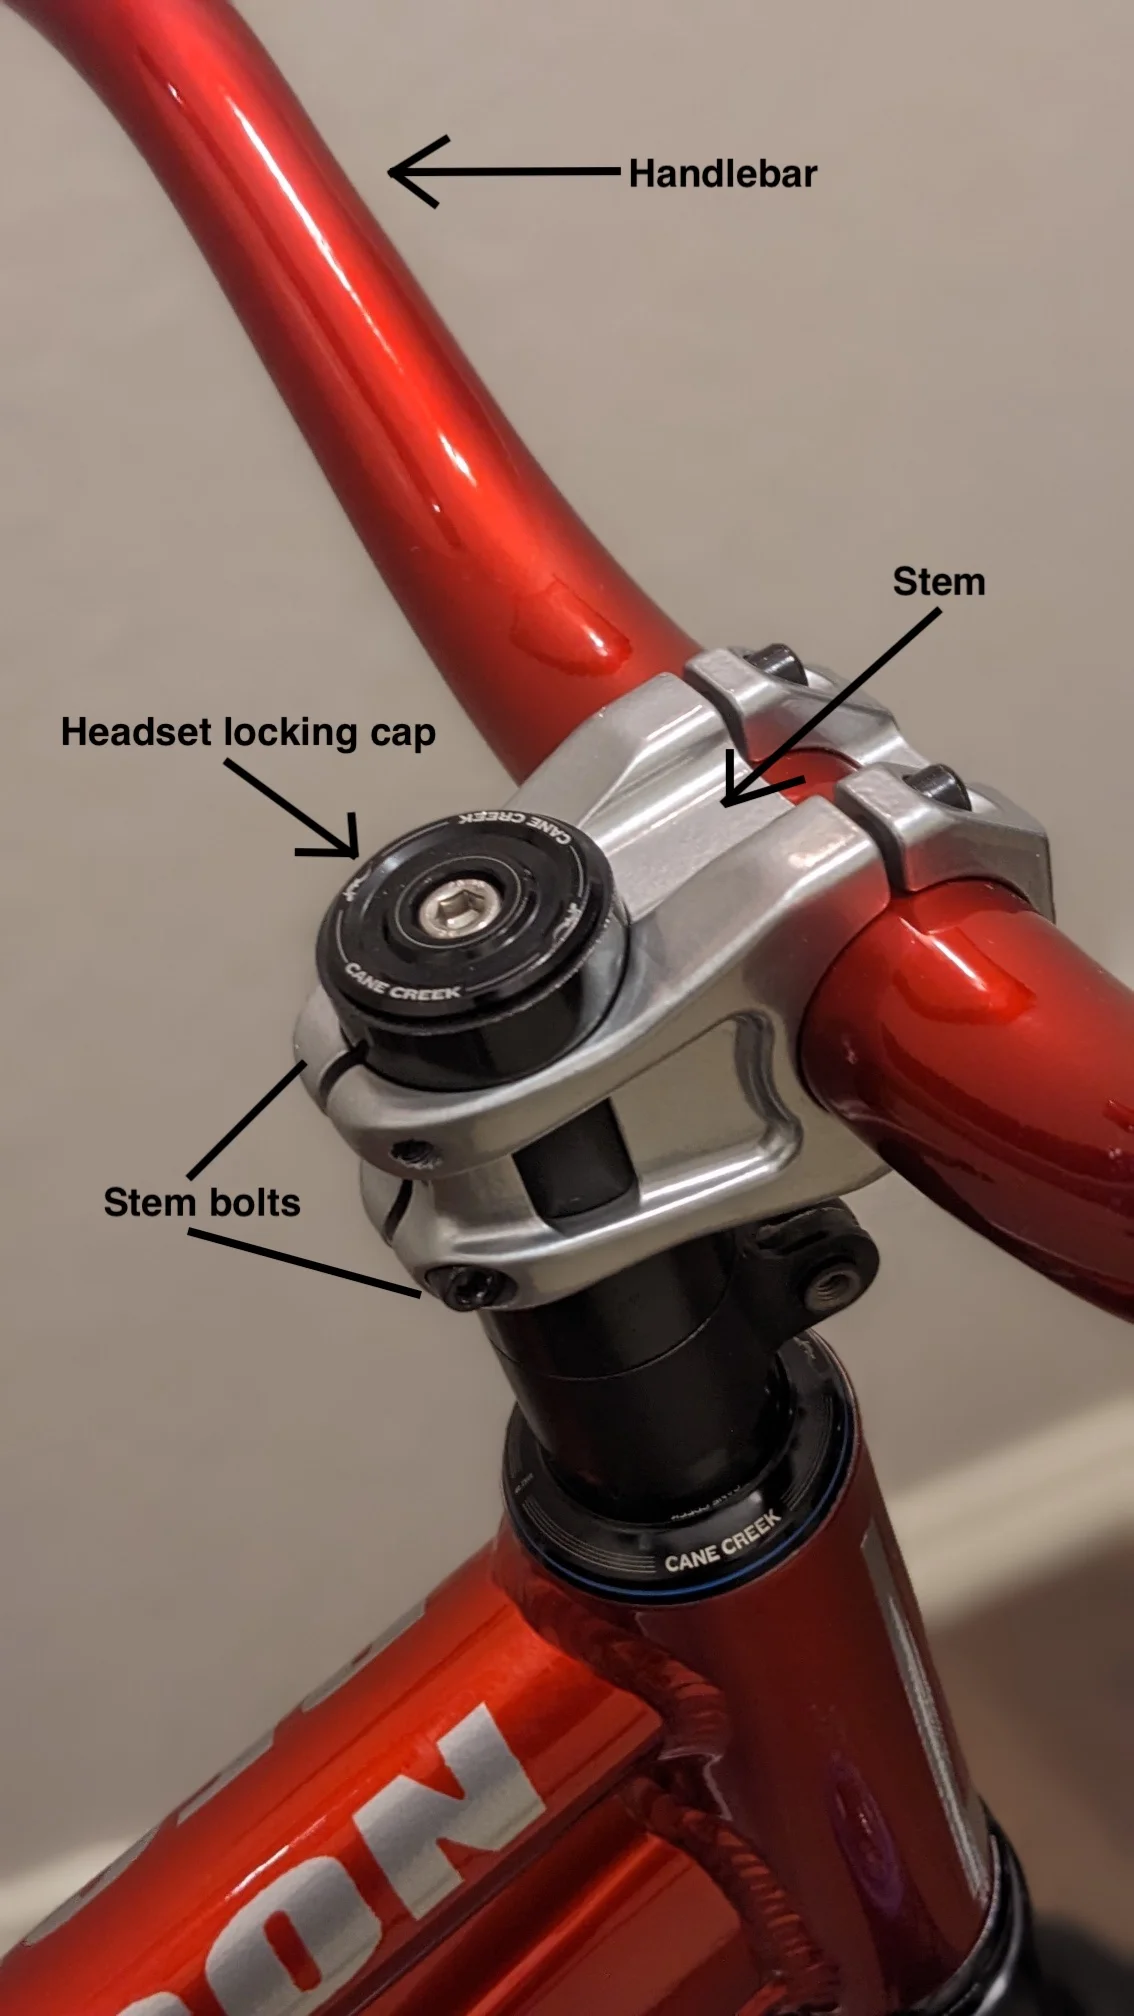
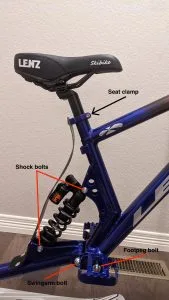
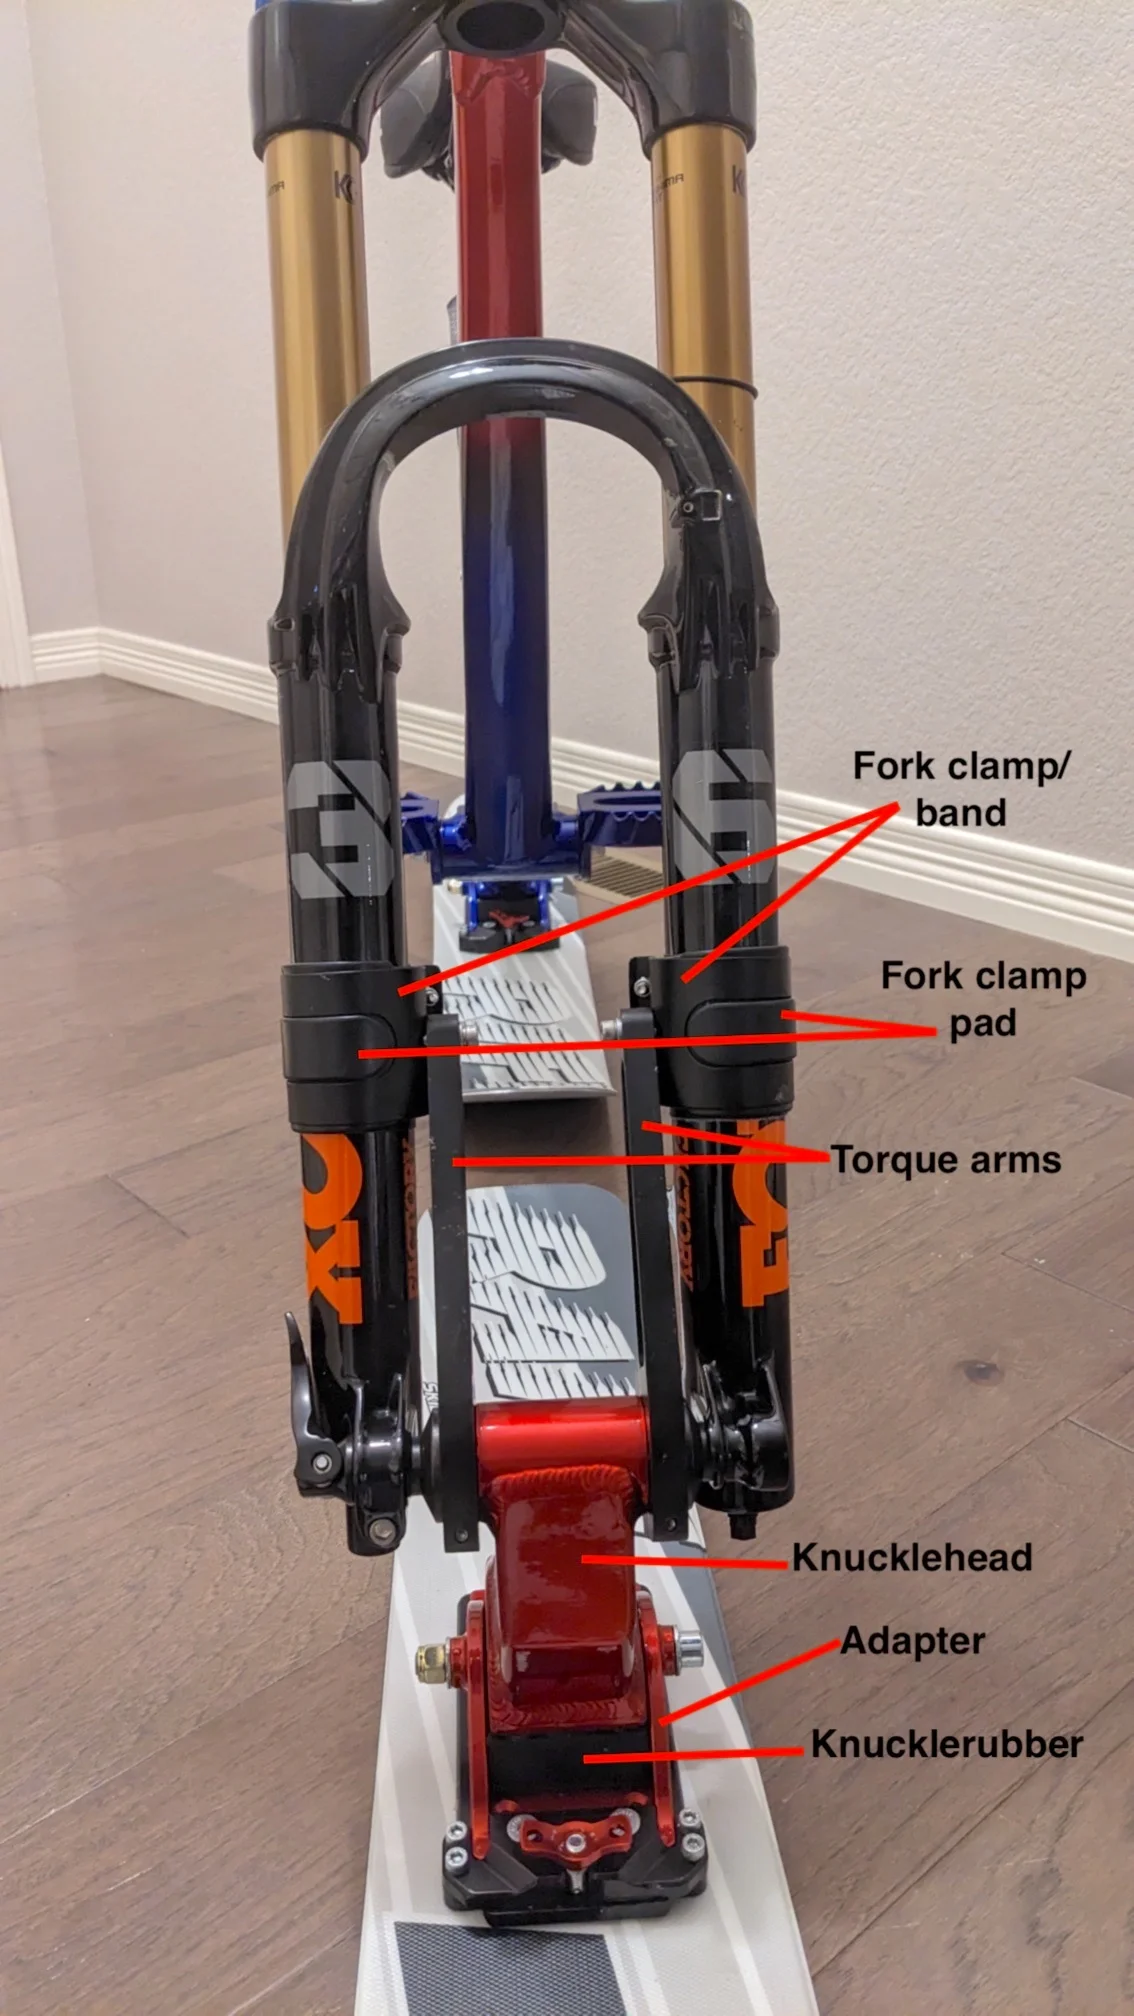
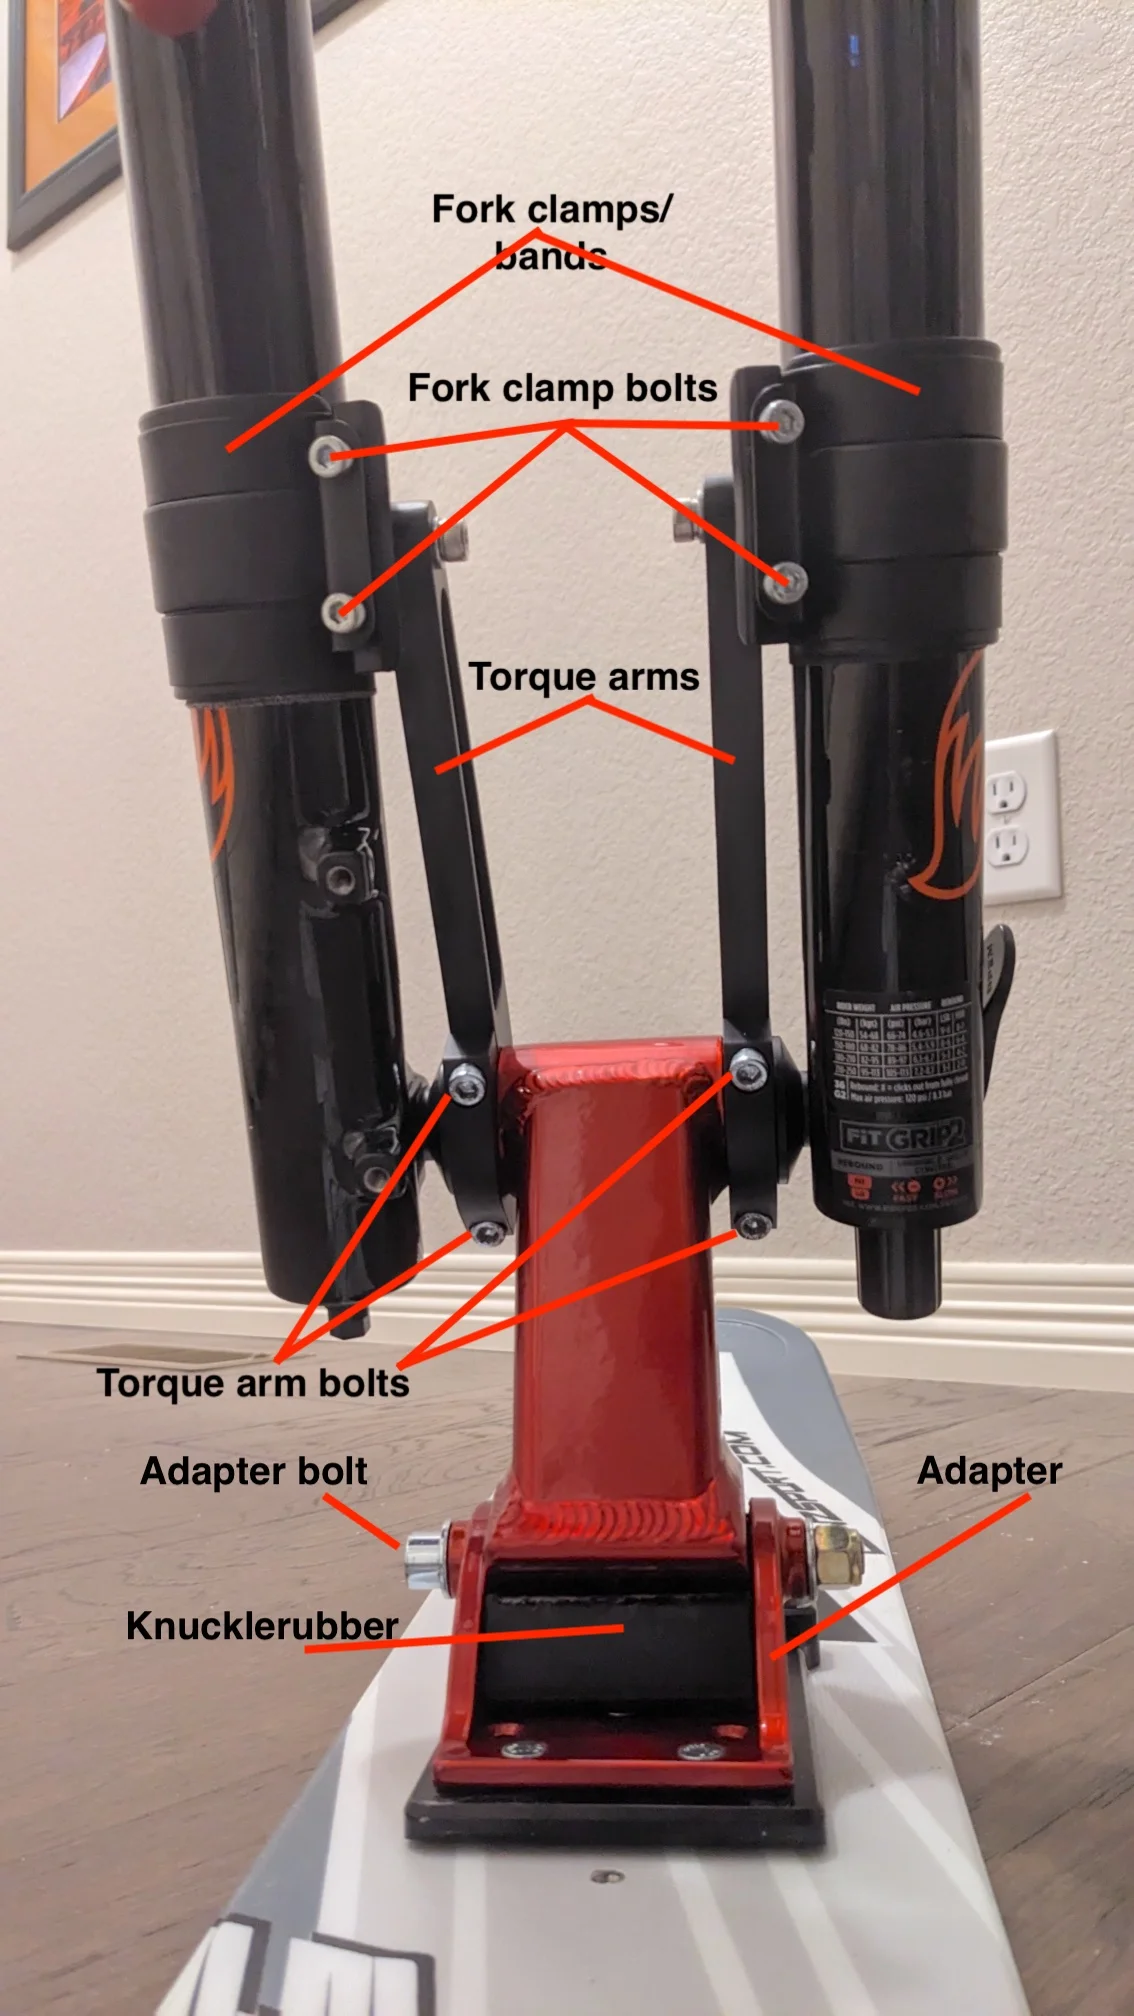
Just as with anything else, learning the “anatomy” of a skibike takes time. We want to help you out with that, so here are some photos to help you figure it all out.
This question has several answers, so we will dig into the details. The answer will be different depending on the type of bike you are ordering.
The Recon, Sortie, and Blip Skibikes are production skibikes made in bulk batches. We try to have these in stock during the skibike season. We keep the frames in stock and then assemble them for each customer based on the various options they choose. They are available in stock or custom colors; choosing a custom color may delay the process. Assembly can take 1-2 weeks IF we have all parts available. If parts are delayed, you can choose to substitute for something available, or wait for the part you wanted.
The Launch and Javelin Skibikes are made-to-order here in Colorado. We generally switch from mountain bikes to Skibikes in October. If you want to have a Launch Skibike for the current skibike season, we recommend getting the order in before September so you can get one in the first batch of frames. We generally run two full batches of Launch frames. The first batch is usually done in early November and the 2nd batch is usually done in early January. Once January hits, we start to transition back to mountain bikes for the next season. If you want a Launch, check with us for availability as we may have a bike available for you. If we don’t have one, we suggest ordering a Recon with all the upgrades to get the high end performance similar to the Launch.
**all deposits are non-refundable and lead times are estimated, not guaranteed. Lenz Sport is dedicated to building handmade and extremely high quality skibike frames. On the Launch and Javelin, we fabricate every single part of the frame in house down to the bolts, dropouts, and pivots, The manufacturing process is very unique and can vary in the amount of time it takes. By ordering this frame, you are getting something special and different from what any other company in the world can offer. We greatly appreciate your patience throughout the process and we look forward to delivering your bike. We cannot promise that we can provide constant updates, but we will let you know when your frame is almost ready for powder coating so we can finalize your custom color choice. Until then, let us know if you want to make any changes to your component choices or frame options.
There is nothing worse than getting a skibike only to find out that the mountain you want to ride at does not allow them. Don’t assume that a particular mountain is skibike friendly just because you saw a bike there. A lot of mountains are NOT skibike friendly, but may allow bikes to people with disabilities through their adaptive program. There is a full list of skibike friendly mountain found on the American Skibike Association’s page Where To Ride.
YES! There are several advantages to getting a purpose-built (factory) skibike over a DIY converted (conversion) bike. Without going in to a lot of detail, here are the highlights:
We have several rental partners that should be able to help you out, and can be found on our website on the “Rentals” page HERE. Most of them are located in Colorado. If you need a rental bike in an area where we don’t have a rental partner, your best bet is to get on the social media groups and ask around.
Yes, you are more than welcome to have a bike shop assemble your bike. We understand that not everybody has a set of tools and a local bike shop is a good place to go. Just be aware that the bike shop is more than likely not going to be familiar with a skibike and might want to do things they shouldn’t, like cutting down the steer tube on the fork. Please inform the shop that everything is as it should be and if they have any questions about anything regarding the bike, they should contact us directly before doing anything.
Most people will say yes, it is easy to learn. But as with anything, how easy something is to learn depends 100% on the person. We often get asked if skiers, snowboarders or mountain bikers pick it up quicker. Not necessarily. Having an understanding of edging control and weight transfer/balance helps but it is not necessary. Likewise, just because you are/were a good mountain biker does not indicate how quickly you will learn skibiking. We typically say that there is a good chance you will mostly figuring out the basics within a couple of runs. Some variables that may affect how quickly you pick it up are:
Check out our How to ride a SkiBike page regardless if you are going to take a lesson or not.
The short answer is yes, you can teach yourself how to ride, and yes, you are better off taking a lesson.
Confused? Let us clarify. Is it possible to teach yourself? Yes, it is. With that said, we STRONGLY RECOMMEND getting a lesson. There are some things that you will learn faster, easier and safer if you take a lesson. Things like how to stop, how to keep your speed in check, edging control, skidded turns, flat skidded traverse, sliding sideways down the fall line, etc. You have to learn to crawl before you can run a marathon. The last thing anyone needs is somebody who thinks they can teach themselves, get out of control with their speed or direction, hit another person and cause harm, and give the sport of skibiking a black eye. There are lot of mountains who don’t like us, and the last thing we need as a sport is for something like this to happen and give them reason to continue to not like us.
As the person writing this, I can tell you from personal experience that being self taught is not all that great. I received minimal instruction before I was handed a bike and was told, “Here you go. Have fun.” Even though I had other riders with me, none of them were able to give me guidance. I went by myself for the first handful of days and thought I was doing OK. Then one day I went up with Devin to teach one of my friends. He did the teaching and within five minutes of her lesson it became clear that I was not in fact doing OK. I was struggling at best. After two runs of receiving proper instruction my riding ability was improved immensely. So take it from me…do yourself and the sport a favor, and get a lesson from the get-go.
We hear this a lot: “I’m a big mountain biker…” “On my mountain bike I…” “My mountain bike is size….”
Let’s be blunt. You cannot compare the size of your mountain bike (MTB) to the size of a skibike. The geometry is completely different. The functionality is completely different. How you ride them is different. The type of terrain you are riding on is different.
Now let’s answer the question: is skibiking like mountain biking? Yes….and no. Yes, you are on a bike frame with the same components as a MTB, holding on to a handlebar, and there are two things in line with each other that are under your body that make contact with the ground. However, how you ride a skibike isn’t really the same as how you ride a MTB.
The Launch is our “flagship” skibike; it is still made 100% in-house by Devin himself, and it’s the bike that helped skibiking become what it is today. The Recon is made over seas but is painted and assembled in house. However, we want to make it very clear that just because the Recon is made over seas, the quality and durability is just as good as the Launch. We have never had a Recon frame fail. The Sortie is our small bike and is closer to the Recon in how it feels and handles, but don’t be fooled; just because it’s a smaller frame doesn’t mean it can’t handle any type of riding and terrain. Because of it’s smaller size it is quick, nimble in tight technical terrain, yet still stable at high speed.
If you were to compare the Launch and Recon in terms of mountain bikes, the Launch is like a downhill bike in that the frame itself is a little more stout, it usually comes with longer travel (160-180mm), and is happiest when going fast and making carves. The Recon is like a long travel enduro bike in that it is a little lighter, the travel is usually a little shorter (150-180mm), and is a great all mountain bike. Devin himself will tell you that the Recon is a better feeling, more natural, more playful bike than the Launch. The Recon is at home with whatever you want to do with it…cruise groomers, navigate the moguls/trees, or play in the terrain park.
Most riders will find the Recon to be sufficient for all styles of riding. Very seldom do we have someone “outgrow” a Recon and get a Launch.
If you are looking for specific geometry differences, you can find that info under the “geometry” tab on each bikes’ page.
We hear this a lot: “I’m a big mountain biker…” “On my mountain bike I…” “My mountain bike is size….”
Let’s be blunt. You cannot compare the size of your mountain bike (MTB) to the size of a skibike. The geometry is completely different. The functionality is completely different. How you ride them is different. The type of terrain you are riding on is different.
Now let’s answer the question: is skibiking like mountain biking? Yes….and no. Yes, you are on a bike frame with the same components as a MTB, holding on to a handlebar, and there are two things in line with each other that are under your body that make contact with the ground. However, how you ride a skibike isn’t really the same as how you ride a MTB.
Let’s answer the second question first. Is one method of transporting your skibike better than the other methods? The short answer is no. It is going to depend on the type of vehicle you are using.
Now for the first question…how do I get this thing up to the mountain? As just stated, it is going to depend entirely on what kind of vehicle you are using. If you are driving a car your best bet would be to remove both skis so it can fit in the back seat, or if you can fold the back seat down, lay it in the back. If you have a sport utility vehicle you might be able to get away with removing only the front ski. With some SUVs you can get away with leaving both skis on and lay it diagonally by turning the fork/ski 180 degrees to shorten the “wheel base”. If you have a truck you can either lay it flat in the bed (same rules apply as the SUV), or hang the front ski and fork over the tail gate like a bike. We do want to point out that the ski might hang down lower than you are used to with your bike, so be careful that the ski stays away from your exhaust pipe. There are some riders who have melted their front ski because it got too close to their exhaust pipe.
Something to consider if you are removing one or both skis is to put a piece of tape over the ski bolts after you put the skis on and before you start riding. This will keep snow and ice from building up in the bolt heads, which is a total pain to remove at the end of the day (we know from experience). We have found that Gorilla tape works well. If you are worried about the tape coming off during the day, you can keep an extra length of tape somewhere on your frame (we prefer on the bottom of the down tube…out of sight, out of mind).
This is personal preference. The BMX bar will allow you to stand more upright whereas the Dirt Jumper (DJ) will sit lower and naturally get your body weight more forward. In skibiking we need our weight forward over the front ski for several reasons, and some have found that by using the lower DJ bar, you naturally put more weight on the front ski.
On that note, when we cut the steer tube on the fork we do not cut it so that the handlebar stem sits right on top of the headset cap like on mountain bikes. We leave about 2″ of stack height with spacers so you can adjust the height of the handlebar. If you feel like you can’t get enough weight forward, try lowering the bar on the stack.
The weight of our bikes will vary slightly depending on the model, size and build options. The following weights are for stock builds** on our Recon and Sortie skibikes with and without the stock Conniption Styx skis.
WITHOUT SKIS
WITH STOCK CONNIPTION STYX SKIS
WITH UPGRADED RIFF RAFF SKIS
WITH UPGRADED ZIG ZAG SKIS
RECON – LARGE
22.91 LBS
27.78 LBS
29.07 LBS
30.19 LBS
RECON – MEDIUM
22.65 LBS
27.65 LBS
28.9 LBS
29.93 LBS
SORTIE
21.88 LBS
26.86 LBS
28.03 LBS
29.15 LBS
**The stock build on these bikes include: Marzocchi Z2 fork; DNM shock; Lenz BMX handlebar. Seat post, seat clamp and handlebar stem are NOT from the Frigid line of components.
Without getting in to details, the fixed pegs make for more solid, consistent handling of the bike. If your feet are always in the same position, you can dial in your riding without sacrificing anything.
That, and if you have ever been mountain biking and have a foot come off the pedal at the most inopportune time, you know how nerve racking it can be trying to get your foot back on. Now take that and add a snow covered slope, big boots and higher speeds. Not exactly a good time if you can’t find the pedal after your foot comes off in the middle of a killer high speed carve, the trees or the moguls.
At this time, we do not offer any kind of adapter or modification for our bikes that will allow you to use normal bicycle pedals.
There are a few differences between the stock and upgraded ski. A short comparison:
The main upgraded ski, the Riff Raff, is a wider ski and the Conniption Styx with a continuous side cut. The rear ski is also shorter than the front which can help with ease, quickness and responsiveness in turning. This also allows the rear ski to slide around corners like a dream.
The Zig Zag is our dedicated powder board and is meant to be ridden in deep powder only. It is wider than the Riff Raff (even wider than the Conniption Styx yet) and also is a continuous side cut. Unless you are in powder that is at least 6″ deep, the Riff Raff is the better choice.
With that said, we do need to state that due to the aggressive upsweep of the tip on the front ski on the Riff Raff and Zig Zag, they may not be suitable for some people to learn on. They are not as forgiving if your body weight is not where it should be. If you don’t have enough weight over the front ski they will either turn when you don’t want to, or not turn when you do want to. Even experienced riders can ‘feel the wrath’ of the Riff Raff and Zig Zag if they get lazy with their body positioning, resulting in loosing an edge and sliding out. We strongly recommend that you flip the knucklehead…more info can be found on our “How To” videos for Lenz Skibikes under the “how to flip the knucklehead” section.
Another worthy note is that the Conniption Styx can be ridden straight out of the box without being tuned (even though we do highly recommend you have them tuned anyway); the Riff Raff and Zig Zag MUST BE TUNED prior to being ridden.
Both of our upgraded skis, the Riff Raff and the Zig Zag, have a continuous side cut. What does that mean? It means that if you put the front and rear ski in a straight line, tip to tail, one uniform arc is formed (as opposed to each ski forming its own arc). We can try to explain it, but THIS ARTICLE can explain it much better than we can.
Why is having a continuous side cut good? Simply put, if both skis work together to make one single radius instead of fighting each other to make their own, you will be able to hold a better edge while making good carving turns. Keep in mind that most riders rarely do a true carve but instead do more of a sliding turn.
Please refer to our How to Tune Skibike Skis page for detailed tuning instructions.
Some people are more meticulous with keeping their skis tuned and waxed than others. If you are not one of those people or are new to the whole ski thing, we hope that this guideline will help.
Tuning interval: As with any ski or snowboard, the edges will need to be tuned/sharpened/de-tuned. There is a detailed tuning guide found on our “Skibike Assembly & Good Info” page HERE. With that said, after your skis have their initial tuning, it is recommended that you check the edges on a regular basis for knicks, burrs and sharpness. If you feel knicks or burrs you will want to get rid of them using either a gummy or pocket stone. If you feel like you can’t hold an edge while riding, run your fingernail perpendicular to the edge. If you are unable to scrape some nail off, it’s time to have them sharpened.
Waxing interval: If you look at the bottom of your skis and there is not much wax left (or any for that matter), it’s time for more wax. If you feel like your skis are a little sluggish and not gliding well, it might be time for more wax. If the temperature of the snow is different than the last time you had your skis waxed, it’s a good idea to get them waxed with the appropriate temperature wax. For example, if the current wax on your skis is a cold temp wax (0-20 degrees) and you will be riding in warmer temperatures (35 degrees), you will want new wax. There are different temperatures of wax for different temperatures of snow. Every manufacturer will have a different temp range for their wax, so you will need to find out what wax the store uses so you can stay on top of it.
What type of wax?: Most shops and riders will use a hot wax. Some people will use a rub-on or spray-on wax for those in-between days where they feel they need a little extra to get them by until their next wax job. If you start waxing your own skis, you will have to experiment and find what you like best. As with most things, this is personal preference. We personally don’t have any experience with anything other than hot wax so you would have to ask around for opinions and feedback on the spray and rub on wax.
Even though it is not recommended to use an air shock, it can be done. The reason we don’t use them much without getting too technical is because the leverage ratio on skibikes is very different than on mountain bikes. In order to keep the shock from bottoming out, the air pressure needs to be higher than it would normally be on a MTB. Not only that, but we must not forget that air volume decreases with altitude and cold temperature (the colder it is, the more air pressure you need). It may not be possible to get enough air pressure in the shock to keep it from bottoming out. Can it be done? Yes, usually with the addition of volume spacers (you will have to look that one up).
Even though it can be done, we do want to advise that you run a higher risk of damaging the shock since it will be easier to bottom out.
Yes, kids can ride a skibike. We even offer a small bike for kids called the Blip, which can be found HERE.
Even though there is not an age limit for riding a skibike, there are some considerations that need to be addressed when talking about kids:
**Some kids may not be able to safely and/or properly load a chair lift by themselves. The bike can weigh half of the kids’ body weight, and the kid may simply not be big or strong enough to get the bike on the chair without assistance.
**Mental capacity: Some kids may not be able to fully comprehend the logistics of how to ride a skibike. Even though they may be able to ski or snowboard, a skibike is different and they may not be able to grasp it. Heck, some adults don’t fully grasp it.
*Body weight: Because kids are smaller they may not have enough body weight or height to properly load the front ski. Properly loading the front ski with body weight is how we keep our speed and control in check, and if there is not enough weight on the front ski, the bike will be difficult to handle.
With that said, we are not saying that skibiking is not for kids at all. We know a handful of kids that are able to ride and they do quite well with it. As with any sport, it will vary from kid to kid. If your 15 year old is able to ride, it does not mean that you 12 year old will also be able to ride. Kids must be treated on an individual basis.
Please refer to our “Ski Adapter Maintenance” section on the “How To” videos for Lenz Skibikes page for detailed information.
It is recommended that you keep your adapter bolts, brass bushings in the knuckles, and the knuckle pads lubricated. We use a general, all-purpose bike grease in the shop, Finish Line Premium Grease. Another one that is good is Park Tool Polylube 1000. For the environmentally conscious person, Mountain Flow has a plant based grease. We personally have not yet used the Mountain Flow grease but it seems to have good reviews.
NOTE: When removing the adapter bolt, you will need an 8mm hex wrench and a 15mm socket. To help avoid stripping the head of the adapter bolt (or any bolt for that matter) use the allen wrench to hold the bolt stationary while loosening/tightening the nut with the socket.
When applying grease to the adapter bolts, clean the bolts as good as possible by removing any existing grease or rust. Apply a thin layer to the bolt. Before reinstalling the bolt, clean out the brass bushings on both sides of the knuckle (the metal block thing that the bolt goes through). To easily access the bushings, remove the adapter. Clean the inside of the bushing hole, then apply a thin layer of grease to the inside of the hole. Before putting the adapter back in place, clean the contact surface of the knuckle pad (the black hard rubber puck thing) and apply a thin layer of grease to the surface.
Making sure that the knuckle pad is securely back in place in the center of the adapter, put the adapter back in place on the knuckle, and put the axle back in. Make sure to tighten the nut as tight as you can get it.
**If you need to replace the bolts, you can purchase them HERE.
**If you need to replace the brass bushings, you can purchase them HERE.
The 2022/2023 season brought about a few changes with one of them being the introduction of a grease zerk on one or both of the knuckles. The reason is that by having a closed grease system, the adapter bolts and bushings will last longer. If you look in between the knuckle and adapter on both sides you will see the top of a black rubber O-ring to help seal the system. All bikes leaving the shop with a grease zerk were properly lubricated. If you remove the adapter, you will want to make sure the O-rings get put back in place when reinstalling the adapter.
What do you do with the grease zerk? You will want to check to make sure there is still grease inside the system periodically. The easiest way to do this is to purchase a grease gun with a grease cartridge (we use a marine grease), attach the gun to the zerk, and see if you can put more grease in. You will know if it is full because you won’t be able to put any more in.
There is not a straight forward answer to whether or not you can take the fork off your mountain bike (MTB) and put it on your skibike, or simply swap the existing fork out with something else. Regardless of what you are wanting to do, there are several factors that need to be addressed:
Our question to you would be, “Why???” Believe it or not, we have been asked this question more than once. And yes, our response was indeed, “Why would you want or need one?” Simply put, you don’t need a dropper on a skibike. You are not peddling uphill and then descending so you don’t need to worry about moving the seat up and down. You are only going one direction, and that’s down. If you know anything about mountain biking it’s that when you are descending you want the seat as low as possible. This is also true for skibikes.
One of the reasons why people think they need a dropper on their skibike is because they don’t understand that the stand-over height is much, much shorter than that of a bike. Unlike most mountain bikes where you might struggle to put one or both feet on the ground with the seat all the way down, it is not an issue on the skibike. The frames are much smaller as is the stand-over height. This means that when you are sitting on the seat you will be able to easily reach the snow with both feet and have plenty of room to spare. In fact, I don’t think we have ever met someone who was unable to reach the ground while sitting down.
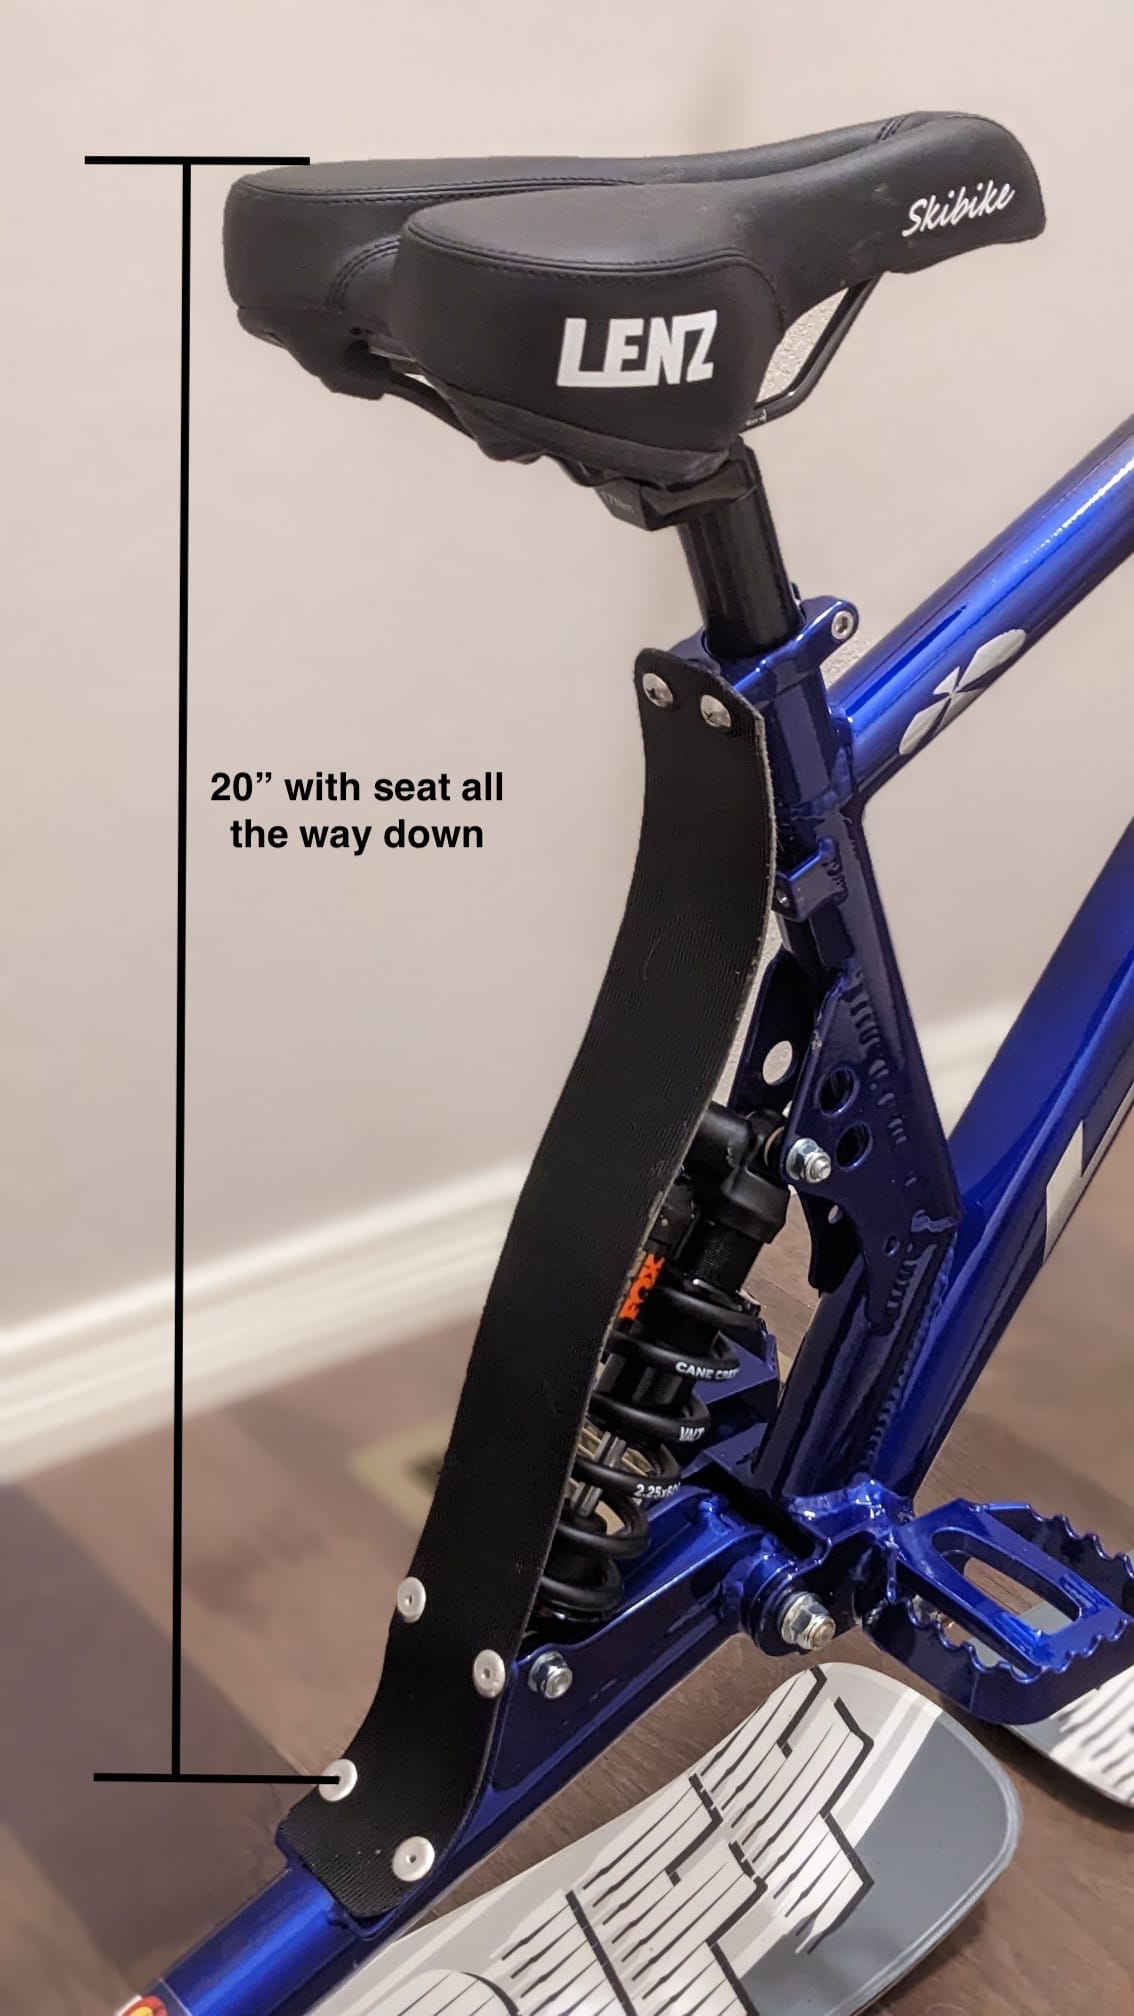
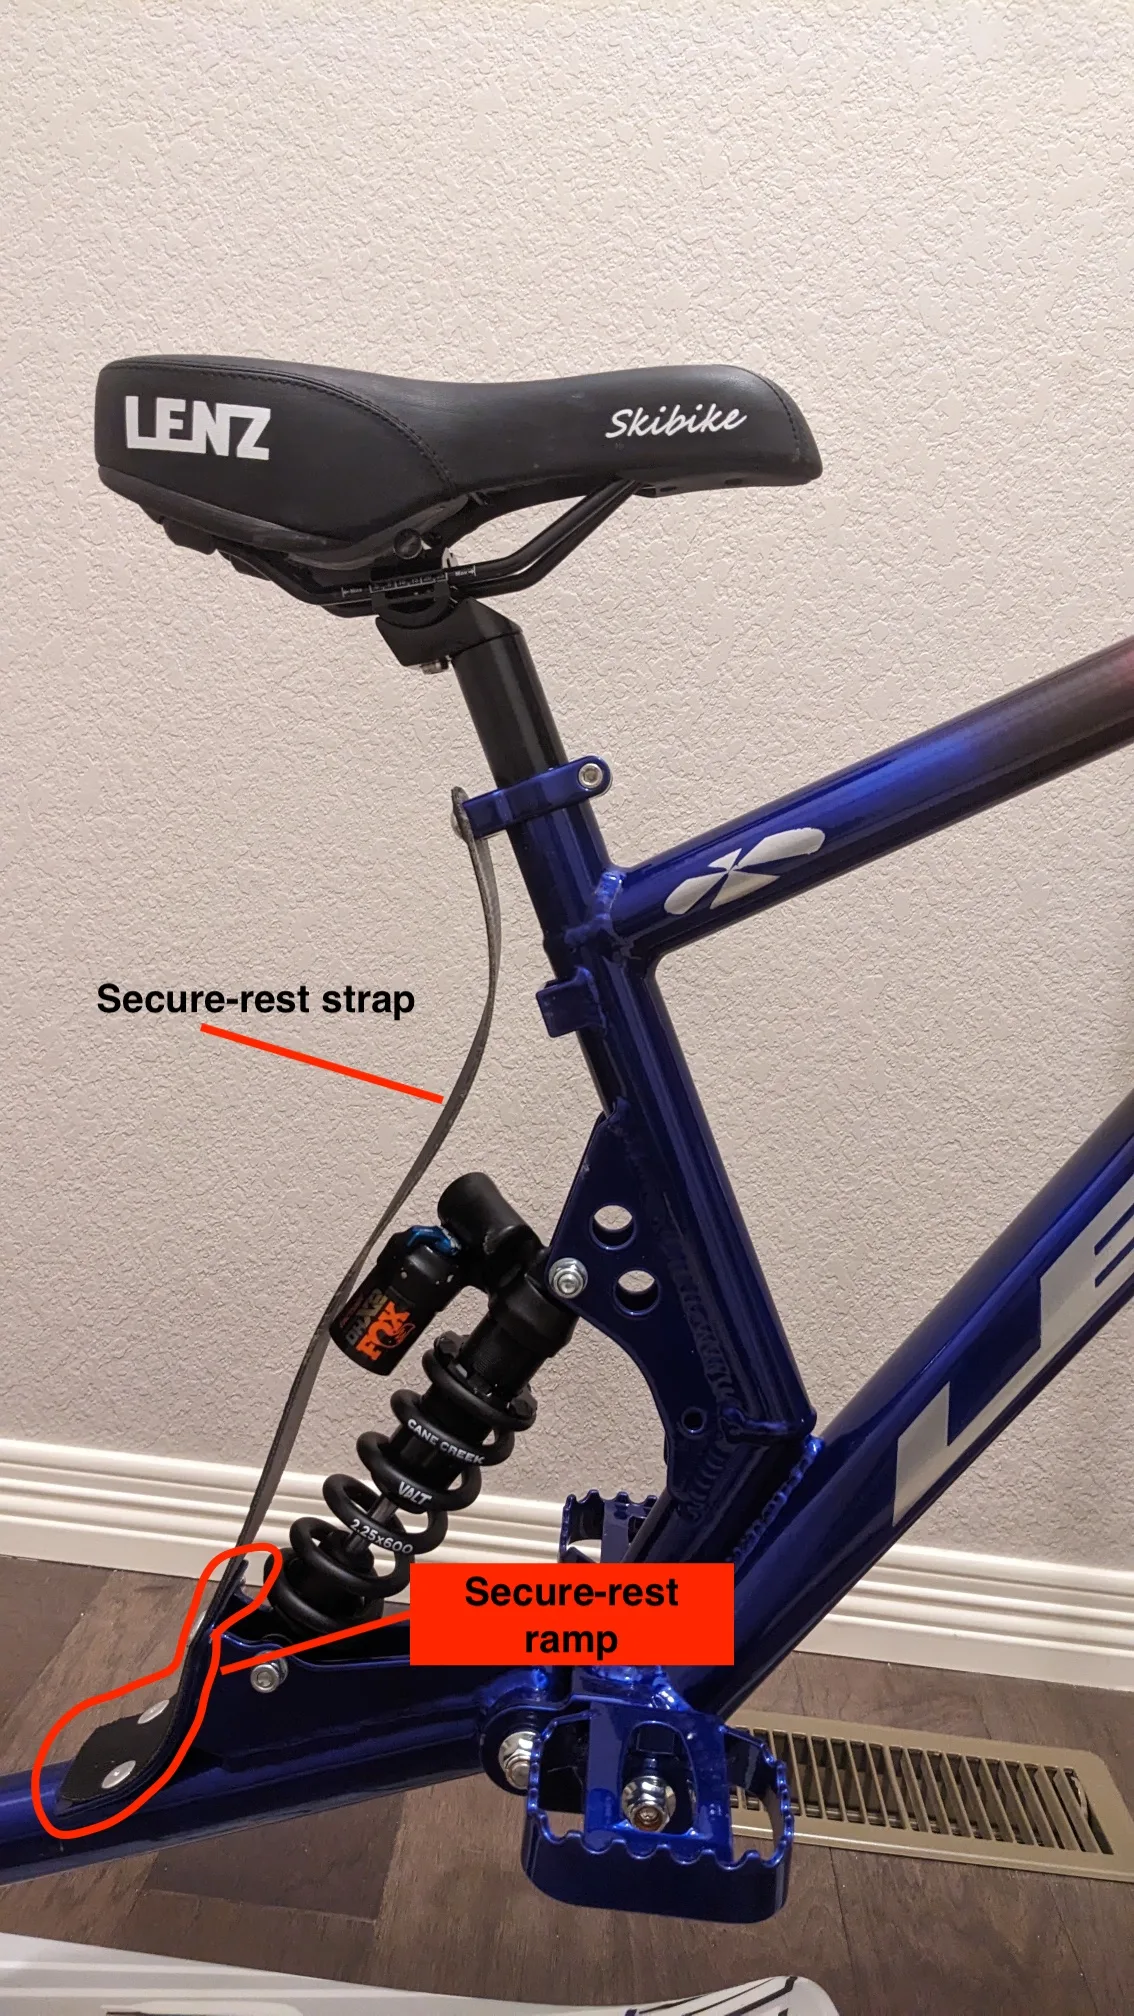
If you do feel the need to replace the seat post with something different, there is something you need to know. Our bikes were designed to sit on the chair next to you vertically. In order to do this, the Secure-Rest strap is designed so that the distance from the bottom rivet to the top of the seat is no more than 20″ with the seat all the way down. This means that when the seat is lowered all the way, the bike will sit on the chair so that the Secure-Rest ramp is nestled up against the front of the seat, the top of the skibike seat will be up against the front of the chair back (where your back is), and you will be able to hook the handlebar behind the seat. Please see the photo below that shows where to measure to and from.
Our question to you would be, “Why???” Believe it or not, we have been asked this question more than once. And yes, our response was indeed, “Why would you want or need one?” Simply put, you don’t need a dropper on a skibike. You are not peddling uphill and then descending so you don’t need to worry about moving the seat up and down. You are only going one direction, and that’s down. If you know anything about mountain biking it’s that when you are descending you want the seat as low as possible. This is also true for skibikes.
One of the reasons why people think they need a dropper on their skibike is because they don’t understand that the stand-over height is much, much shorter than that of a bike. Unlike most mountain bikes where you might struggle to put one or both feet on the ground with the seat all the way down, it is not an issue on the skibike. The frames are much smaller as is the stand-over height. This means that when you are sitting on the seat you will be able to easily reach the snow with both feet and have plenty of room to spare. In fact, I don’t think we have ever met someone who was unable to reach the ground while sitting down.
If you do feel the need to replace the seat post with something different, there is something you need to know. Our bikes were designed to sit on the chair next to you vertically. In order to do this, the Secure-Rest strap is designed so that the distance from the bottom rivet to the top of the seat is no more than 20″ with the seat all the way down. This means that when the seat is lowered all the way, the bike will sit on the chair so that the Secure-Rest ramp is nestled up against the front of the seat, the top of the skibike seat will be up against the front of the chair back (where your back is), and you will be able to hook the handlebar behind the seat. Please see the photo below that shows where to measure to and from.
Absolutely. Our full decal kits are $30. Please Contact us for more information.
The answer is a little more complicated than a simple ‘yes’ or ‘no’. Here’s why:
In order to repaint a frame, it has to be stripped down to raw aluminum first. That is not something that we are set up to do, and it would be very expensive to have us do it. We aren’t saying that it can’t be done, it’s just something that we don’t do in our shop. However, there are a lot of places that will strip your frame if it is disassembled and all of the bearings and bushings are pressed out.
With that said, once your frame is stripped we should be able to re-powder coat it and re-assemble it for you. It will still cost a little bit as we will have to prep it before powder coating, but it won’t be as bad as if we had to strip it as well. Your best time to do this is in the summer when we are not in peak skibike season; even then we would suggest allowing several weeks for us to get it done.
No. Changing the coil on your shock is very simple and does not require you to fully remove the shock from the bike. Detailed instructions with a video can be found on our “How To” videos for Lenz Skibikes, fourth block down.
Yes. All of our skibikes are designed to give you easy access to all adjustments without needing to remove the Secur-Rest strap and/or the shock. If, for some reason, you are having difficulty accessing one or both adjustment, you can remove the top screws on the Secur-Rest strap and fold it back. There should not be any reason you would need to completely remove the shock.