Welcome to the awesome and unmatched world of skibiking! Now that you have your very own Lenz Sport skibike, it is important that you keep it maintained so it will continue to perform at the unsurpassed level for years to come. With the information and subsequent videos on this page, you will be able not only learn more about your bike, but you will be able to maintain your own bike. This will save you time and money in the long run. (For example, let’s say you are on a long “ski” weekend and you realize you need to have your skis tuned; they aren’t holding an edge like you prefer and they aren’t gliding well on the snow. Would you rather be able to do it yourself at the end of the day, or wait hours the following day for some local shop to do it for you, all the while your buddies are out shredding it up without you?)
On this page you will find the following information and videos:
Other pages you might find useful are:
On this page you will find our “how to” videos for your Lenz Sport Skibike.
Maintaining the ski adapters on your bike is critical for keeping your bike running at its best. The corresponding video, “Lenz Sport skibike adapter maintenance”, will show you what you need to do and how to do it.
We recommend that you service both adapters before each season. If you ride a lot (more than 30 days per season) you should so this a couple of times throughout the season. Servicing the adapters includes:
Tools you will need to service your adapters are:
**If you need to replace the bolts, you can purchase them HERE.
**If you need to replace the brass bushings, you can purchase them HERE.
On this page you will find the following information and videos:
Other pages you might find useful are:
On this page you will find our “how to” videos for your Lenz Sport Skibike.
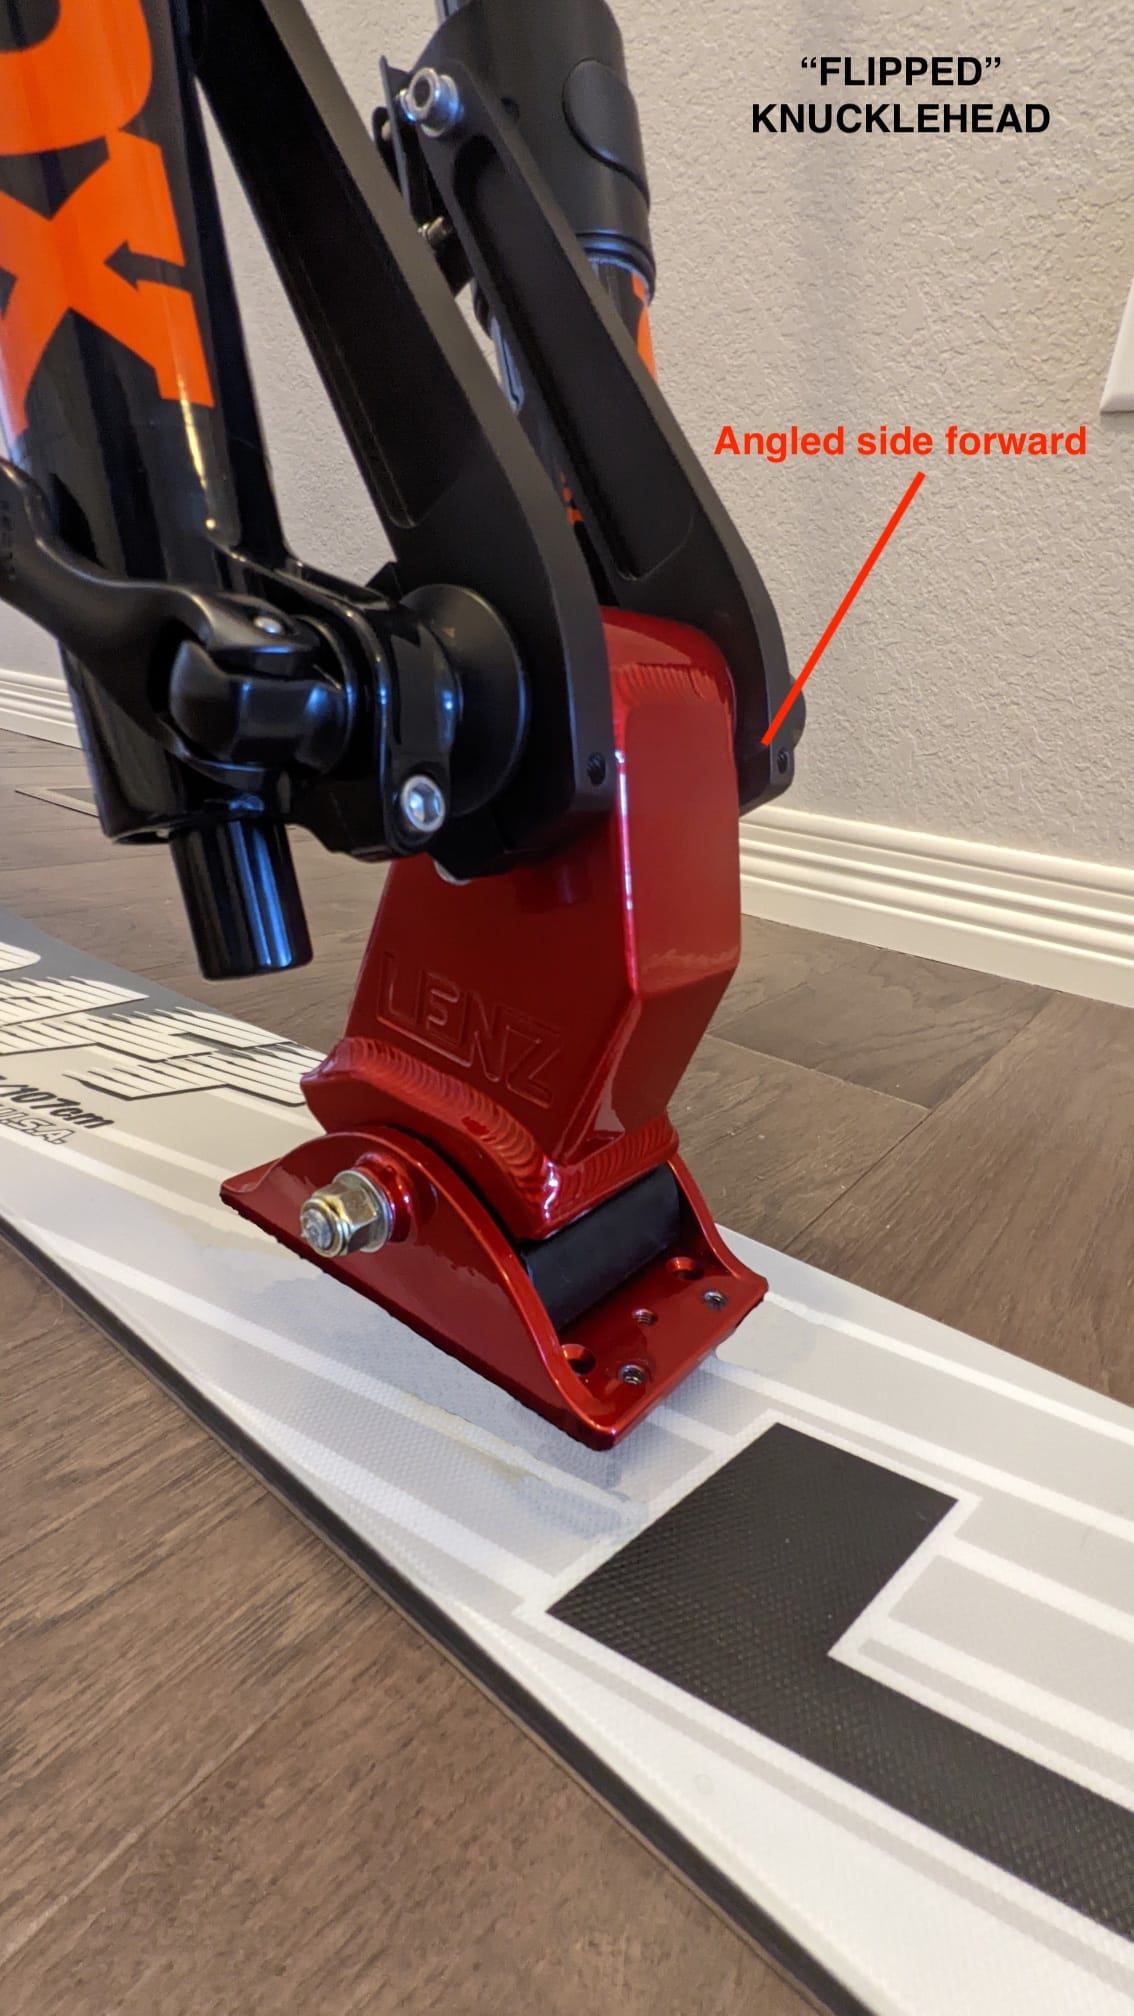
If you are running our Riff Raff or Zig Zag skis, we HIGHLY RECOMMEND that you orient the knucklehead tower (the big block looking thing that attaches the front ski to the fork) so that the angled side is facing forward and the flat side is facing backward. By flipping the knucklehead around, it means that the new “correct” orientation is that the angled side of the knucklehead is facing forward instead of backward. Why do we recommend this? We have found that due to the aggressive up-sweep of the tip on the front ski, it can be difficult to load the front ski enough to get it to respond appropriately. To compensate for the increased forward center of gravity, turning the knucklehead around will bring the front ski closer by about 1 inch. This will allow your body weight to properly load the front ski without the need to change your riding position. This is more noticeable with lighter riders.
If you flip the knucklehead around and are still having issues with the performance of the front ski, try de-tuning the tip more. If you feel the need to do this, start with taking the de-tuning further back into the effective edge. If that still doesn’t help, dull the tip more. As a last resort, try standing further forward on the foot pegs.
**NOTE: When you reassemble your knucklehead, you will need to tighten the torque arm bolts. The correct torque setting for those bolts is 110 in-Lb. If you do not have a torque wrench, you will want 1-2mm of gap between the two pieces on both the top and bottom, making sure the gap distance is the same.**
Can you flip the knucklehead with our other skis? It isn’t necessary but it won’t hurt anything. In other words, if you have a set of Riff Raff and a set of Conniption Styx and you flip the knucklehead for your Riff Raff, it is not necessary that you flip it back around when you run the Conniption Styx.
This is what the flipped knucklehead should look like:
On this page you will find the following information and videos:
Other pages you might find useful are:
On this page you will find our “how to” videos for your Lenz Sport Skibike.
Tools needed to flip the knucklehead:
Since this has so many steps involved and can be lengthy to write out, please watch the corresponding video, “How to install the front retention system”.
Installing the current front ski retention system can be tricky, so we hope that the information in this block and the corresponding video (How to install the front retention system) will help. Don’t be surprised if you struggle with getting the fork clamps on; it can be challenging depending on what fork you are installing the system on, but if you follow the video it shouldn’t be too bad. If you are still having issues, contact us. We have three sizes of fork arm clamps and two sizes of fork arm clamp pads, so it is possible you do not have the correct combination. If you are replacing an older retention system, that is why we require the information we do when you order…to hopefully get you set up with the correct parts. However, mistakes are made and things do happen, so there is no guarantee that you will have the correct parts.
Here are all of the parts of a complete retention system:
Here is a list of tools you will need:
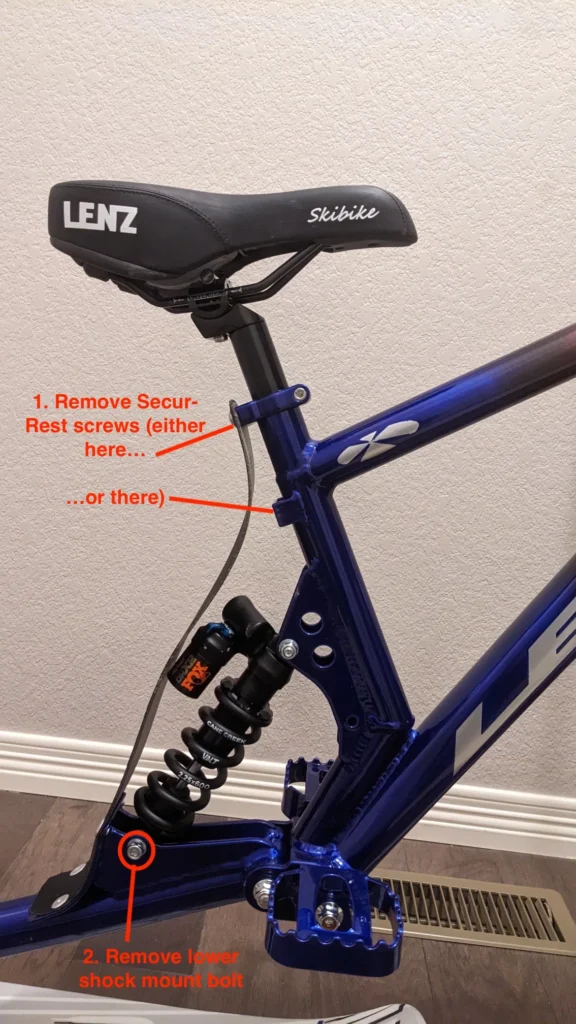
Changing the coil (spring) on all Lenz skibikes is quite simple. Our bikes are designed so that you do NOT need to fully remove the shock, nor do you need to fully remove the Secur-Rest strap. The process is quite simple and quick. If you have a newer Fox DHX or DHX2 it will take a little bit longer, which will be discussed in detail a little bit further down (an easy way to tell if you have a newer model is when you turn the preload adjuster, if it clicks every 1/8 turn or so, you have a new model. If it is a smooth turn all the way around, it’s an older model). Otherwise it should not take more than 10 minutes or so. If you have the Javelin, the process might be different.
You will need the following tools:
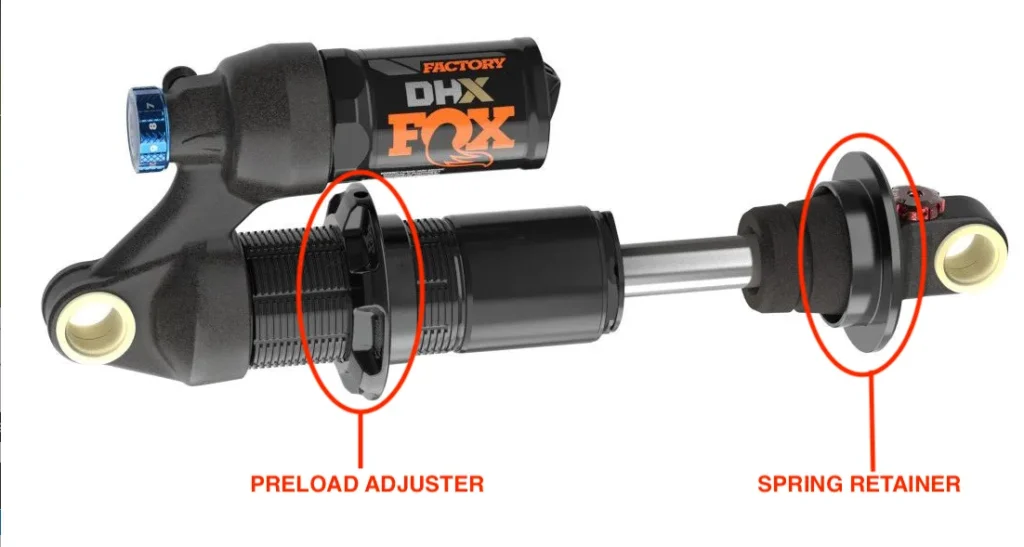
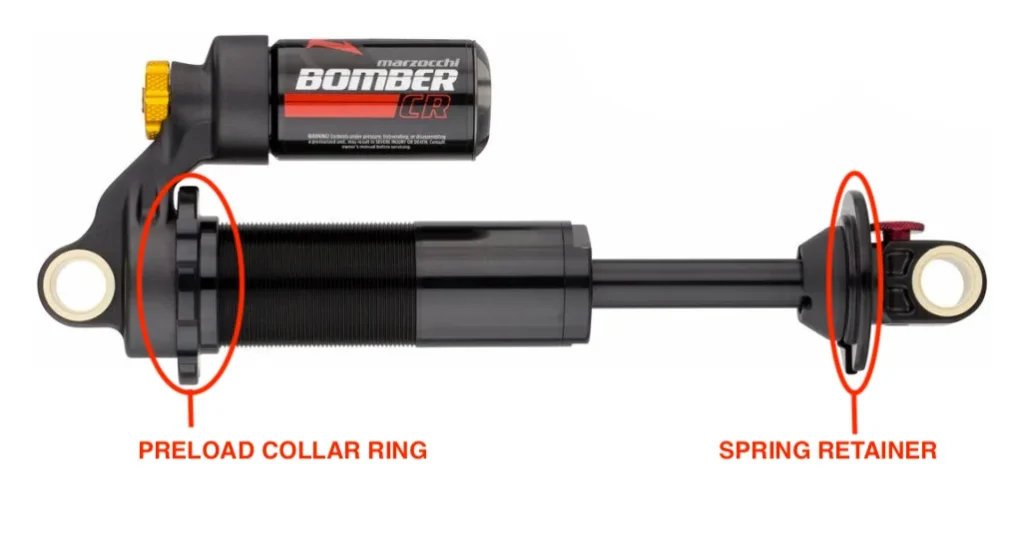
Follow these steps (please refer to the photos below for the shock parts diagrams):
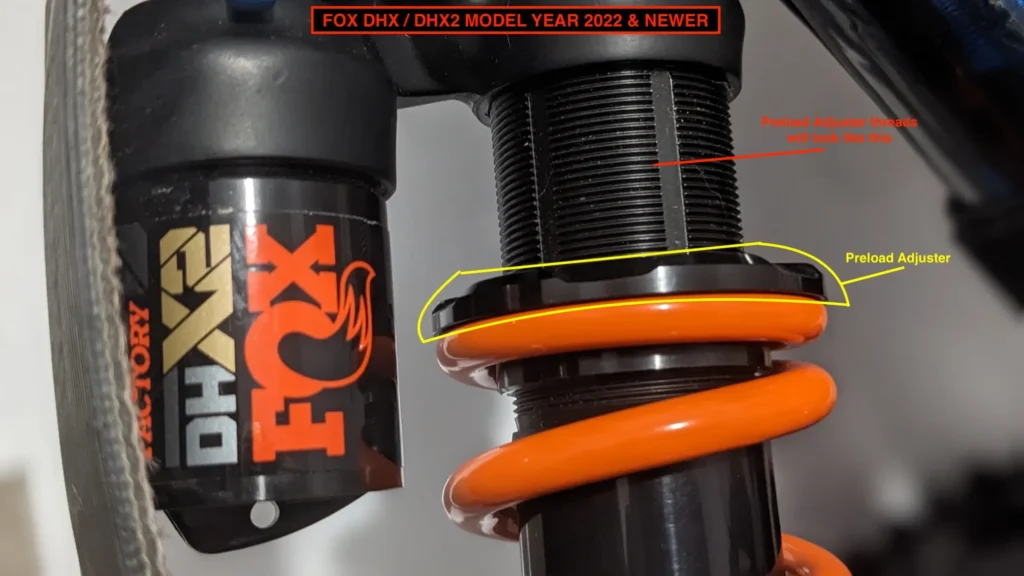
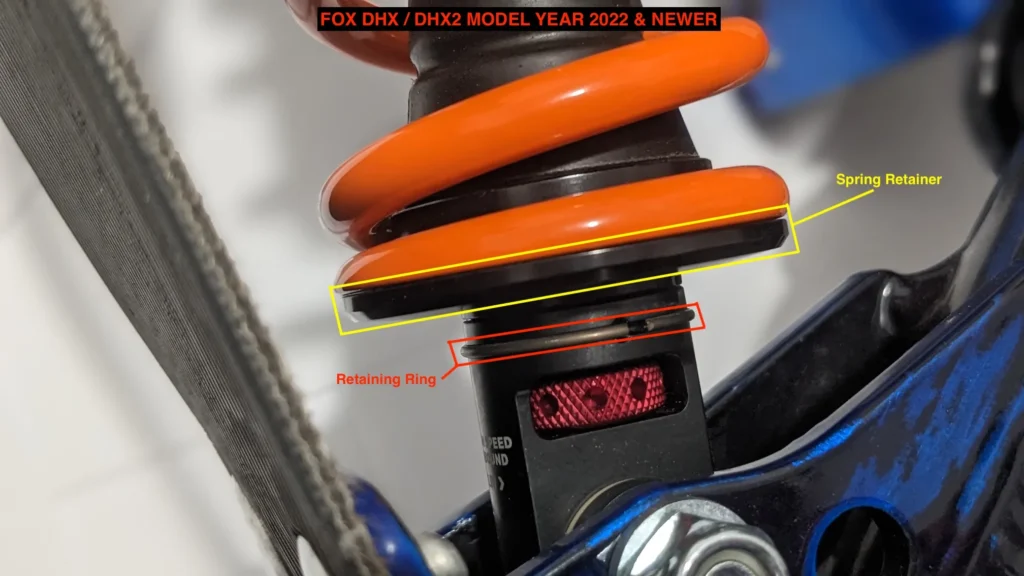
FOR FOX DHX/DHX2 MODEL YEAR 2022 AND NEWER:
REFER TO THE PHOTO BELOW DEPICTING THE THREADS FOR THE PRELOAD ADJUSTER TO DETERMINE IF YOUR SHOCK IS A NEWER MODEL
FOR MARZOCCHI BOMBER, DNM BURNER AND FOX DHX/DHX2 MODEL YEAR 2022 AND OLDER: