How to Ride a Ski Bike
INTRODUCTION
Riding a skibike is simply awesome. It ties skiing and mountain biking together in a way that is unmatched. It gives people who can’t ski or snowboard anymore an avenue to get back on the snow. You also don’t need any experience on skis or a snowboard to learn how to ride a skibike. Most people will say that the learning curve is quite shallow, meaning that it is fairly easy to learn with most people figuring it out after two or three runs. Even though it is something you can teach yourself, it is highly recommended that you take a lesson. As with anything, you will learn faster if you have someone teaching you because they can spot what you are doing wrong and correct it on the spot. (As the person writing this, I can tell you from personal experience that taking a lesson is best. I was, for the most part, self taught for the first 5 days. I thought I had it figured out…until I went up with Devin. He was teaching a friend of mine and made me do all of the skills. I was quickly humbled and realized that all I knew was how not hurt myself. The reality was that I didn’t know anything about how to ride the bike safely or properly. After that day of receiving a proper lesson, my skill and confidence increased exponentially.) Because we know that taking a lesson is not always an option, we decided that having videos to break down how to ride step-by-step will help those who can’t take a lesson. Even if you have taken a lesson or have a few days on the bike, these videos can still be beneficial. There are some skills shown in the videos that a lot of experienced riders don’t even know about (things like side sliding straight down the fall line). The day you think you know it all is the day you become dangerous to yourself and others.
Before we begin we want to remind you that the Skier Responsibility Code still applies to skibiking. Know and obey the Code. It’s your responsibility. If you are new to snow sports, let us give you “the codes”.
- Always stay in control. You must be able to stop or avoid people or objects.
- People ahead or downhill of you have the right-of-way. You must avoid them (it is up to you to avoid them).
- Stop only where you are visible from above and do not restrict traffic.
- Look uphill and avoid others before starting downhill or entering a trail.
- You must prevent runaway equipment.
- Read and obey all signs, warnings and hazard markings.
- Keep off closed trails and out of bounds areas.
- You must know how and be able to load, ride and unload lifts safely. If you need assistance, ask the lift attendant.
- Do not use lifts or terrain when impaired by drugs or alcohol.
- If you are involved in a collision or incident, share your contact information with each other and a ski area employee.
At the bottom of the page you will find “how to skibike”videos. Each block of written content will describe what you will see in each video. The topics are as follows:
- Step 1: How to load the chairlift & gondola
- Step 2: How to unload the chairlift
- Step 3: Proper body position & finding your edges
- Step 4: Flat skidded traverse
- Step 5: Learning how to turn with garland turns
- Step 6: 180 degree one turn & stop
- Step 7: Downhill turns & weight transfer
- Step 8: Turning with weight & foot transfer (rudder turns)
- Step 9: Hockey Stops
- Step 10: Side-slide down the fall line
- Step 11: Tying it all together with good turns
- Step 12: The Grand Finale with a good run
How to Ride a Skibike Step 1: How to load a chair lift
While some people will start off on a “magic carpet” the majority will have to take a chair lift to the top. We will address how to get in a gondola in a bit. Let’s begin with a few things you need to know.
1. There is nothing wrong with asking the lift attendant to slow the chair down to make it easier for you to load, especially for the first handful of times. You can also ask them to call the attendant at the top and ask them to slow it down for unloading. If you need to ask the attendant at the top to slow it down, when you get in view of the attendant, take your hand and move it in a repetitive downward motion to signal that you want them so slow it down. It’s better to have the lift slowed down than it is to drop your bike.
2. Your bike counts as a person. If the chair is a two person chair, you will ride it by yourself. If it’s a 4 person chair and you are riding with another bike, it will be just the two of you. You get the idea.
3. You cannot put the bar or bubble down. If a skier or boarder wants to ride up with you, please be courteous and tell them ahead of time about not being able to lower the bar. It’s best to inform them before it’s your turn to get on the chair. Some mountains require you to ride the chair with the bike in front of you…we’re sorry if that’s the case. We will have to either shoot another video on how to load like this or dig up a video somewhere, because that is not how we load our bikes. Be patient with us on that one as it might take a bit of time.
4. Know if the mountain you are at has a “leash law”. Some mountains require that you have a leash attached to the bike while riding the lift; some mountains require that you have a leash attached while you are on the lift as well as riding the bike. If you have to have a leash while on the chair, put it on before you get to the front of the line.
Let’s get started. Our bikes are designed to sit on the chair vertically next to you. It is 100% personal preference if the bike is on your right or your left. When you get to the loading line, stand on the line with bike next to you and the foot pegs over the line. Grab the middle of the top tube with one hand.
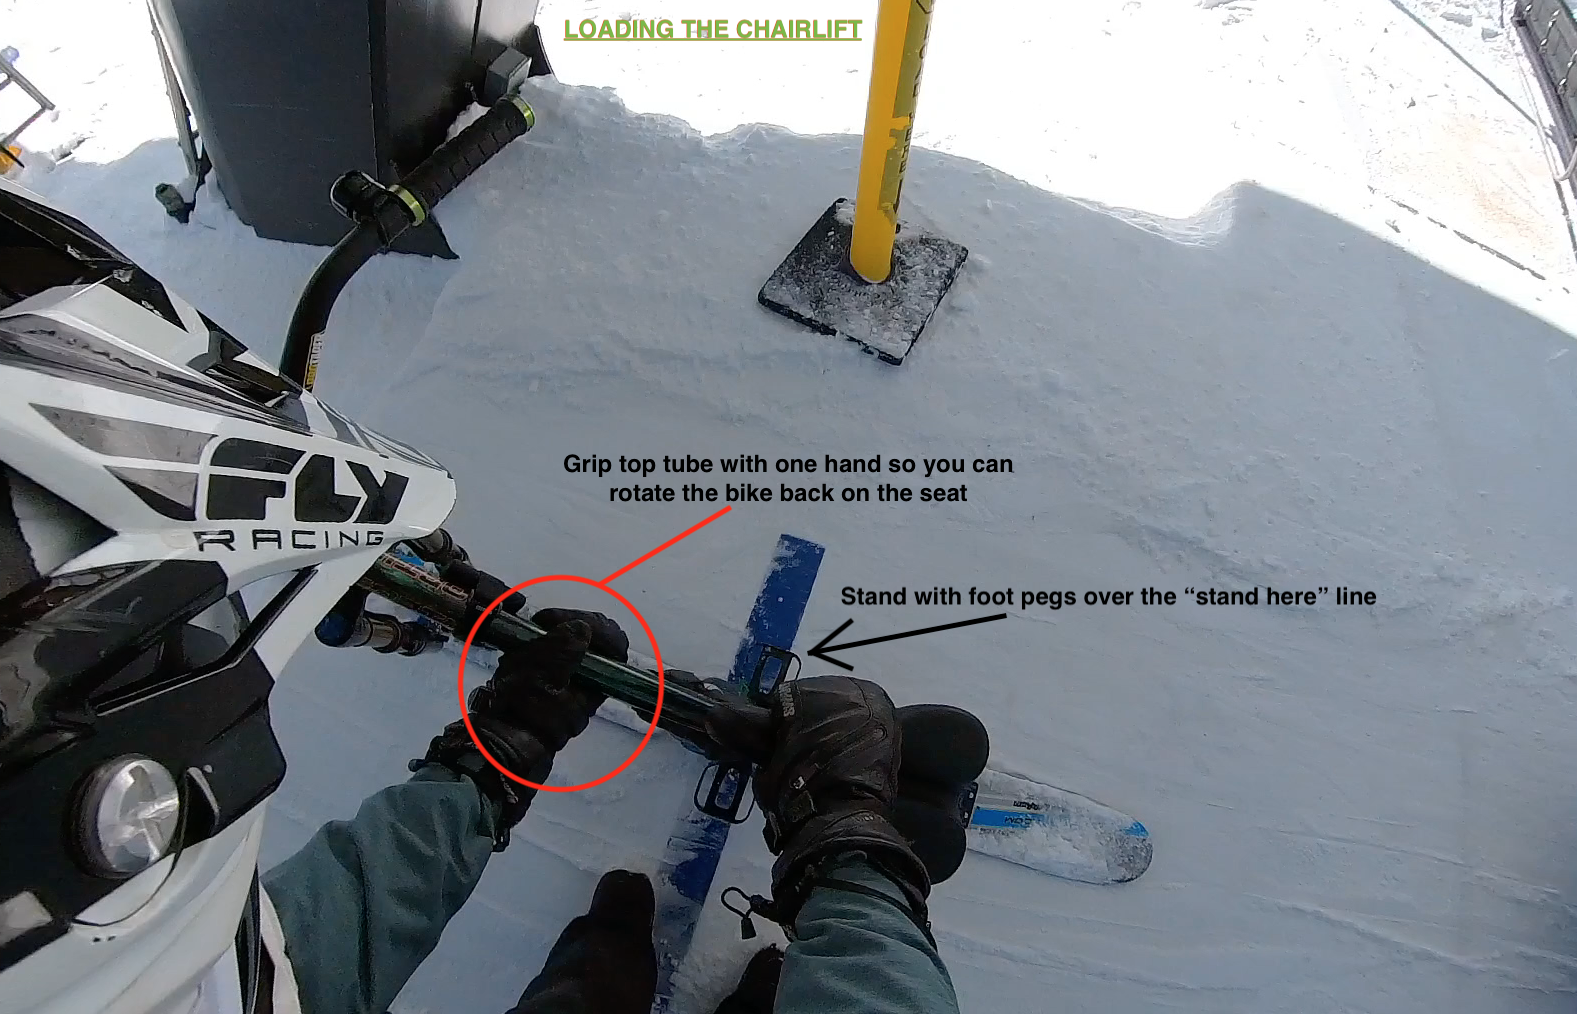
CLICK ON PHOTO TO ENLARGE
As the chair approaches you and you sit down, lift the bike up so that the Secure-Rest makes contact with the front of the seat. You can use your leg closest to the bike to help stabilize the bike by putting it underneath the closest foot peg.
CLICK ON PHOTO TO ENLARGE
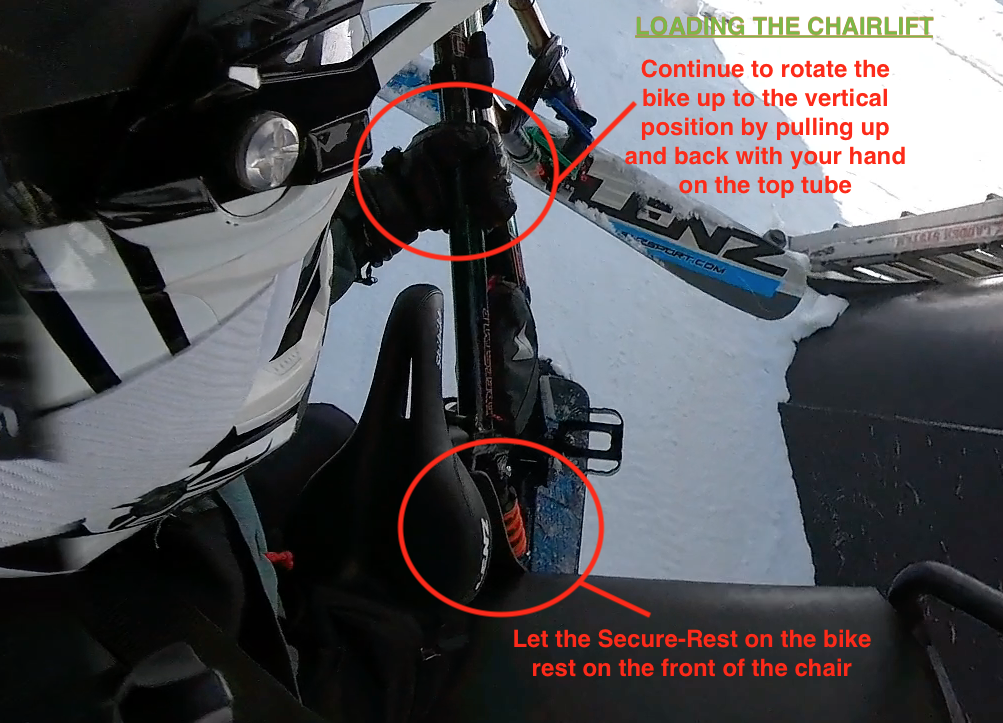
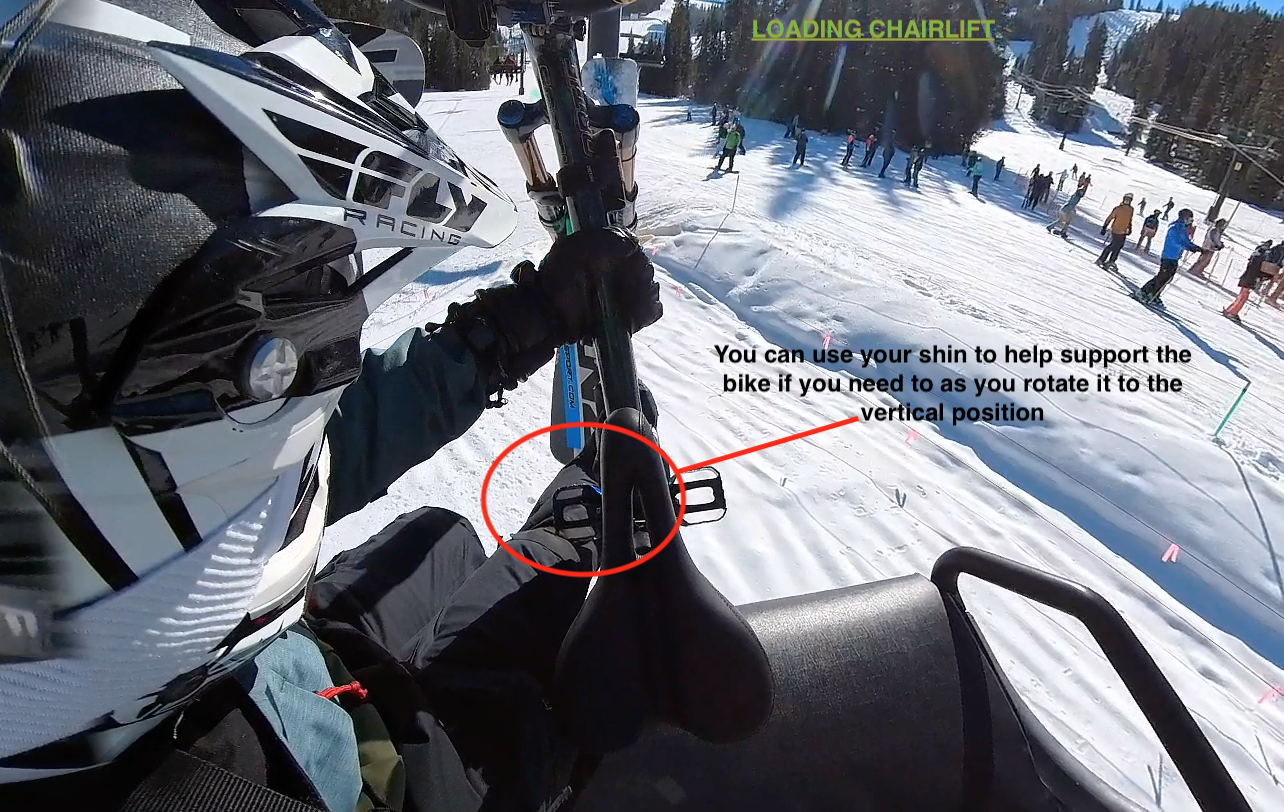
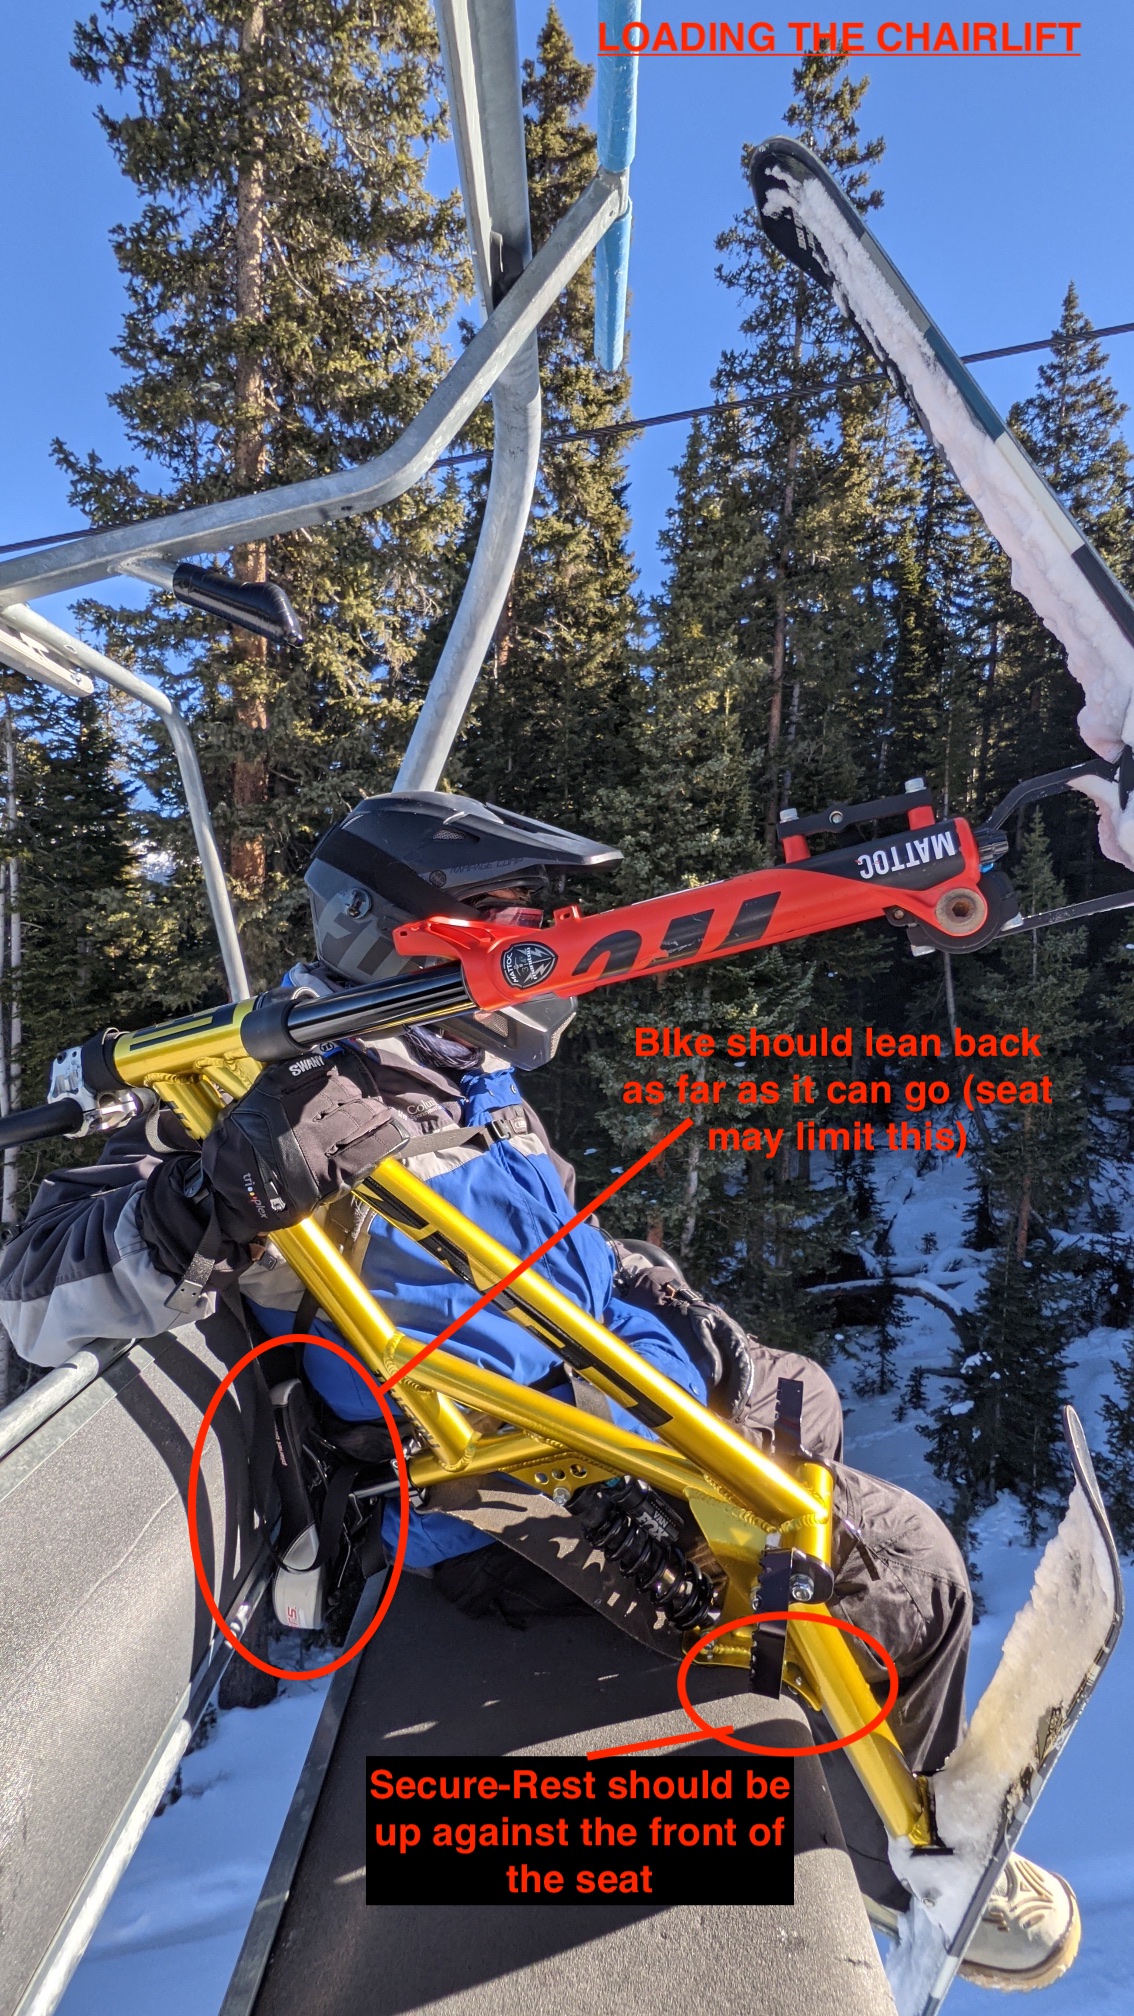
As the chair moves forward and the rear ski clears the platform, simply rotate the bike back towards the back rest of the chair by pulling it back. It should “rotate” to the vertical position, using the Secure-Rest as the pivot point. Once the bike is vertical, you can slide it back as far as it will go. It is natural for the front ski/handle bar to rotate 90 degrees. In most cases, you can hook the handlebar behind the seat. After the bike is in place it should be nice and stable. You can hold the bike by holding on to a foot peg or the frame. Sit back, relax, and enjoy the ride up.
CLICK ON PHOTO TO ENLARGE
If you are riding in a gondola, you will walk in carrying your bike next to you. Once inside, you will need to turn your front ski/handlebar 90 degrees to shorten the “wheel base”. This will allow you to leave the bike standing up as if it were on the ground yet fit inside the gondola. It should also allow enough room for another bike to fit. Should you be with another bike, the second person to get in will enter in the same manner as the first person and set their bike right next to the first one. Both people will then be able to sit on the bench and enjoy the ride up.
How to Ride a Skibike Step 2: How to unload a chair lift
We cannot stress this enough: if you feel you need to have the chair slowed down so you can safely unload, please do not hesitate to ask the lift attendant at the top to slow it down. This can be done by moving your hand in a repetitive downward motion.
When you are getting close to the top, around 2 or 3 lift poles away, you want to get your bike ready to unload. If your front ski rotated on the ride up, start by rotating your front ski/handlebar back to the normal position so that the tip is pointing up. Next, make sure that the handlebar is free and clear from the frame/poles and bar on the chair itself. Trust me, it sucks when you go to get off and the end of the handlebar is still behind the frame of the chair. Once the bike is in the correct position and free from catching on anything, hold on to the bike in the same fashion that you did when you got on the chair with one hand holding on to the top tube. With your other hand grab either the seat, handlebar or stem spacers. (An alternative to holding on to the top tube, as shown in the video, is to hold on to the foot peg closest to you.) Slightly rotate the front ski down while making sure that the Secure-Rest remains in contact with the front of the seat. When you get to the unloading platform, let the tail of the back ski make contact with the platform. As you exit the chair, walk off and rotate the front ski down toward the snow. Once you are off the chair, push your bike to a safe area clear of the unloading zone. It really is that simple.
If you are in a gondola, exiting is easier than getting in. You will simply reverse your course by carrying your bike out starting with the rear ski. Once you have room you will need to turn your front ski 90 degrees again so that it is in line with rear ski. This will allow you to exit the gondola in the same manner in which you entered.
How to Ride a Skibike Step 3: Proper body position & finding your edges
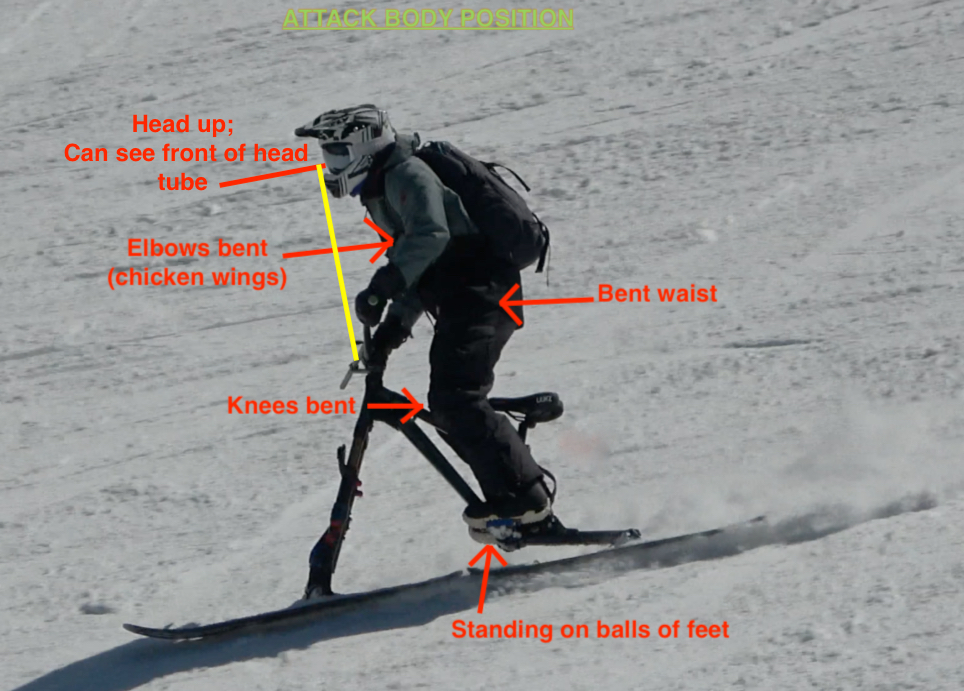
PROPER BODY POSITION, AKA “ATTACK POSITION”
The foundation for being able to ride a skibike is good body position. The ATTACK POSITION is standing on the foot pegs in an athletic stance: standing on the balls of your feet, knees bent, slight bend at the waist, arms bent (think chicken wings), head up and looking forward. We cannot emphasize this enough: if you cannot look down and see the front of the head tube, you do not have correct body position. Likewise, if your legs are straight and /or your arms are straight out in front of you, you do not have correct body position. We understand that every body is different with some being limited with physical issues. You may need to slightly modify how you stand if you have physical limitations such as a bad shoulder, knee or hip. But for the vast majority of riders, this position is what you want to be in.
CLICK ON PHOTO TO ENLARGE
Why is the attack position so critical? It’s quite simple. Unlike mountain biking, you need to have your weight forward over the front ski. Where the front ski goes, the back ski follows. Without enough weight on the front, it will be difficult to turn the bike and you will have a hard time keeping your speed under control. The front ski will chatter as it is not making solid contact with the snow, which means that the back ski won’t have anything to follow. Also, if there is too much weight over the back ski, it can’t slide around under your body, which is kindof the whole point. When the back ski can slide around, we can control our speed. Think of it like driving a front wheel drive vs rear wheel drive vehicle in the snow. A front wheel drive vehicle will pull you though the snow whereas a rear wheel vehicle will push you though the snow. Which one handles better and is easier to control? The front wheel drive. The skibike is like a front wheel drive vehicle. There is a good demonstration of leaning forward vs. leaning back and the effects it has on controlling the bike in video # 7 starting at the 5:17 mark.
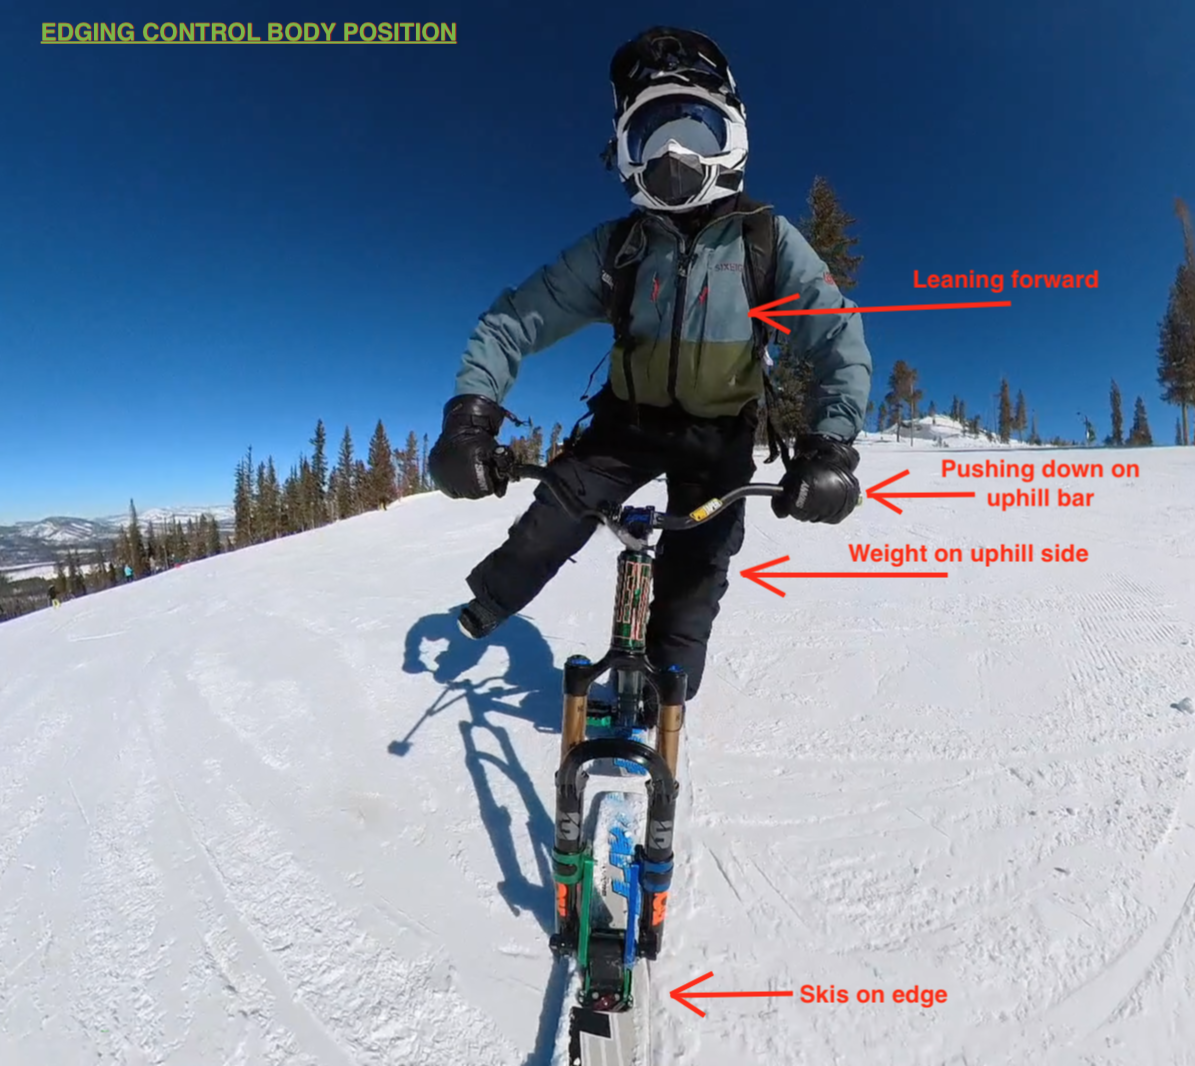
FINDING YOUR EDGES
The first skill in learning how to ride a skibike is finding your edges. The most important thing to remember is to keep your weight forward. If you lean back you will go faster, which I’m guessing you don’t want to be doing. When things start to go bad our natural reaction is to lean back so that we get more distance between us and whatever is in front of us. On the skibike, just as with skis, leaning back will only make the problem worse. If you feel like you are going to fast, you feel out of control or you can’t stop, LEAN FORWARD. Drop your chest all the way down to the handlebar if you have to. Worst case scenario, lay the bike down on the uphill side.
Why is good edging control important? Aside from being a building block to being able to ride a skibike, it is a safety maneuver. Should you find yourself on a run that is too advanced for your skill and you can’t make good turns to get down (i.e. too steep, icy, moguls, trees), this is the safest way to get down. It will take some time as your downhill progress is minimal, but it’s a lot better than crashing and hurting yourself.
The way we teach this skill at Lenz Sport is to take you straight across the run from one side to the other in a straight line so that you are riding 100% on your uphill edge. Your body weight should be on the uphill side to the point where you can take your downhill foot off the foot peg. On the handlebar, your weight should also be on the uphill side. This can be achieved by leaning uphill. For example, if I am traversing from right to left so that the uphill side is on my left and the downhill side is on my right, I should be able to take my right foot off the foot peg and my right hand off the handlebar. This will tell you if you have enough weight on the uphill side.
 CLICK ON PHOTO TO ENLARGE
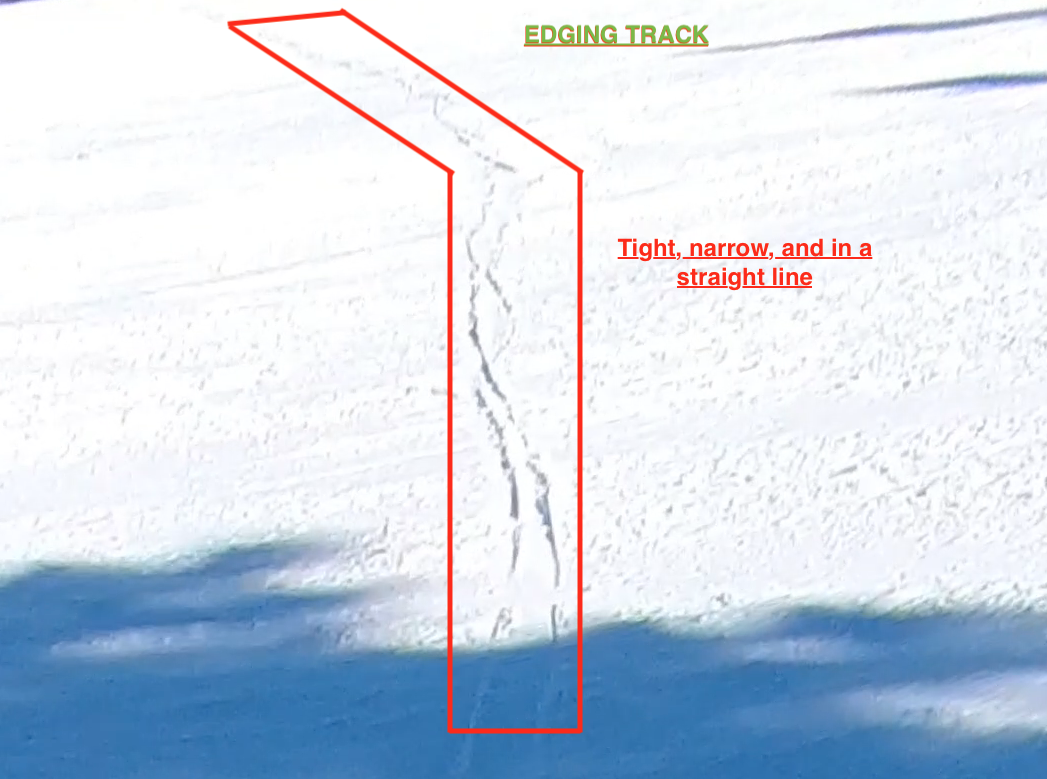
To stop when you get to the other side, point your front ski uphill. You will have to commit to holding the ski in that position. Hold it there until you stop. Do not get in the bad habit of putting your feet down to stop, or “Flinstoning” (as in Fred Flinstone) as we call it. Putting your feet down is a good way to break a leg. Leaning forward will help. As with skiing or snowboarding, you want to start turning before you get to the point where you have to turn. Look where you want to go; where your eyes are looking, your body will follow. Once you stop, put the bike on edge so it doesn’t slide backward. Put your feet down and stand up. Grab the bike underneath you, lift it up, turn around, and set the bike down. If you look at your track it should be small, narrow and in a straight line from where you started on the other side. If it is wide it means that you were not 100% on your edges and had a fair amount of contact between the base and the snow. Next, get on the bike in the attack position, go in the opposite direction, and do it again. Keep doing this until you are comfortable with where that balance point is between the edge and the base of your skis, you can maintain a good body position, your speed is under control, and you can stop.
CLICK ON PHOTO TO ENLARGE
How to Ride a Skibike Step 4: Flat skidded traverse
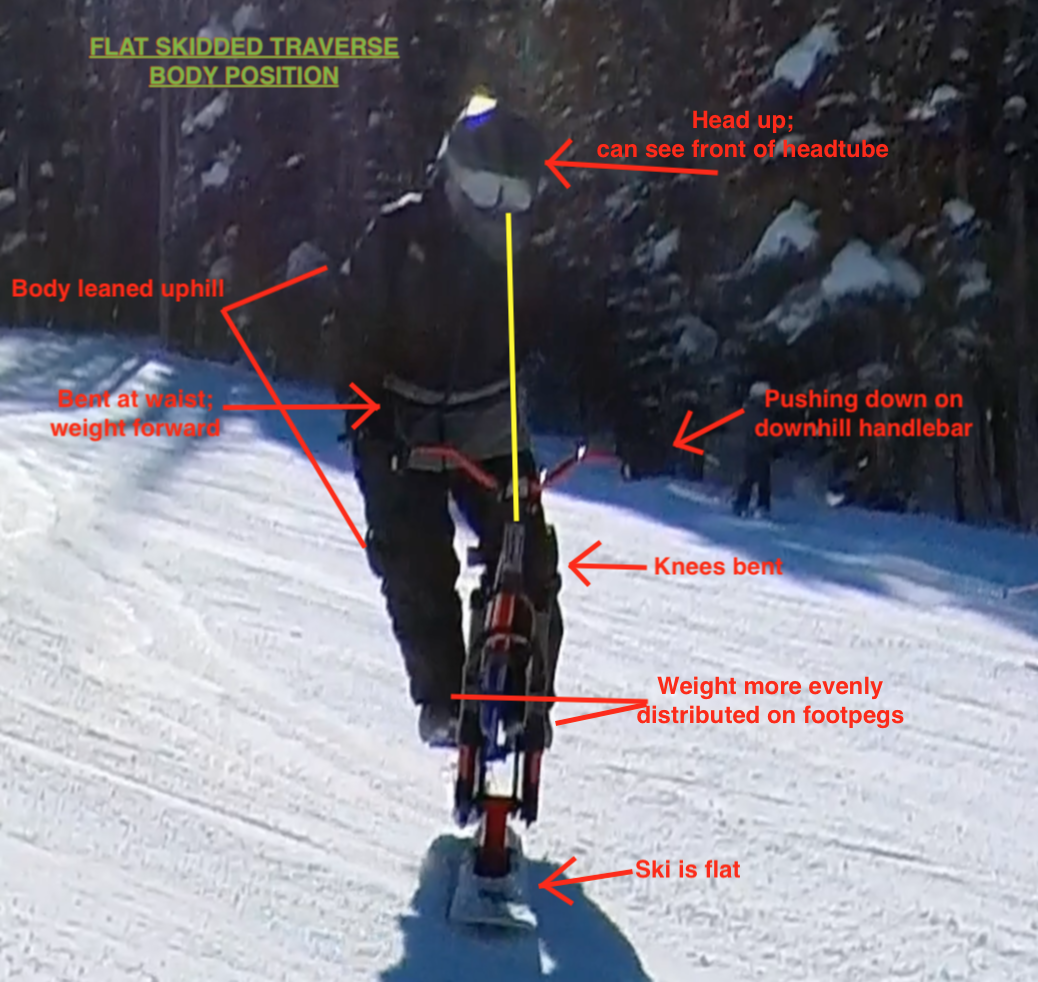
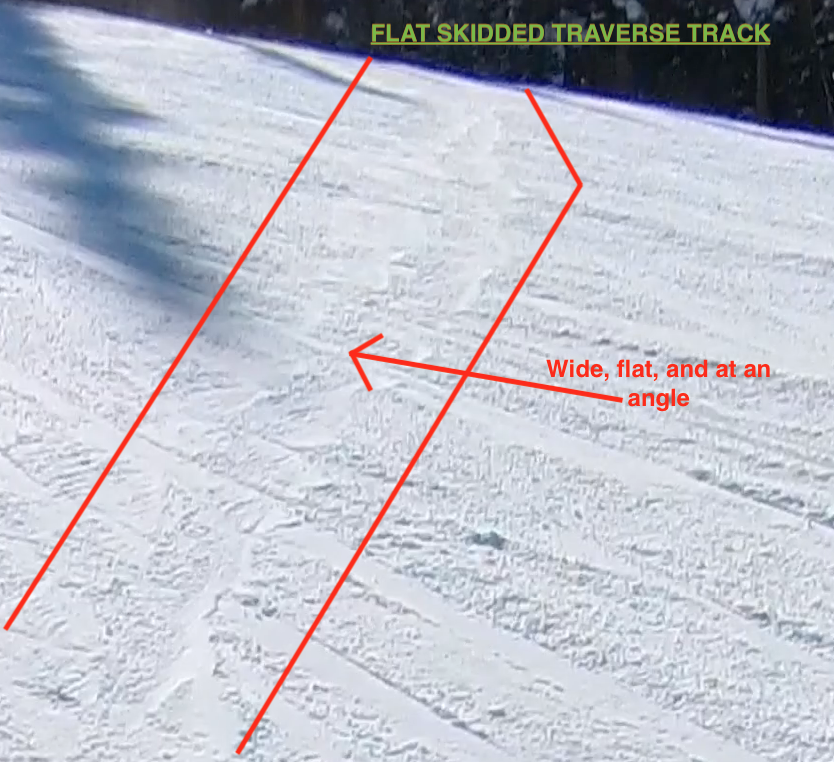
The second skill you need to master is called the Flat Skidded Traverse. Just like good edging control, this is a safety maneuver should you find yourself on a run that is too advanced for your skill. The difference between riding on your edges and the flat skidded traverse is that you are going across the run at an angle as opposed to straight across. You will make more downhill progress but will still be going from one side to the other.
Your body position still needs to be in a good attack position– stand on the balls of your feet, knees bent, bent at the waist, bent elbows (chicken wing arms), head up but able to look down and see the front of the head tube. The same rules apply as the previous step–keep your speed under control by leaning forward, stop by turning your front ski uphill, start your turn before you need to turn, come to a complete stop, put your feet down, pick the bike up underneath you, turn around, and go the other direction.
The purpose of this skill is teach you where the balance point is on the base of your skis instead of the edges. You will be letting the bike slide underneath you. The way we teach this skill at Lenz Sport is having you go across the run from one side to the other on the base of the ski. To do this, you will be pushing down on the downhill side of the handlebar while shifting some of your body weight from 100% on the uphill side to about 50/50. You will still lean your body uphill. As you go across the run the first time, making sure you are keeping your weight forward, push down (not forward) on the downhill handlebar. This will flatten the front ski so that the base is making solid contact with the snow. You will have to find the balance point on your feet with how much of your body weight is on the uphill vs. downhill footpeg as it will vary from person to person. You will know you have found the right amount of weight distribution when your back ski starts to slide sideways. If you feel like you can’t get the back ski to slide, put a little more weight on the downhill foot peg. (If you put too much weight on the downhill foot peg, you could go “high side” over the bike, which means the downhill edge will catch and send you flying over the bike on the downhill side.)
 CLICK ON PHOTO TO ENLARGE
When you get to the other side, stop by doing the same thing you did in the first step. Because the front ski is going to be pointed a little more downhill and you might have a little more speed, you might need to start your turn sooner. You will probably also have to turn the front ski more to get it pointed uphill. If you turn the handlebar and the ski isn’t turning or it chatters, it’s because you don’t have enough weight on it. Get your weight forward, drop your chest to the handlebar if you have to, commit to the turn and force it. One way to force the turn (this is discussed further in the next step) is to either pull your uphill elbow in to your side and hold it, or push your downhill hand out, lock your elbow and hold it. (If I am going from right to left so that the uphill side is on my left, I will either tuck my left elbow in to my side or straighten my right elbow.)
Once you are stopped and turned around, look at your track. Unlike the edging track, this track should be wide, flat and going from one side to the other at an angle.
CLICK ON PHOTO TO ENLARGE
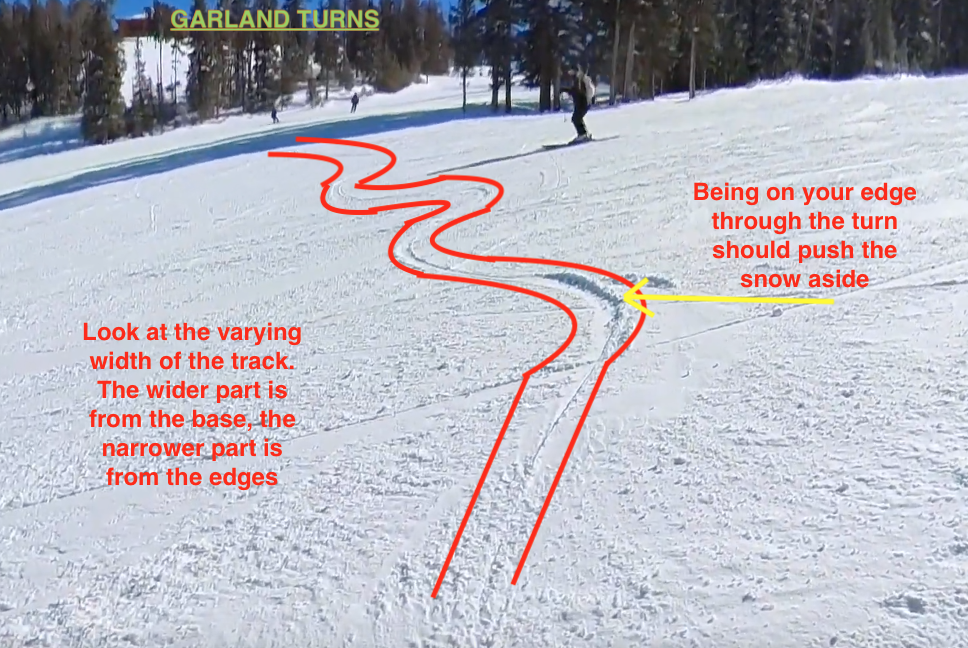
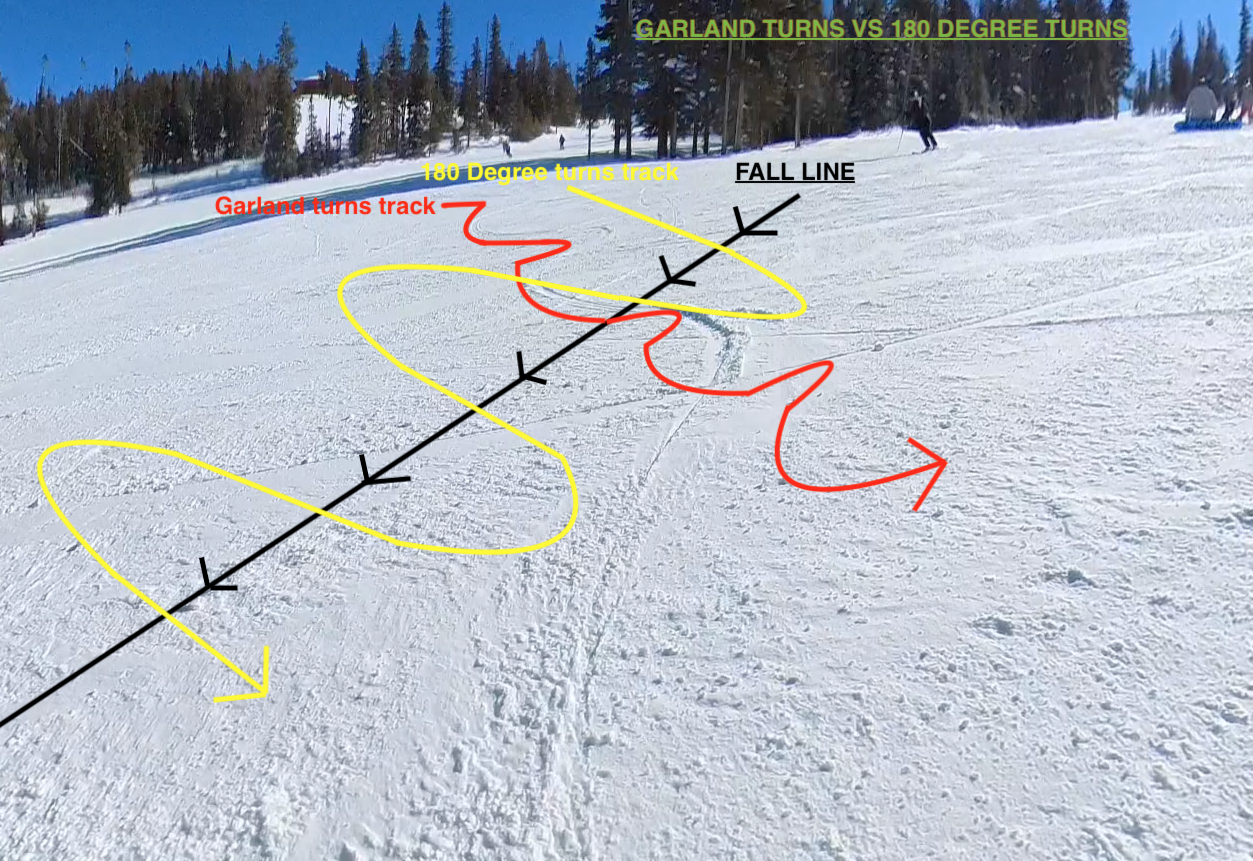
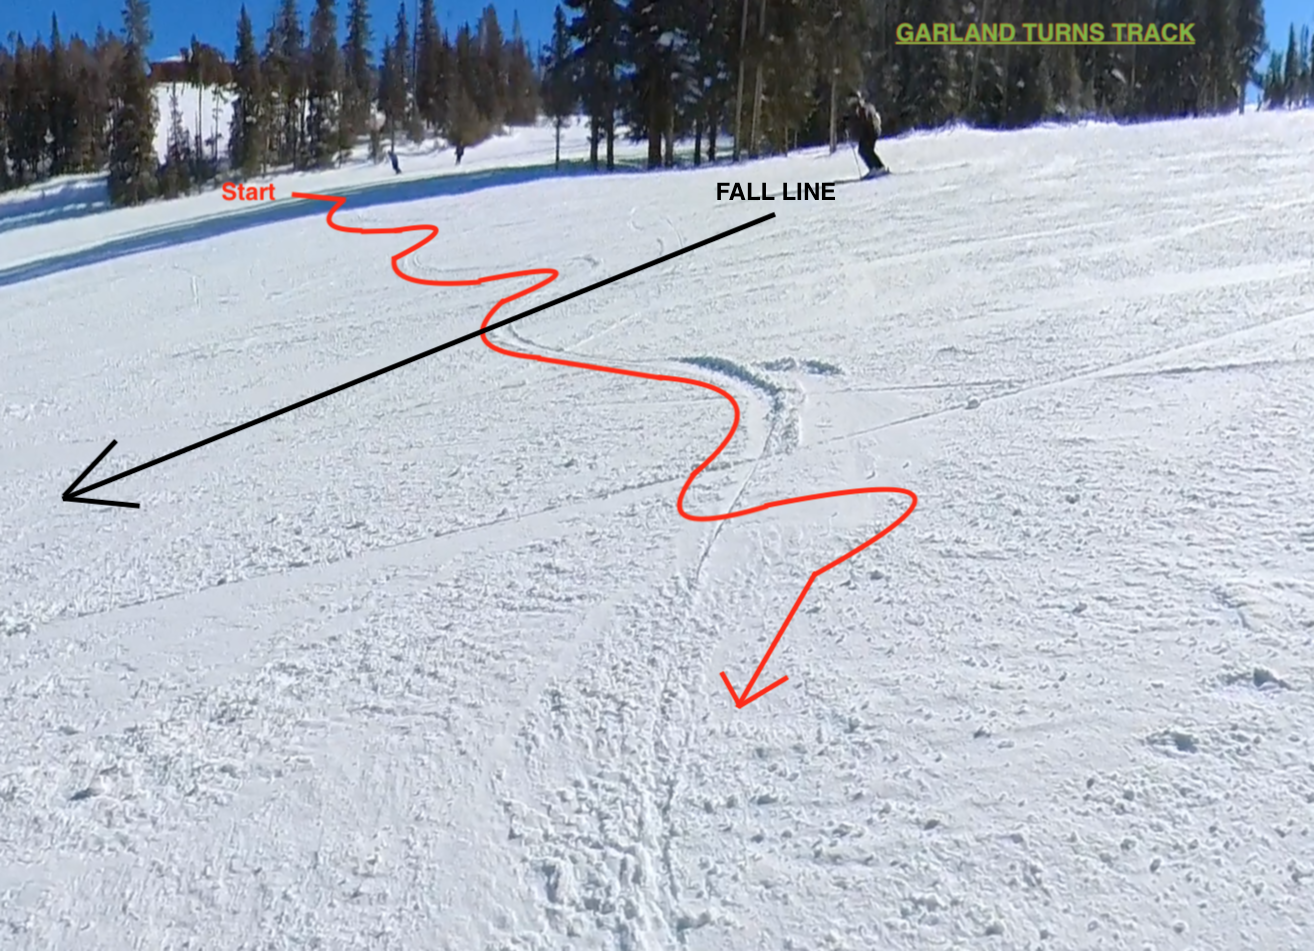
How to Ride a Skibike Step 5: Learning how to turn with garland turns
Now that you have figured out how to control your edges and flatten the ski, it’s time to start learning how to make connected turns. The technique that we teach at Lenz Sport for this is called “Garland Turns”. If you think about holiday garland and how it hangs on a tree, rafters or a banister, that is the same pattern we are going to try to make with the skibike. This is going to incorporate everything you have learned up to this point and add a new element–downhill progression. If you do these turns correctly you will be able to feel when you transition from the edges to the base of the skis as you enter and exit the turns. As with the previous two skills, it is imperative that you keep your body weight forward over the front ski. Because you will be pointing the bike down the run (down the fall line) to gain a little bit of speed, you will really need to stay forward to keep your speed under control. You will also unload the rear ski, making it easier for the ski to slide underneath you as you make the turns.
You will be initiating the turns with the handlebar. Natural tendency is to lean back as we turn…do not lean back. As mentioned a number of times, and as you may have figured out, leaning back makes us go faster and it makes the front ski chatter. You might find that you have to mentally commit to making the turns. Just as when you learned how to stop by pointing the front ski uphill by either pulling the uphill elbow in to your side or locking out the downhill elbow, you can use those same techniques when doing these turns. Your body weight distribution will remain neutral over the foot pegs (50% on the uphill foot peg, 50% on the downhill foot peg). Keep your knees bent, bend at your waist, and keep those arms bent. Again, if you can’t see the front of the head tube when you look down, you aren’t forward enough. Think of it as charging into the turn. (For those of you who want to learn how to run the moguls or play in the trees, charging into the turn is what you will need to do to make tight, quick turns. Developing a good technique now will help you down the road.)
Start down the run by slightly pointing the front ski downhill to pick up a little bit of speed. Your skis will be on the base. Remember, the more forward you are on the bike the slower you go…that’s a good thing. When you are ready, mentally and physically commit to making the turn. If you are moving from right to left, you will be turning the handlebar to the left. Commit to holding the turn all the way through until your bike comes to a near stop. As you are making the turn you should feel the skis transition from the base to the uphill edge. Once the bike is almost stopped, turn the handlebar back to the right to get the ski pointed downhill again. After you have gained a little speed again, turn the handlebar to the left and hold it until you almost stop; turn it back to the right to go downhill again. When you look back at your track you should see a nice garland pattern. If you did it right you will be able to see where the ski was making contact with the snow between the base and edges. Keep repeating this until you have reached the other side of the run. Just as before you will pick the bike up and turn around. Wash and repeat.
CLICK ON PHOTO TO ENLARGE
Once you get comfortable with making these turns and your speed remains in check, you can start to incorporate weight transfer on your foot pegs. If you put more weight on your downhill foot peg as you make the turn, you will gain speed. Be careful if you try this as it does not take a lot to get the downhill edges of the skis to catch, sending you flying high side over the bike. Conversely, if you put more weight on the uphill peg as you make the turn, you will help force the back ski to slide through the turn. Play around with this only when you feel comfortable with making smooth connected garland turns with your speed in control (are you figuring out that we are big on keeping your speed under control yet?)
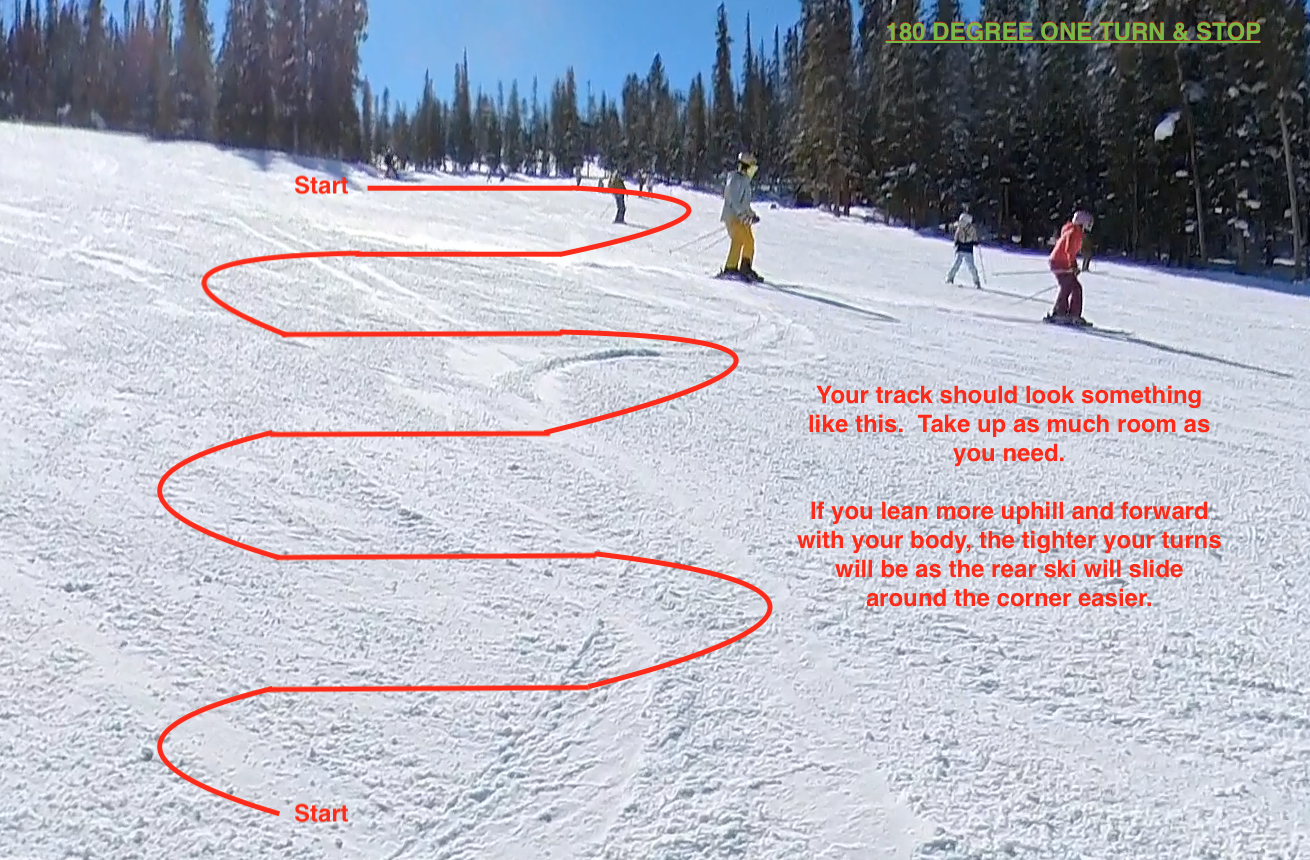
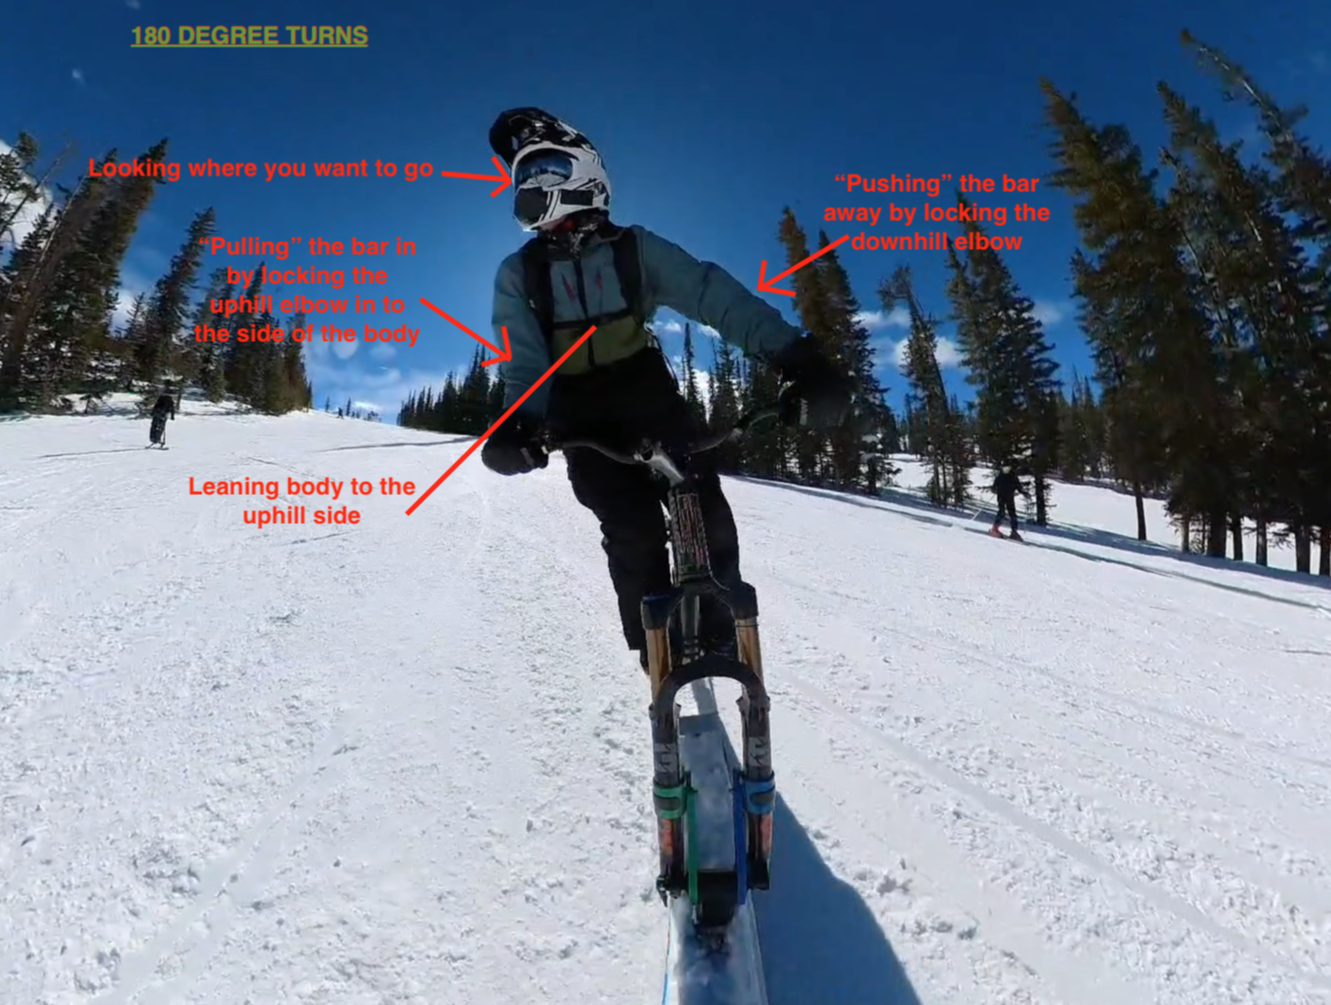
How to Ride a Skibike Step 6: 180 degree one turn & stop
This skill is called “180 degree one stop turns”. We call it that because if you do each turn correctly, your speed should be slow enough after the turn that you come close to stopping. The purpose of this skill is to take what you just learned with the garland turns and direct the turns more downhill, one turn at a time. Instead of doing 90 degree turns, you are doing 180 degree turns. Some will argue the logistics of these turns actually being 180 degrees. What you need to remember is that after you make the completed turn you should be facing in the direction from which you just came. That means if you are going from right to left before your turn, after your turn you should be going from left to right. You will still be taking up a fair amount of real estate on the run as you will be traversing from one side to the other in between each turn, so be mindful of other skiers and riders above you on the run.
CLICK ON PHOTO TO ENLARGE
Do you remember in the garland turns how we introduced the concept of mentally and physically committing to making the turn? That is going to be more important as you start to do these turns because you will be going a little faster in the turn. Just as with skiing or snowboarding, anytime you point the front ski down the hill (down the fall line), you are going to gain speed. We cannot stress enough that it is imperative that you get your body weight forward during all stages of the turn, especially as you come around the corner. Remember what we said earlier that when we get going too fast or feel like we are out of control, our natural reaction is to lean back so we distance our self from whatever is in front of us…a defense mechanism to “give us more time”? What happens when we lean back? We go faster, thus exacerbating the problem. If at any time you feel like you can’t make the turn, you are going too fast, you are starting to get out of control…LEAN FORWARD. Shove your hips all the way up to the handlebar; drop your chest all the way down to the handlebar…do whatever you have to do get your body weight forward.
Now that we have that out of the way, let’s get in to the logistics of this skill. Start off on one side of the run. Go straight across on your uphill edge just as you did when you learned good edging control. Mentally commit to making the full 180 degree turn. Get yourself in that good attack position. Evenly distribute your body weight on your foot pegs (you will learn how to incorporate shifting your weight while turning in the next skill, so for now keep your weight even.) Look where you want to go…where the eyes look, the body will follow. When you are ready, lean forward and initiate the turn by turning your handlebar. In the video the rider talks about and demonstrates a method of “pushing” or “pulling” the handlebar to physically commit. What this means is that you can “push” the handlebar away from you our “pull” the handlebar in to you to to help you get around the corner. For example, if I am going from right to left I will be making a right hand turn. I can either “push” the handlebar away from me throughout the turn with my left arm by locking out my left elbow (this is the hand that starts off on the uphill side before the turn and ends up on the downhill side after the turn); Or I can “pull” the handlebar in to me throughout the turn with my right arm by bringing in my right elbow and locking it in to my side (this is the hand that starts off on the downhill side of the turn and ends up on the uphill side after the turn).
CLICK ON PHOTO TO ENLARGE
Once you are out of the turn, straighten your handlebar to go straight across the run again. If you are doing this on a flat run and don’t have much speed once you are done with the turn, you can point your front ski slightly downhill to gain a little speed. Once you are reset (in a good body position) and at a comfortable speed, do another turn. Again, unlike the garland turns that were done going across the run and in one direction, these turns are more downhill and are done going both directions.
CLICK ON PHOTO TO ENLARGE
Once you start to get the hang of making these turns, you can adjust how tight of a turn you make by doing a couple of things. If you lean uphill more with your body going in to and throughout the turn, you will allow the rear ski to slide underneath you, thus the rear ski will come around the corner quicker. If you are more aggressive with the execution of the turn with the handlebar, the tighter and quicker the turn (if you “pull” the bar all the way in to your side or “push” the bar all the way away from you as opposed to only part way, the bike will turn quicker and sharper). If you drive your body weight on your uphill foot peg through the axis of the peg (weight transfer), the bike will slide easier. Again, you will learn more about the weight transfer in the next step. When you are ready to start experimenting with these elements, work on one element at a time. It is hard to know how the bike responds and what the outcome is if you do more than one new thing at a time. When you feel you have a good handle on how to do these turns, you can move on to the next step: downhill turns & weight transfer.
How to Ride a Skibike Step 7: Downhill turns & weight transfer
Good news! We are starting to make some good progress in learning how to ride a skibike. Let’s recap on the skills we have learned this far. After learning how to load and unload the chairlift and gondola, we learned all about the proper body position (attack position) and why it is so important. Next we learned how to find our edges followed by good edging and speed control. Then we started to learn how to do the flat skidded traverse, which is the first part of learning what happens when we push down on the handlebar and move our body weight around. (If you remember, both the edging control and flat skidded traverse can be used as safety maneuvers should you find yourself on a run that you can’t safely make turns on.) Next we learned how to make turns using our knowledge of edging and base control by making garland turns. Lastly we learned how to take our turns from going across the run to going down the run when we learned 180 degree turns. By now you should be pretty comfortable with your body position, keeping your speed in check, and start to have a feel and understanding of basic turns.
As you learned in the previous skill, it is a natural tendency when we start downhill turns such as these that we lean back. That is because, as you know, anytime you point your front ski downhill you go faster. As your turns progress throughout this skill it will be more important than ever that you keep your speed in check by being aggressive in your attack position. We will be introducing another factor to your turns in this skill with transferring your body weight through your foot pegs to help you turn. This can, and will, increase your speed if you do not do it correctly. Rather than be reactive to the increase in speed throughout the turn, you can be proactive during this increase by charging forward more as you start the turn and throughout it, then relaxing once you are out of it.
There are two parts of this skill block, the first of which is downhill turns and weight transfer. In the corresponding video this starts at the 0:59 mark. One of the reasons we use fixed foot pegs on our bikes is because we feel that you are able to generate more consistent power with transferring your weight through the peg if the peg is in a constant, fixed position. (You can actually turn the bike by fishtailing the back ski by means of directing your weight through the foot peg, but that will be addressed more in depth later on.) For those of you who ski or ice skate, this should come easy as the technique is similar. You are going to be driving the force of your body weight through the uphill foot peg to the downhill side while leading with your downhill hip (hockey players–think of throwing a hip check). In order to do this you will need a considerable amount of lean to the uphill side in order to get the skis on edge to enable the rear ski to slide, and also to avoid the downhill edge catching and sending you flying over the bike. The bike will also be leaning to the uphill side; some people find it useful to let the seat hit the inside of the uphill leg as a guide. It is very similar to when you learned edging control, only now you are putting force through the foot pegs in the middle of your turn. If you mountain bike, this is going to be the OPPOSITE of what you do when cornering while descending. On a MTB and you corner to the right, you are leaning the bike to the right (your seat hits the inside of the right leg) while keeping your body on the outside of the turn. This creates traction, right? By doing the opposite, you are allowing sliding. Hopefully the photo below will help illustrate this:
![]()
CLICK ON PHOTO TO ENLARGE
Let’s get to the weight transfer turns themselves. You are still going to initiate the turns with the handlebar but now we are going to work on weight transfer on the foot pegs with the turns. Because you are going to be going more downhill, you may or may not make it totally from one side to the other. You are still going to making garland turns but now the turns will be slightly more vertical (with the fall line) as you make your way across the run. As you make your way across the run, let’s say right to left, you will want your body weight evenly distributed on your foot pegs. You will be turning to the right. Start your turn with your handlebar just as you did in the previous two sections. As your bike starts to turn around the corner, you are going to decrease the weight on your downhill foot peg (right foot) and put all of your weight on the uphill foot peg (left foot). As you transfer your weight at the beginning of the turn, you will simultaneously throw your body weight to the downhill side, leading with your hip. In this case it will be your left hip, since that is the one that is going to be downhill at the end. As stated above, this is the same motion that skiers use to slide around the corner, and it’s the same that hockey players use to make a hip check or hockey stop. You don’t need to do a full turn, just enough to get the bike to slide around the corner. To stop the turn you will need to straighten the handlebar and put your body weight back to neutral on the foot pegs. Practice going one direction at first to get the feel for it, then change direction and go the other way. Just as with the garland turns, your track should look like this:
CLICK ON PHOTO TO ENLARGE
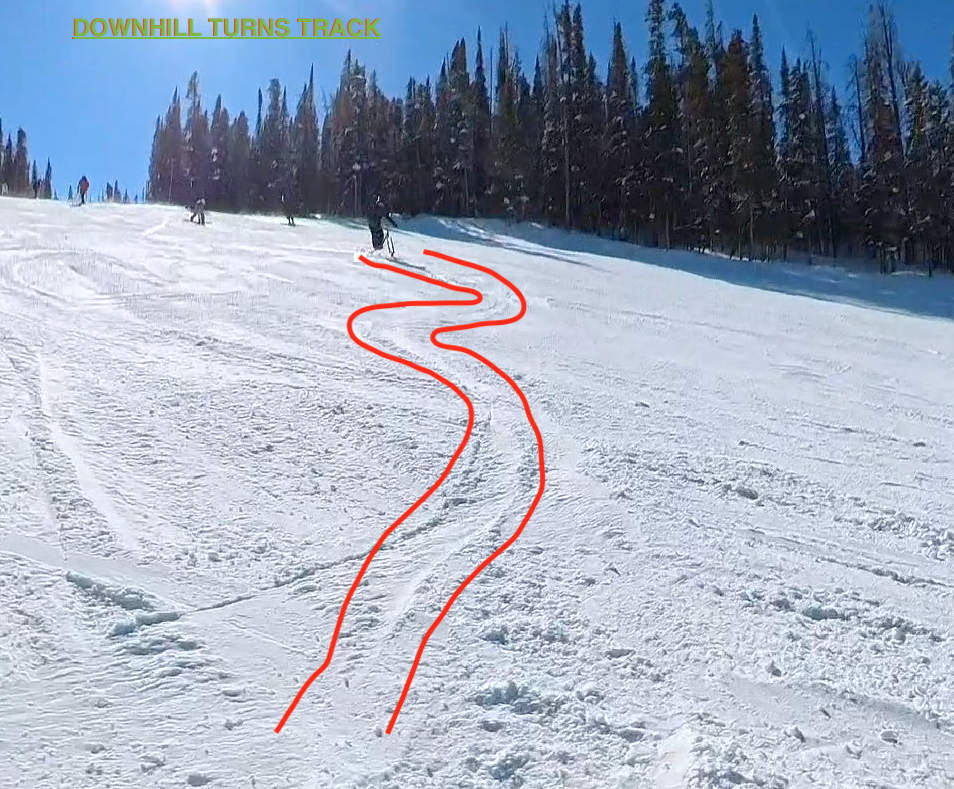
Let’s get to the second part of this skill block: downhill turns. These turns are going to take everything you have learned so far and start tying them together so you can start making connected downhill turns. Start off just as you did with the garland and 180 degree turns by getting in your attack position and pointing your front ski downhill. Instead of pointing it straight down the hill, try to point it across the run at a 45 degree angle. You will want to go across the run at an angle before initiating your first turn. (A little reminder on how to mentally and physically commit to the turn…you can “push” the handlebar away from you throughout the turn by locking your uphill elbow; or you can “pull” the handlebar in to you by locking your downhill elbow in to your side. This is mentioned at the 2:50 mark in the video.) The following photo will remind you of the difference:
CLICK ON PHOTO TO ENLARGE
When you are ready, initiate your turn just as you have been, only now you are going to hold the turn 90 degrees downhill; your general direction of travel should not change as you are now maintaining a downhill direction as opposed to going across the run. As you come “around the corner”, you should feel the rear ski skid / slide underneath you…this is what you want to have happen. It’s at this point in the turn that you can use the weight transfer to help come around the corner. You will repeat these half turns as you make your way across and down the run. Remember, you have to mentally and physically commit to the turn from start to finish. By now you should know that if the front ski starts to chatter or you feel like it isn’t turning, get your body weight forward. You should know where that “happy point” is. If you want a good demonstration that shows what happens when you lean back so that you have full arm extension, it is at the 5:37 mark in the video.
How wide your turn is will vary depending on how fast you are going and how tight you take your turn. If you really crank on the handlebar you will make a tighter turn. Likewise, if you are more relaxed with how much you turn the handlebar, your turn will be wider. The more weight transfer you have as you go around the corner, the faster and tighter your turns will be. You will repeat these turns back and forth until you are comfortable and confident in your turns. Take up as much real estate from side to side as you need to make these turns count. Your track should look like connected turns going downhill:
CLICK ON PHOTO TO ENLARGE
When you are ready, move on to the next step: making better turns with weight transfer & your feet (rudder turns).
How to Ride a Skibike Step 8: Turning with weight & foot transfer (rudder turns)
At this point in your progression on learning how to ride a skibike, you should have a solid foundation and understanding on how to do turns. In the last skill you started using weight transfer with your feet on the foot pegs to help turn the bike, as well as introducing using your body weight (throwing your hip in to it). In this skill you are going to take that and build on it. As mentioned in the video, the rider refers to these as “rudder turns”. For those of you who are pilots, this will feel very familiar as it is similar to stepping on the rudder pedals to slide the tail of the plane behind you. You will still need to have a little input from the handlebar, but the majority of the turn is done with your feet and weight transfer. If you need a refresher on what you need to do with your body, take another look at this photo:
![]()
CLICK ON PHOTO TO ENLARGE
The reason we feel this skill is important is because it is one way you can scrub speed if you need to, for example if you are on a cat track and need to slow down but can’t make an actual turn, or if you need to slow down going in to a jump. It can also be used as an evasive maneuver if you need to make a very quick turn to avoid hitting someone or something. More so, this is the technique you will need to use to make tight, technical turns (i.e. moguls or trees, “slalom” turns, etc.).
To start this maneuver you will need to be going downhill. Start with doing little turns. While you maintain your good attack position, all you are going to do is lift up your downhill foot off the foot peg and drive your body weight with your uphill foot through the foot pegs. This will cause the rear ski to slide. If you want to skid the rear ski to the right you will drive the force with your right foot; if you want to slide to the left it will be done with your left foot. Think of it as stepping into the inside of the turn. You will need to lean your body in to the turn while keeping uphill lean. For those of you that mountain bike, think of “pumping” your body weight in to and through the turns. It sounds confusing but as you will see in the video, it really isn’t. If you try to do this with your weight on the downhill foot peg instead of the uphill foot peg, you will find that even though you can still get the bike to slide it is very easy to get “top heavy”, catch the downhill edge, and get thrown off the bike.
Once you get the feel for this technique, you can start doing bigger turns. To do this you will initiate the turn with the handlebar while starting your weight transfer. For you pilots, this is the same as a coordinated turn. You will find that using a little bit of handlebar turn combined with the weight transfer turn will result in nice smooth turns that flow, much like that of a slalom turn on skis. Once you find the rhythm of making the turn with your bike and body at the same time, you will notice that the turns will become relatively effortless. For quicker turns (if you want to run moguls or trees, for example), you can put more of your body weight on the fork which will unload the rear ski even more, and then you can literally kick the rear ski around under you. The more aggressive you are with the pumping action, the quicker the turns will be. Play around with it, have fun. After all, at this point you are really starting to ride the skibike!
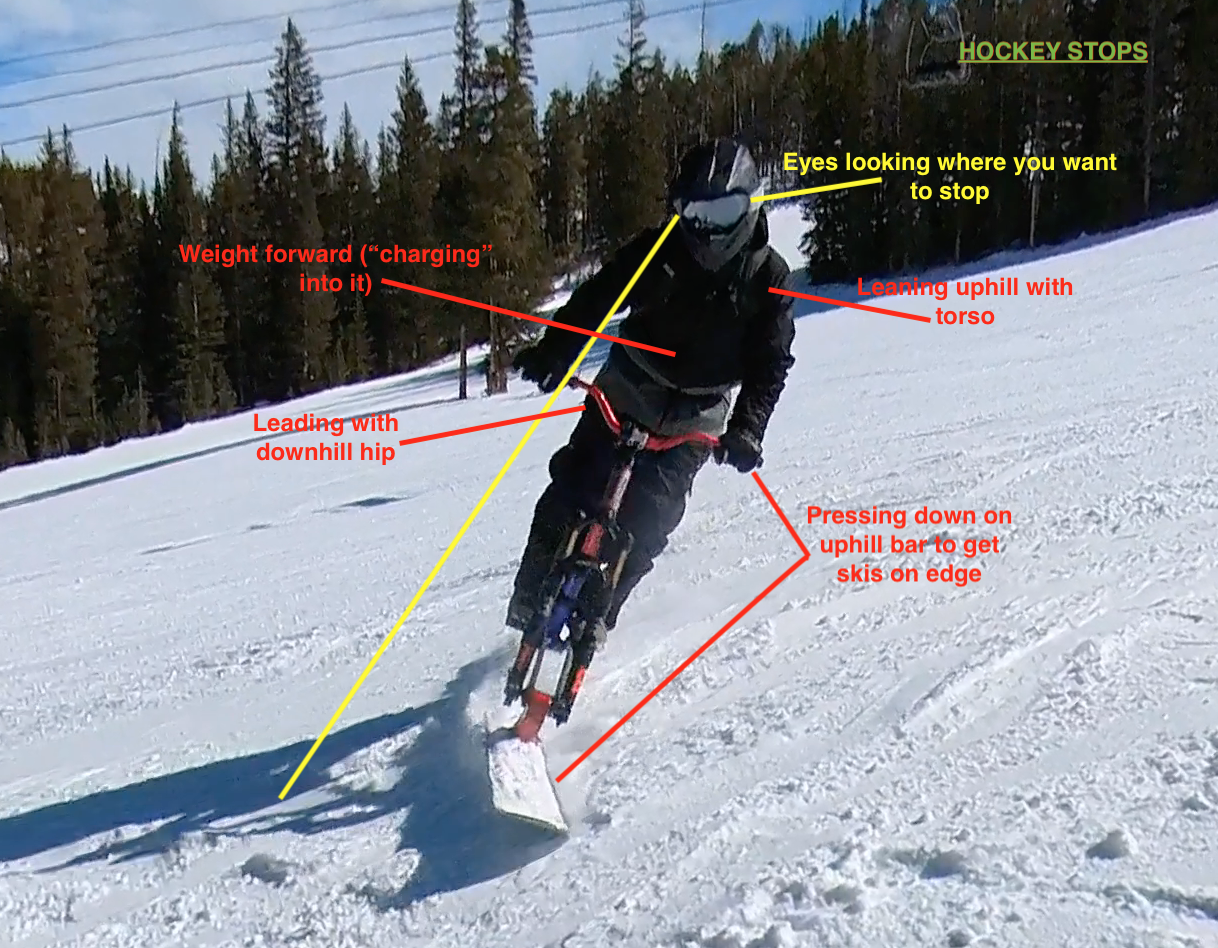
How to Ride a Skibike Step 9: Hockey Stops
If you have not figured out how to do a hockey stop yet, now is the time. Skiers will be at a slight advantage since the technique is very similar. Hockey players and ice skaters, you should find the body movement and weight transfer extremely similar to doing a hockey stop on skates (ence the term “hockey stop”). By now you should be comfortable and confident with edging, sliding the bike, turns and weight transfer. All of those are going to come in to play with hockey stops.
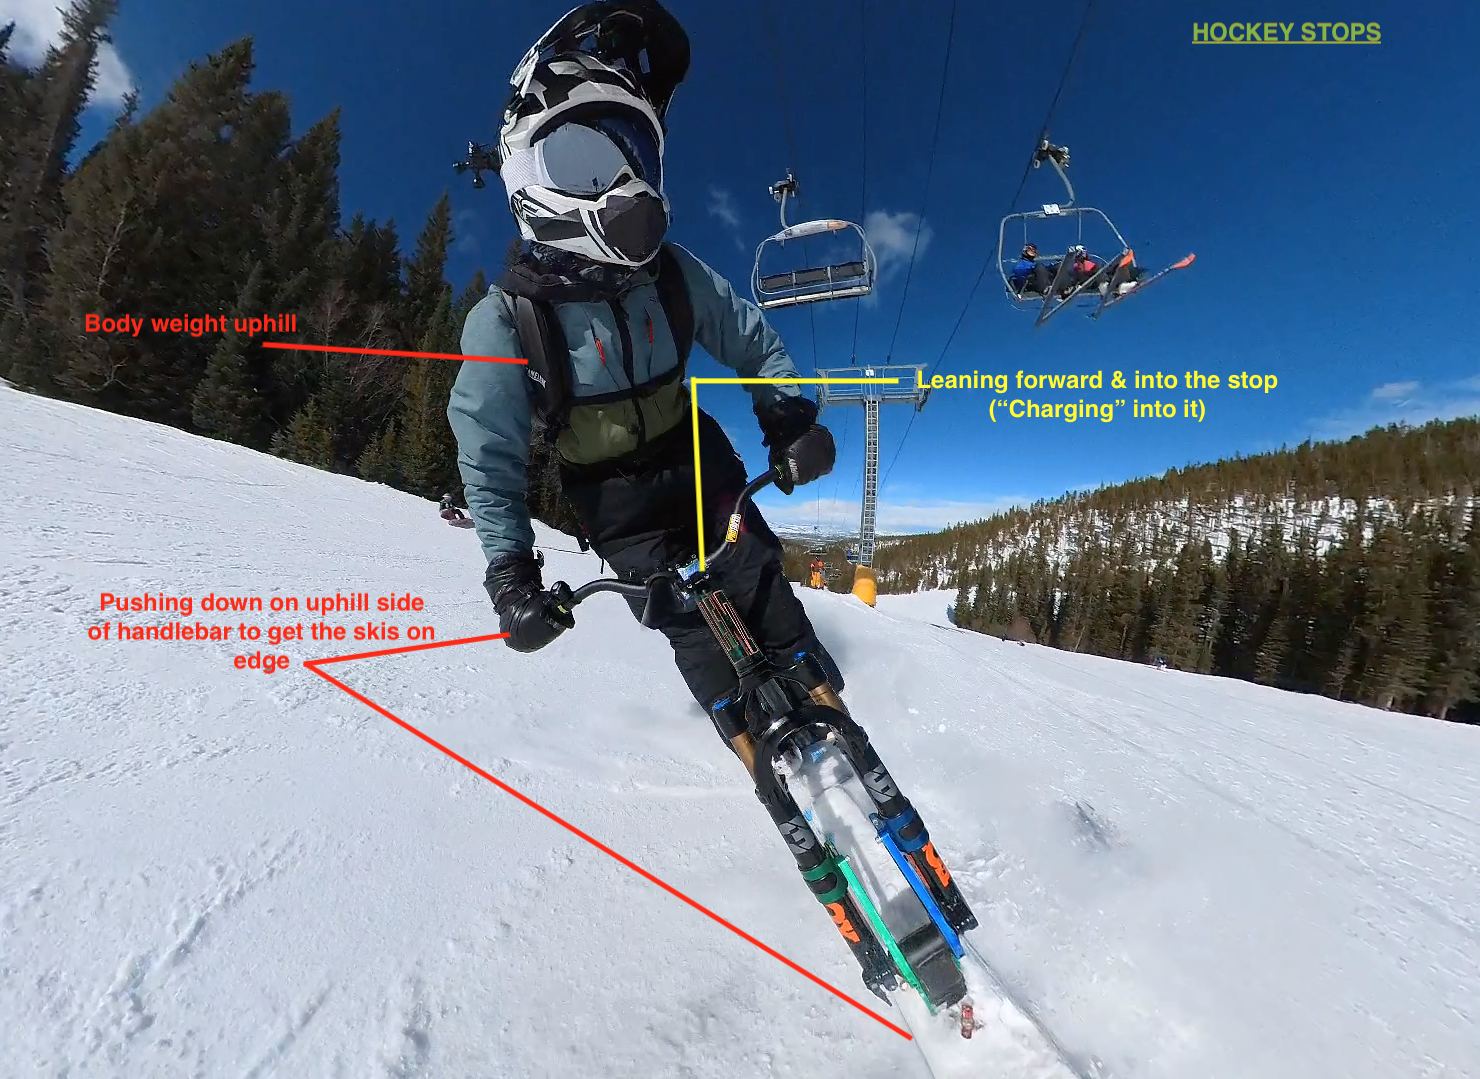
To execute these stops you will initiate the stop (turn) by turning the handlebar. You will need a good amount of body lean to the uphill side so you make the bike “lighter”, allowing it to slide easier. You will also incorporate weight transfer once again from the uphill foot peg through the bike; you will also want to lead the slide with your downhill hip. Once you have made the initial turn and the bike is perpendicular to the fall line and starting to slide, you will want to apply downward pressure to the uphill side of the handlebar.
All of this is done at the same time: leaning your body uphill while leading the stop with your downhill hip; “charging” in to the fork; applying downhill pressure to the uphill side of the handlebar to get the skis on edge; driving your weight from the uphill foot peg to the downhill side.
You will need to hold this position until the bike stops. You can change the rate of the stop by leaning more uphill and driving your weight through the foot pegs quicker, as well as leaning the bike more uphill. If you want a slower more drawn out stop, be less aggressive with the technique.
If you need to abort the stop: lean the bike downhill so it is more upright by letting up on the uphill side of the handlebar and pressing down on the downhill side of the handlebar, straighten your torso upright, and put your body weight neutral on the foot pegs.
How to Ride a Skibike Step 10: Side-slide down the fall line
The last actual skill that we teach is side-sliding down the fall line. It is possibly the hardest one to master, and is perhaps one of the more important ones if you look at it from a safety standpoint. Just as edging control and the flat skidded traverse are techniques you can use to safely navigate your way down a run that you can’t safely make turns down, side-sliding down the fall line is yet another way to get down a run. Let’s say your friend (or somebody else) is directly below you on the run and needs assistance, and if you try to make a turn to get to them, you will end up going past them. Perhaps you take a wrong turn and end up on a steep black run when you are barely comfortable on blues. Maybe the run you are on has steeper parts than you like, or it is extremely hard packed or worse yet, icy. Or maybe you didn’t see where your friend went and you find yourself staring down a steep run that is nothing but moguls, and you have never even tried them. There are all sorts of scenarios in which you might find yourself past your comfort zone and you start asking yourself, “Now what do I do? I don’t think I can safely make my normal turns down this thing. There is no way I can duck in to the trees on either side and navigate over to another run. Should I get off my bike and walk down?” It is those situations that having this skill in your tool box will come in handy. Skiers can side step down a run, snowboarders can slide on their heel or toe edge down a run, and we can side-slide down a run.
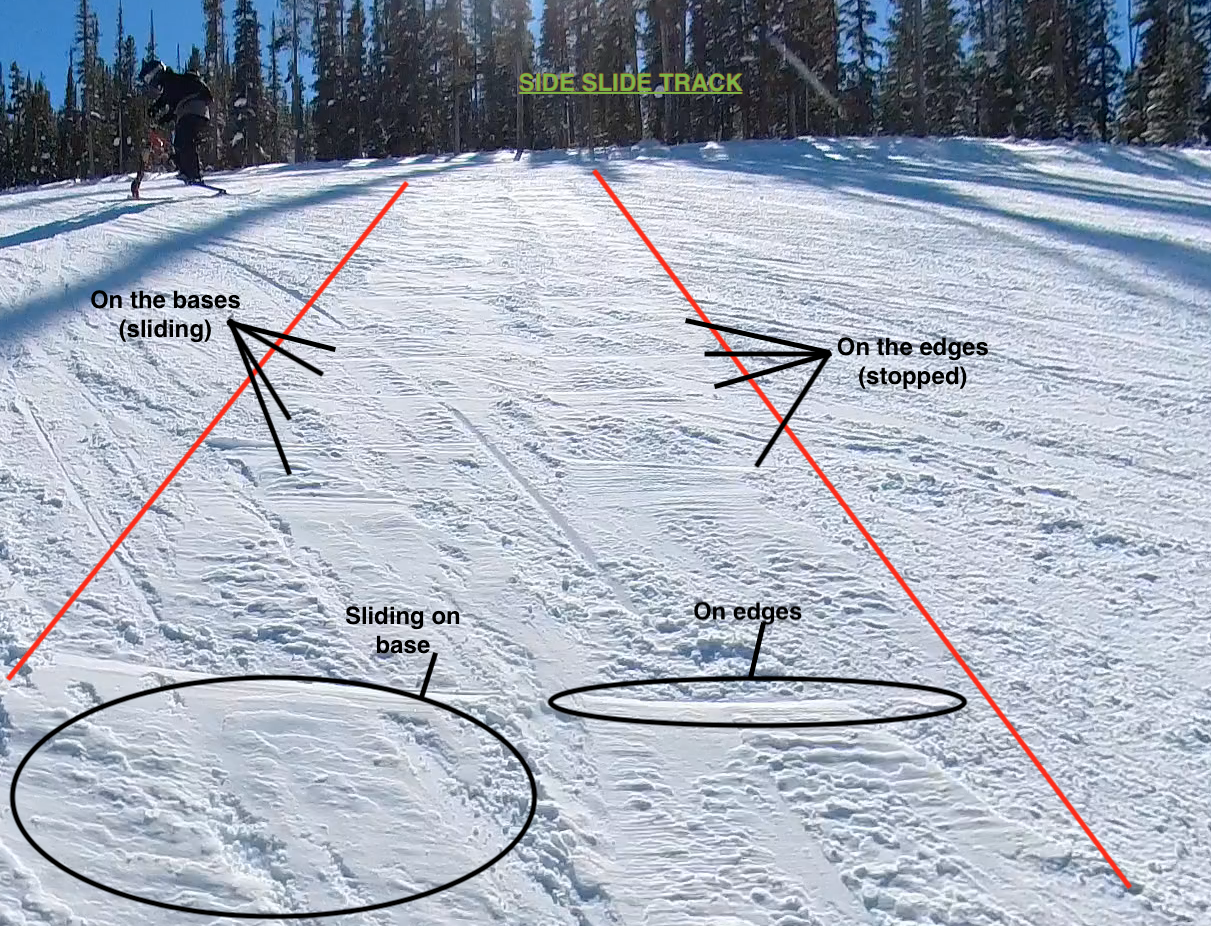
The reason this skill is so hard to master is because it is a balancing act. Unlike the flat skidded traverse where you are sliding across the run on your bases at an angle, you will be sliding on your bases straight down the fall line with little or no forward or backward movement. You are balancing on that point between your edges and your bases where the bike slides easily. Your body weight is neutral over the bike because if you lean forward you will move forward; if you lean back you will move backward. Too much input with either the bike or your body to the downhill side and you will likely catch the downhill edge and go flying over your bike (high-siding). Too little input and you will remain on your edges and you won’t slide at all. When you do this properly, your track should look like this:
CLICK ON PHOTO TO ENLARGE
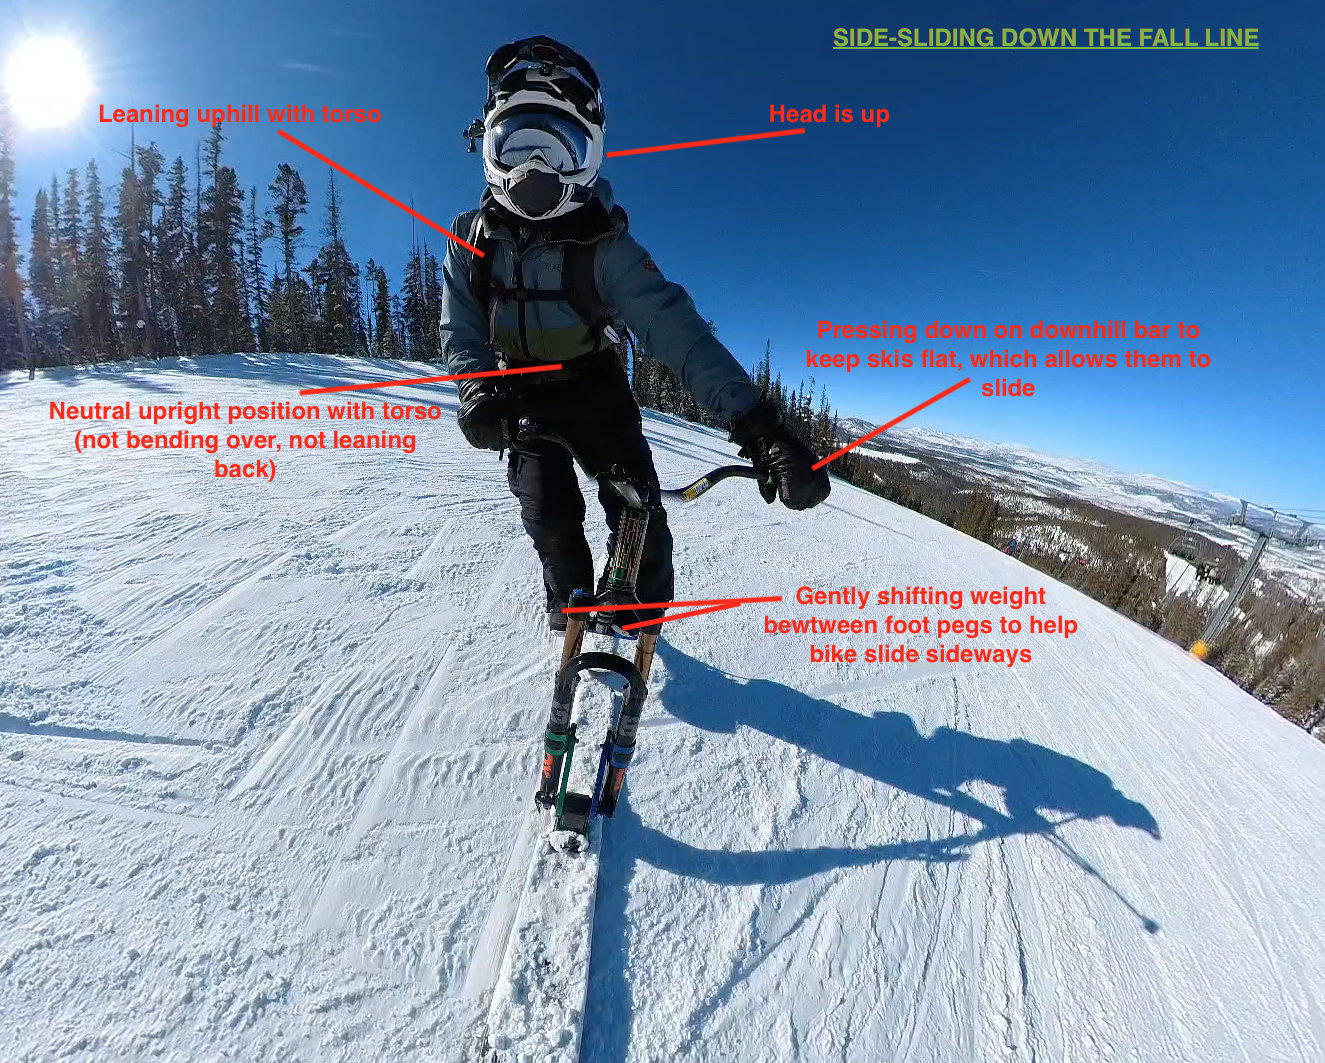
So, let’s get to it. You will need to find a part of the run that has some slope to it as you need gravity to work with…trying to do this on a flat section doesn’t work out too well. To do the side-slide you will want to start off with your body weight neutral on the foot pegs, your torso should be neutral (not leaning forward or backward), your hands should be applying slightly more pressure on the uphill side of the handlebar, and the bike should be on the uphill edges. Take a little bit of time to figure out where that balance point is on your edges before moving on to the actual sliding.
To get the bike to slide sideways down the fall line, you need to apply a little bit of pressure to the downhill side of the handlebar to flatten the skis from the edges to the base. The easiest way to do this is to press down on the downhill grip as opposed to pushing forward on the grip like you do when you turn. You will need to lean your body uphill, and you can transfer some of your body weight to your downhill foot peg. Be careful not to put too much weight on the downhill peg, as you could easily catch that edge and go flying high-side off your bike.
CLICK ON PHOTO TO ENLARGE
When you first start to do this you can expect the slide to be short lived and choppy, meaning it more than likely won’t be a sustained and smooth slide right away. Take it in small steps. Figure out how much pressure you need to apply to the downhill handlebar to get the skis to flatten out. Figure out how much body weight you need to put on the downhill foot peg to help get the skis flat and help with the slide. Figure out how much body lean to the uphill side is necessary. If you find yourself moving forward, stand more upright. If you find yourself sliding backward, lean forward just a bit. Once you figure out all of these things on their own, you can start to combine them until your slide is nice and smooth.
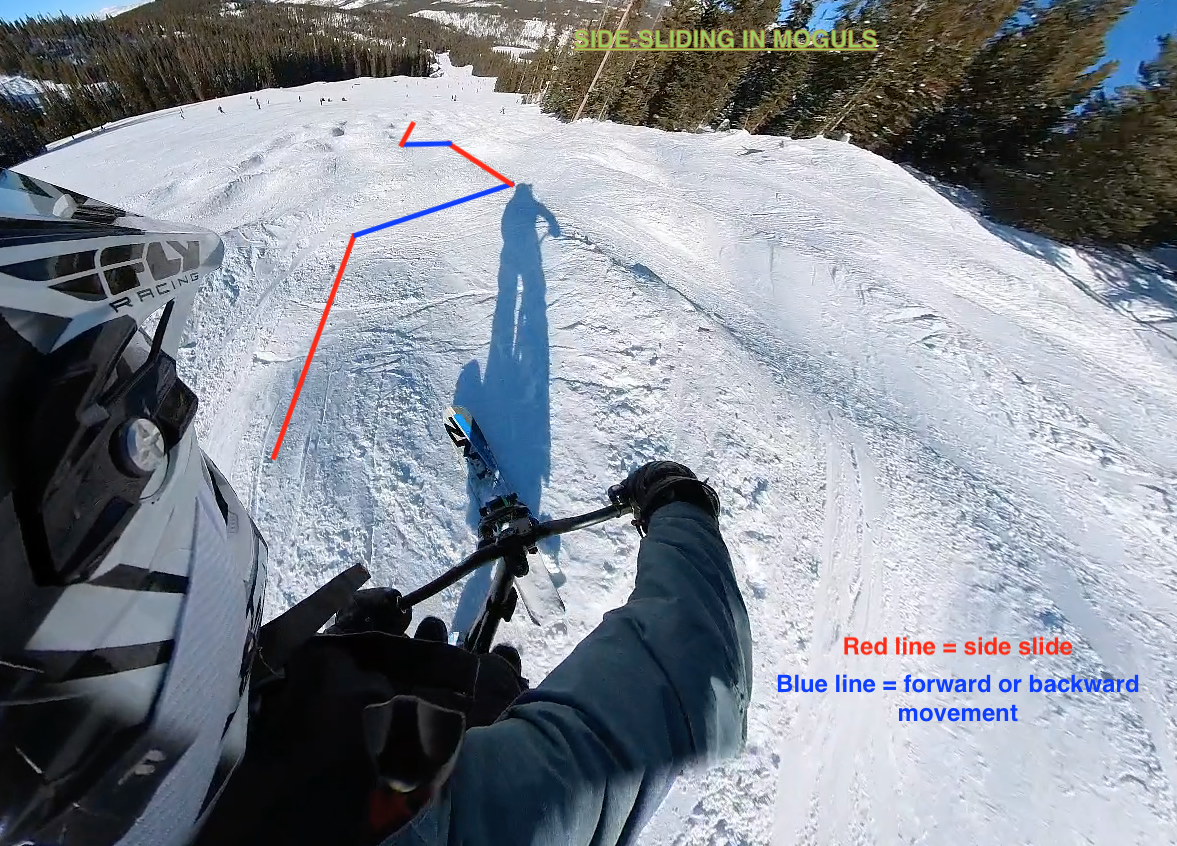
If you are wondering how you can use this technique to navigate out of a mogul field, it is quite simple. Just as a snowboarder can slide on their heel edge over the bump and through the trough, you can do the same thing. Put your body weight forward to go forward until you find a place you can slide down. Repeat this until you are out of the field, or you get to a section where you can start making turns.
CLICK ON PHOTO TO ENLARGE
How to Ride a Skibike Step 11: Tying it all together with good turns
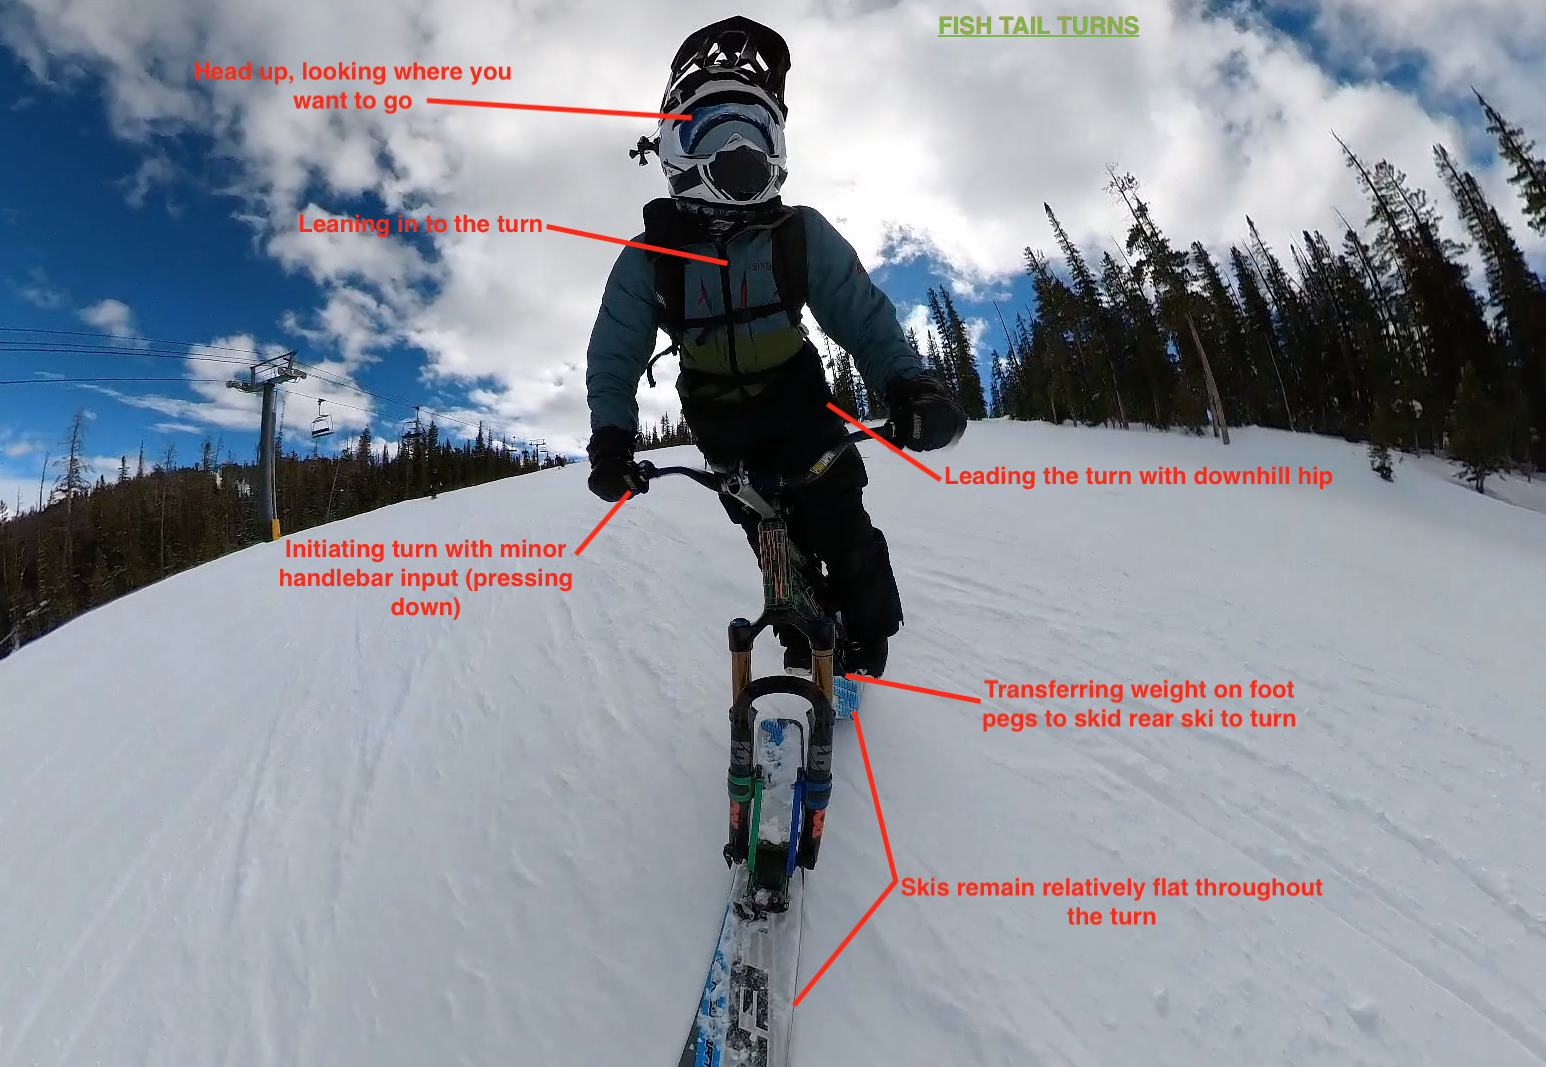
CONGRATULATIONS! By now you should be able to say that you can safely and confidently ride a skibike. You have learned all of the basics of riding a skibike with things like proper body position, edging control, sliding the bike, making different kinds of turns (handlebar vs. weight transfer) and stopping with hockey stops, as well as learning a few safety skills (flat skidded traverse, side sliding, etc.). Now it’s time to take everything you have learned, tie it all together, and talk about the two main different kinds of turns you can do: fish tail sliding turns and carving turns.
Fish tail / sliding turns are just how they sound: you are cruising down the run and your turns are more of the sliding type. These turns are are usually done quicker and tighter than carving turns, and are typically done mainly with weight transfer (remember those feet / rudder turns you learned?) as opposed to big input from the handlebar. That does not mean that they have to be quick and tight; you can stretch them out as long as you want to. Just remember that these turns are done on the base of the skis instead of the edge.
To do these turns you will still need to have little bit of handlebar input to start the turn but it is not very much. As always, charge in to the turn with your body weight forward (you should know by now that the more weight you have on the rear ski, the less it will slide). Start the turn with a little bit of bar input and then use your feet and weight transfer to do the turning. The technique is the same as when you learned how to scrub speed and how you stepped in to the turn on your foot pegs. You will also have a lot of downhill hip input to lead the turns. Think of it as like a dance or, for you those of you who mountain bike, it’s like pumping on a pump track. You should find it easy to get in to a rhythm of simultaneous bar and body input. Some people find it useful to count out the length of the turn to make them consistent. For example, you can do a 1-2-3, 1-2-3, or maybe a 1-2-3-4, 1-2-3-4 count as you make your turns.
CLICK ON PHOTO TO ENLARGE
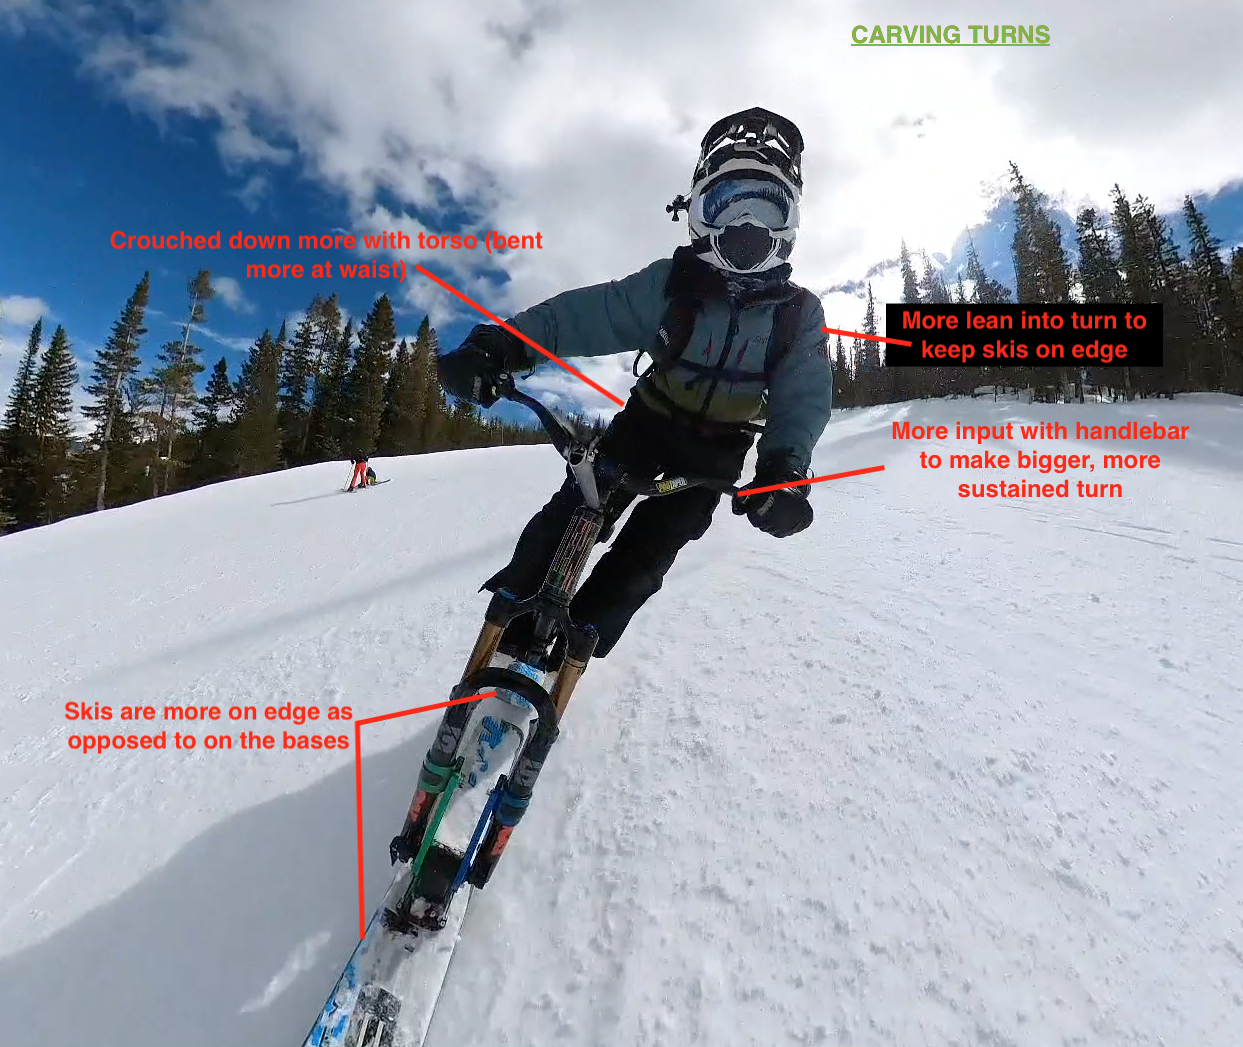
Carving turns (starting at 3:15 in the video) are done primarily on the edges as opposed to the bases. If you have ever wondered what the turning radius of the ski means, this is where that comes in to play. What that means is that if you were to put your skis on edge and hold it, they would make a circle of XX meters big. All skis are designed using a circle (or “radius”) to define its sidecut. The lower the radius number, the smaller the circle and the “snappier” or “quicker turning” the ski will be. The higher the number, the more stable it will be when making larger, arcing turns at speed. (You can find a better explanation of ski side cuts on this Ski Sidecut Explained webpage.) For example, our Riff Raff skis have a radius of 24 meters; our Conniption Styx have a radius of 18 meters. This means that the Conniption Styx will make a smaller circle if you were to maintain an edge.
So what does all of that mean for carving turns? It means that if you are cruising down the hill and want to maintain maximum speed, you will want to do carving turns. Think of Super-G ski racers and how they make big turns on the edges of their skis and their bases are rarely in sustained contact with the snow; slalom ski racers still make their turns on their edges but their bases make more contact with the snow. You can do the same thing on your skibike. Let’s explain how this is done.
Some riders find it useful to crouch down a little more in their attack position to make these turns as it helps lower the center of gravity. You can do this by lowering your chest and sticking your rear end out, bending more at the waist and knees, or both. Mountain bikers, think of when you are descending and how you kind of crouch down (especially if you watch a pro downhill racer). Same thing. You are still in your attack position but you are more or less crouched down and hugging the frame. Your turns are going to be more with the handlebar and not so much with weight transfer. It is true that you will still need a little bit of weight transfer to keep the bike on track, but you aren’t using it to make the bike slide. Because the turn is going to be bigger, you will need to hold the turn with the handlebar longer, just as you did when you first started to make the 180 degree turns. The big difference between the 180 degree turns and the carving turns is the speed at which you are traveling.
CLICK ON PHOTO TO ENLARGE
If you could look at the difference in the tracks made between the fish tail turn and the carving turn, you would see that the fish tail track is flatter and the carving track is narrower. This is because of the amount of time the bases of the skis are in contact with the snow.
How to Ride a Skibike Step 12: The Grand Finale with a good run
This last video is just a run from top to bottom. Some things are still discussed, like the difference between our Lenz BMX style handlebar and the Dirt Jumper style handlebar (starting at the 4:05 mark). Sit back and enjoy the run; after all, you earned it.