Skibike Assembly & Other Good Info
On this page you will find a lot of really good info about skibikes and skibiking. Check out these other pages for more good info:
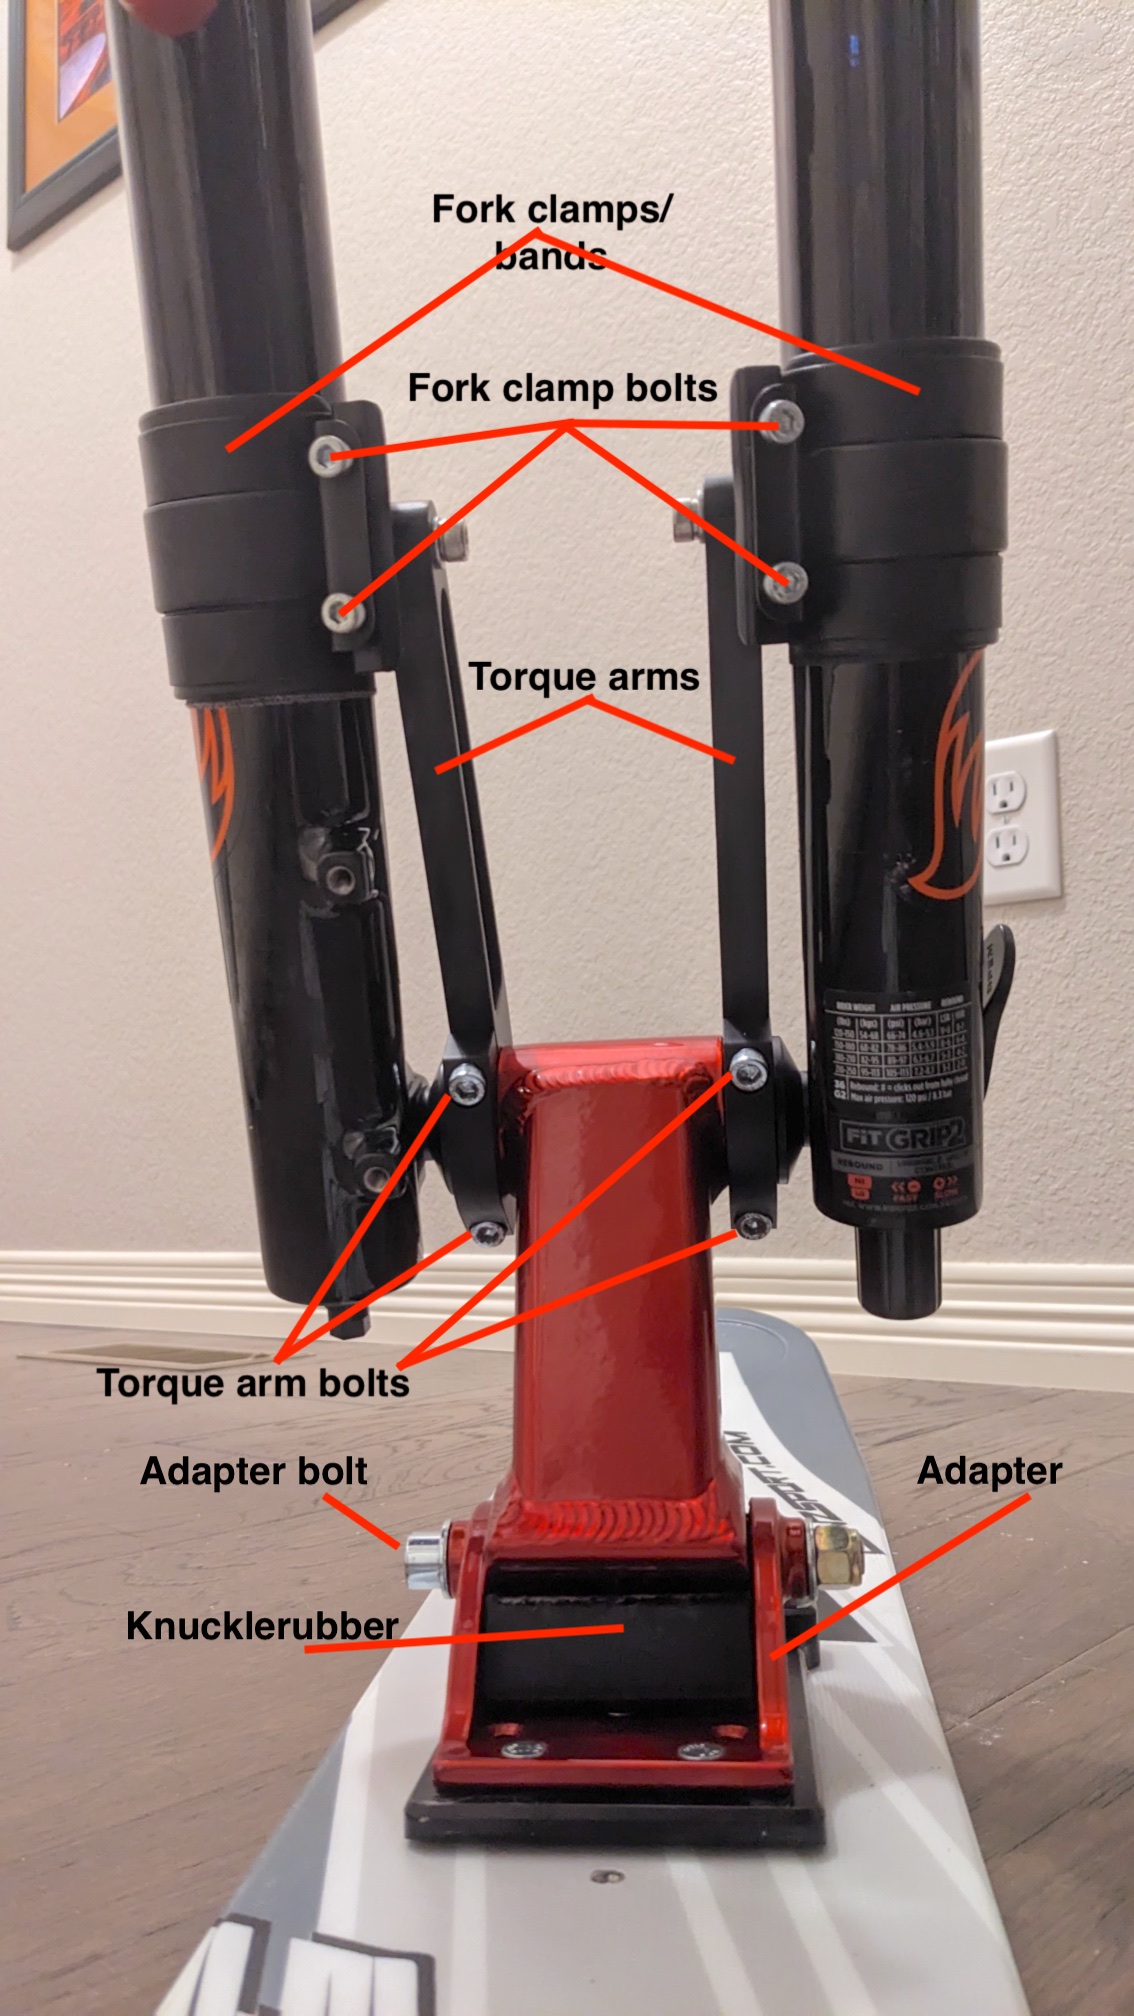
Congratulations on the purchase of your new Lenz Skibike! We know you are excited to assemble it and get shredding as soon as you can, so to help that process here is a list of the tools you will need to assemble your bike. If you need help, there is an assembly video HERE. Located at the bottom of this section are photos that will show you the “what’s what” of your skibike. If you need to take it to a bike shop for assembly, please inform the shop that everything is as it needs to be; tell them that if they have any questions about anything, they should contact us directly before doing anything. (For example, they may say that the steer tube on the fork is too long and they want to cut it. DO NOT LET THEM CUT THE STEER TUBE!)
*The air pressure in your fork is NOT SET and is something you will need to do before you ride. You will need a bicycle shock pump to set it to your riding weight (weight with gear). Refer to the owner’s manual included with your bike (it would be in the bag that your invoice was in) for information about how to set the pressure. NEVER USE AN AIR COMPRESSOR TO SET THE AIR PRESSURE IN YOUR FORK!
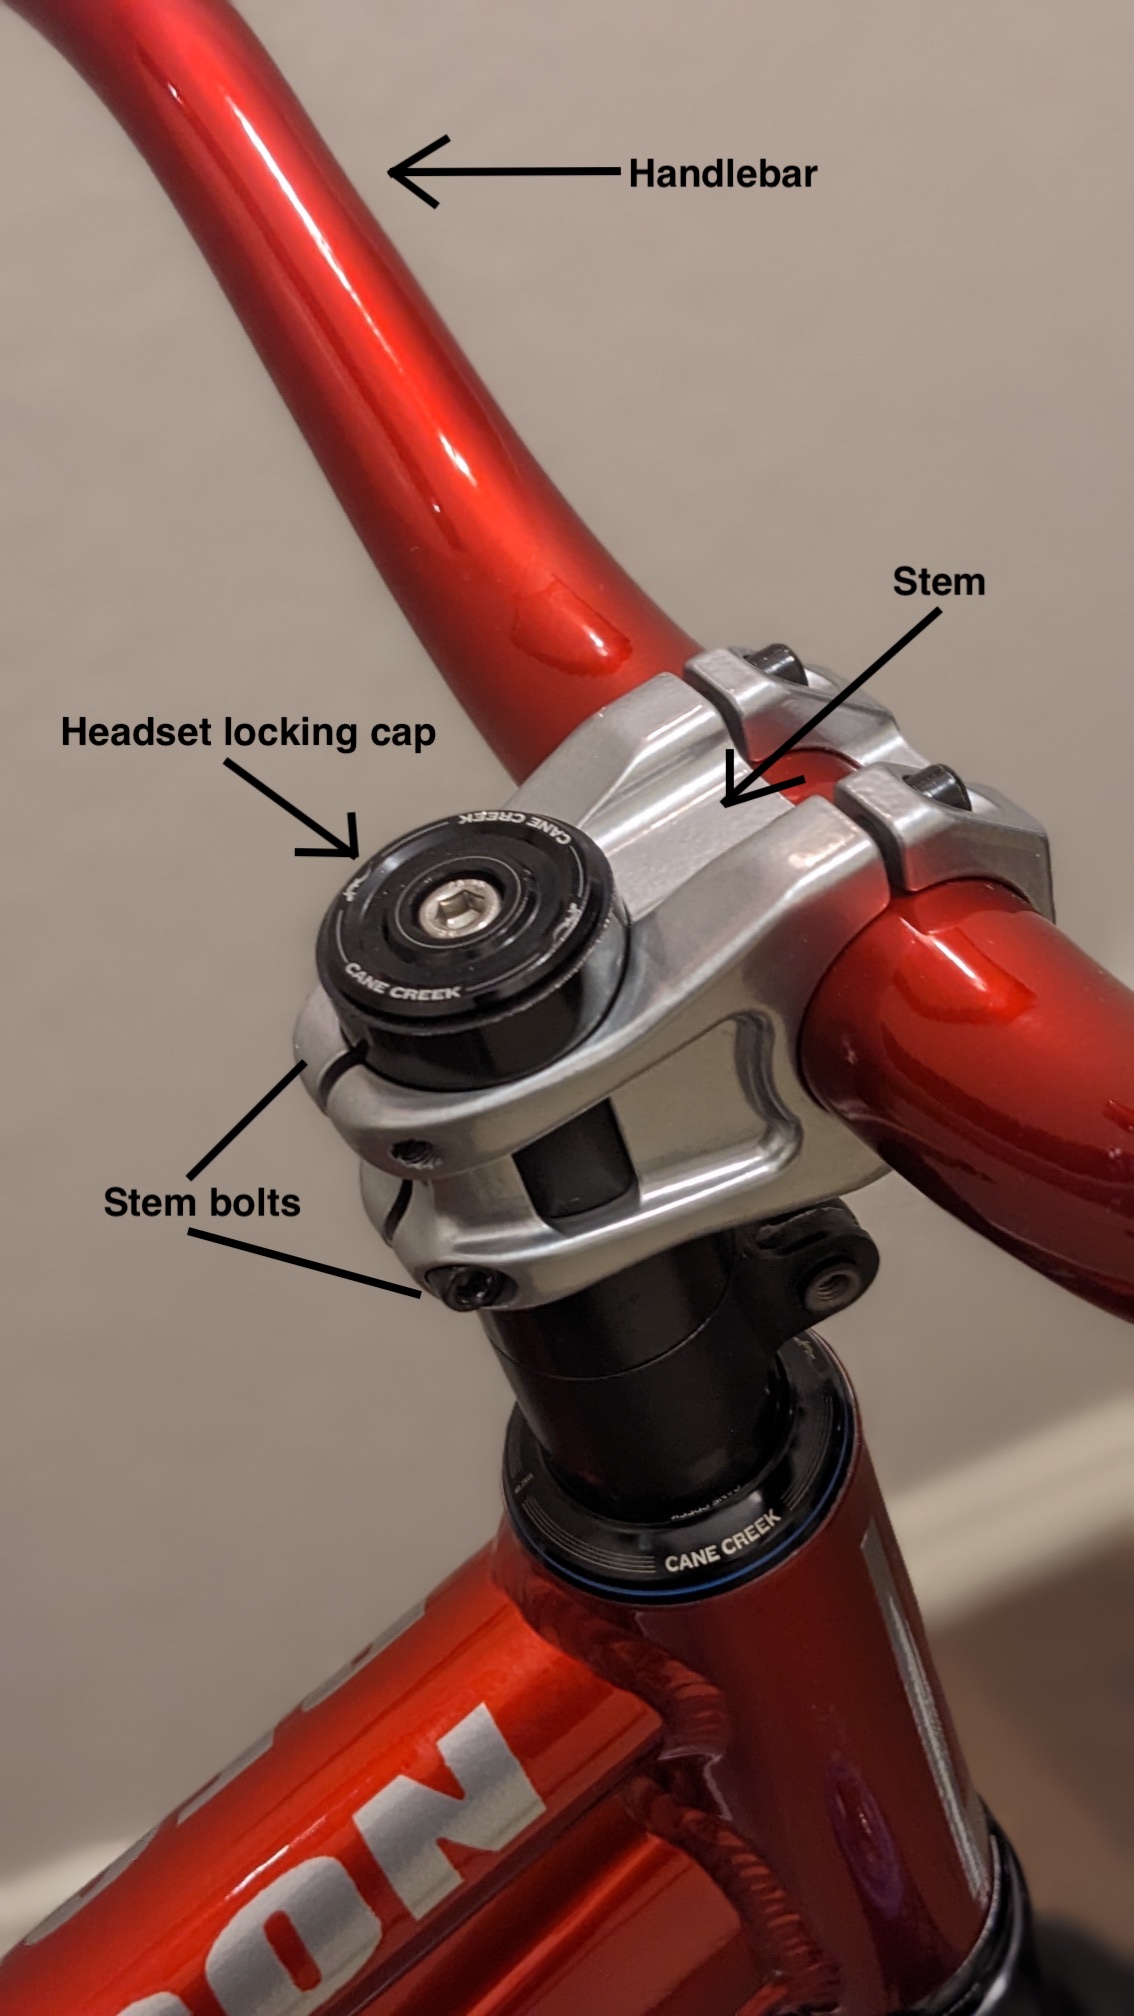
*Headset locking cap — 5mm hex allen wrench
*Handlebar stem — 4mm hex allen wrench
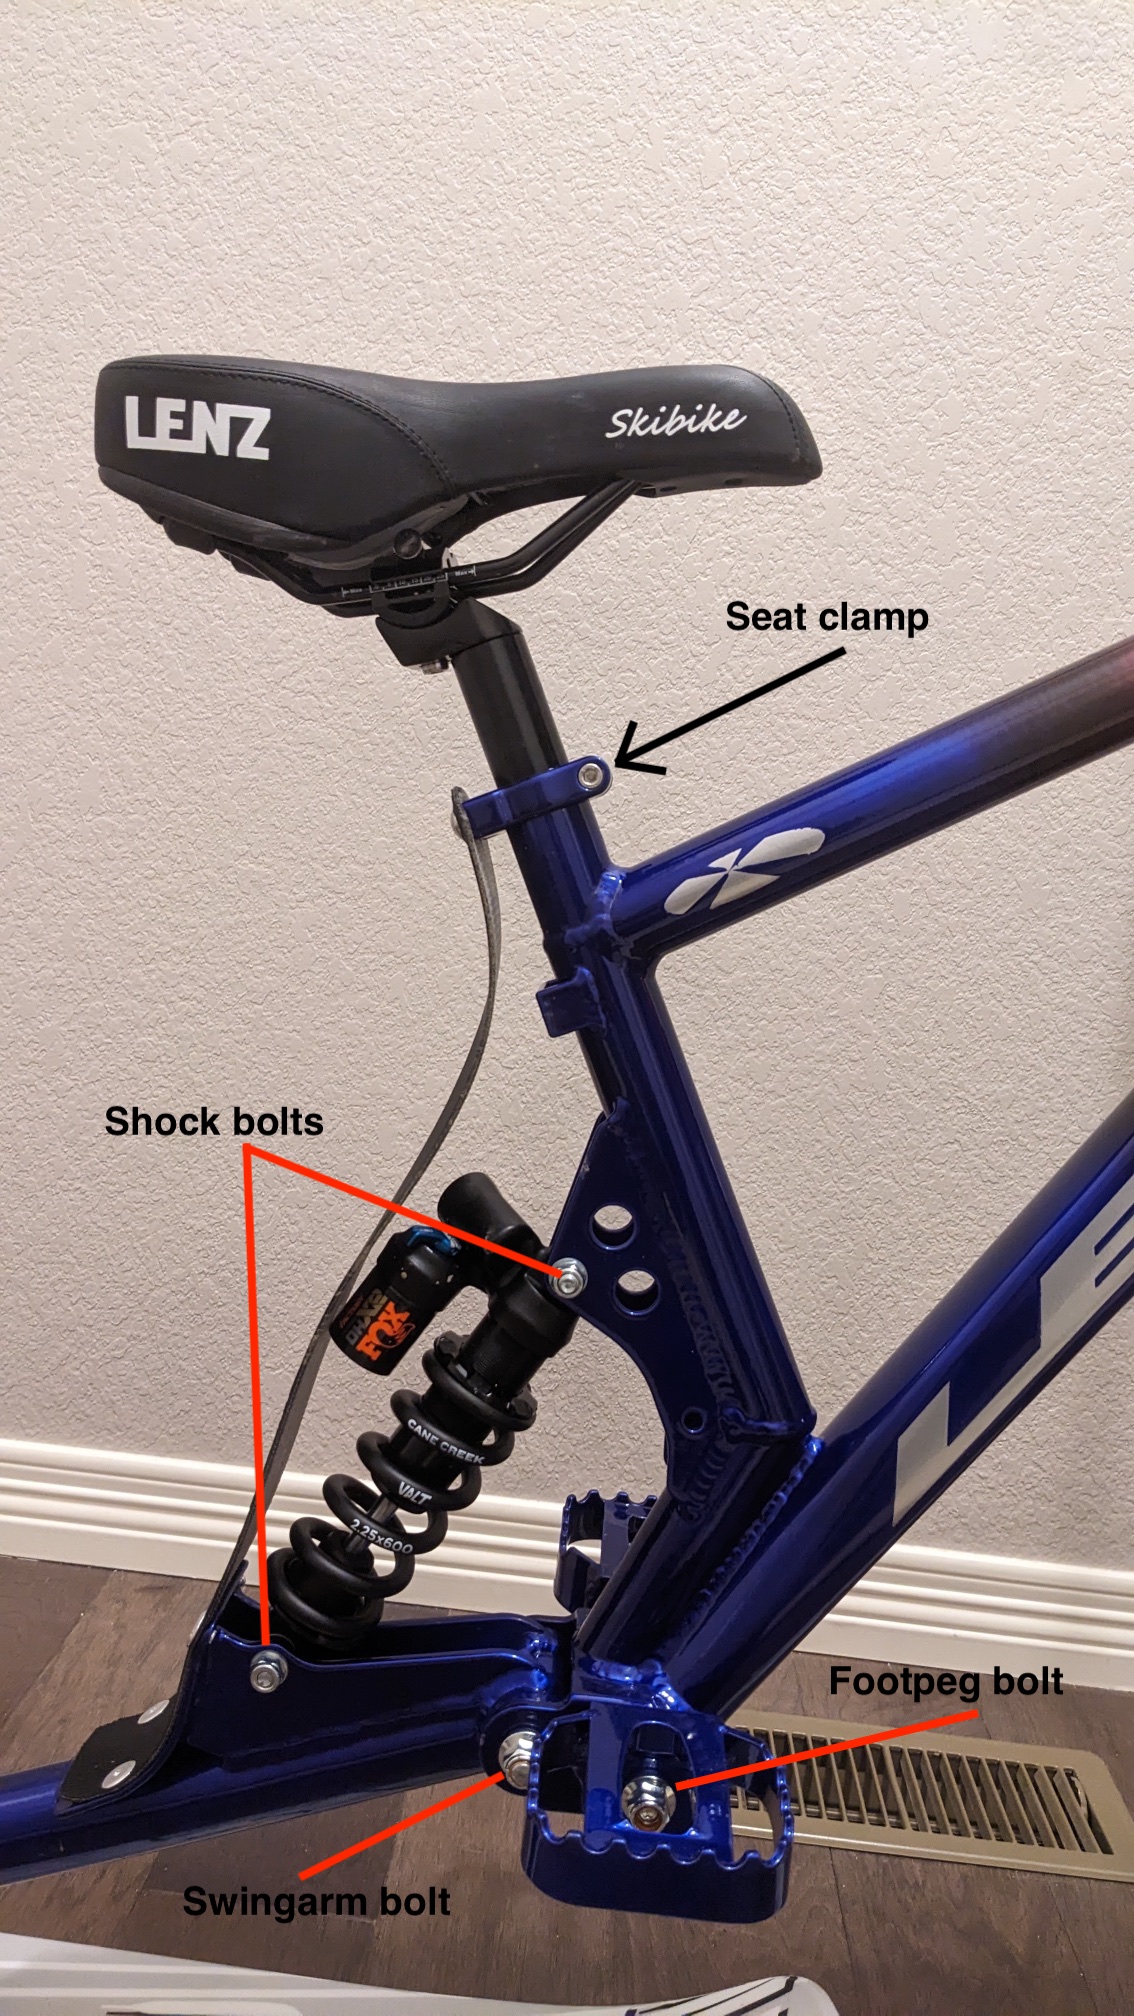
*Seat clamp (if applicable) — 5mm hex allen wrench
*Foot pegs — 8mm hex allen wrench & 15mm or 18mm socket (or box/open end wrench; a crescent wrench can be used as a last resort)
*Ski bolts — 5mm hex allen wrench (a 4mm hex wrench is needed if you have the strap going from the adapter to the ski). A long handle wrench with a ball end is best.
It’s a good idea to check all of the bolts at least once per season, more if you ride a lot. Aside from the tools and bolts listed above, here are a few more:
*Ski adapters — 8mm hex allen wrench & 15mm socket (or box/open end wrench; a crescent wrench can be used as a last resort)
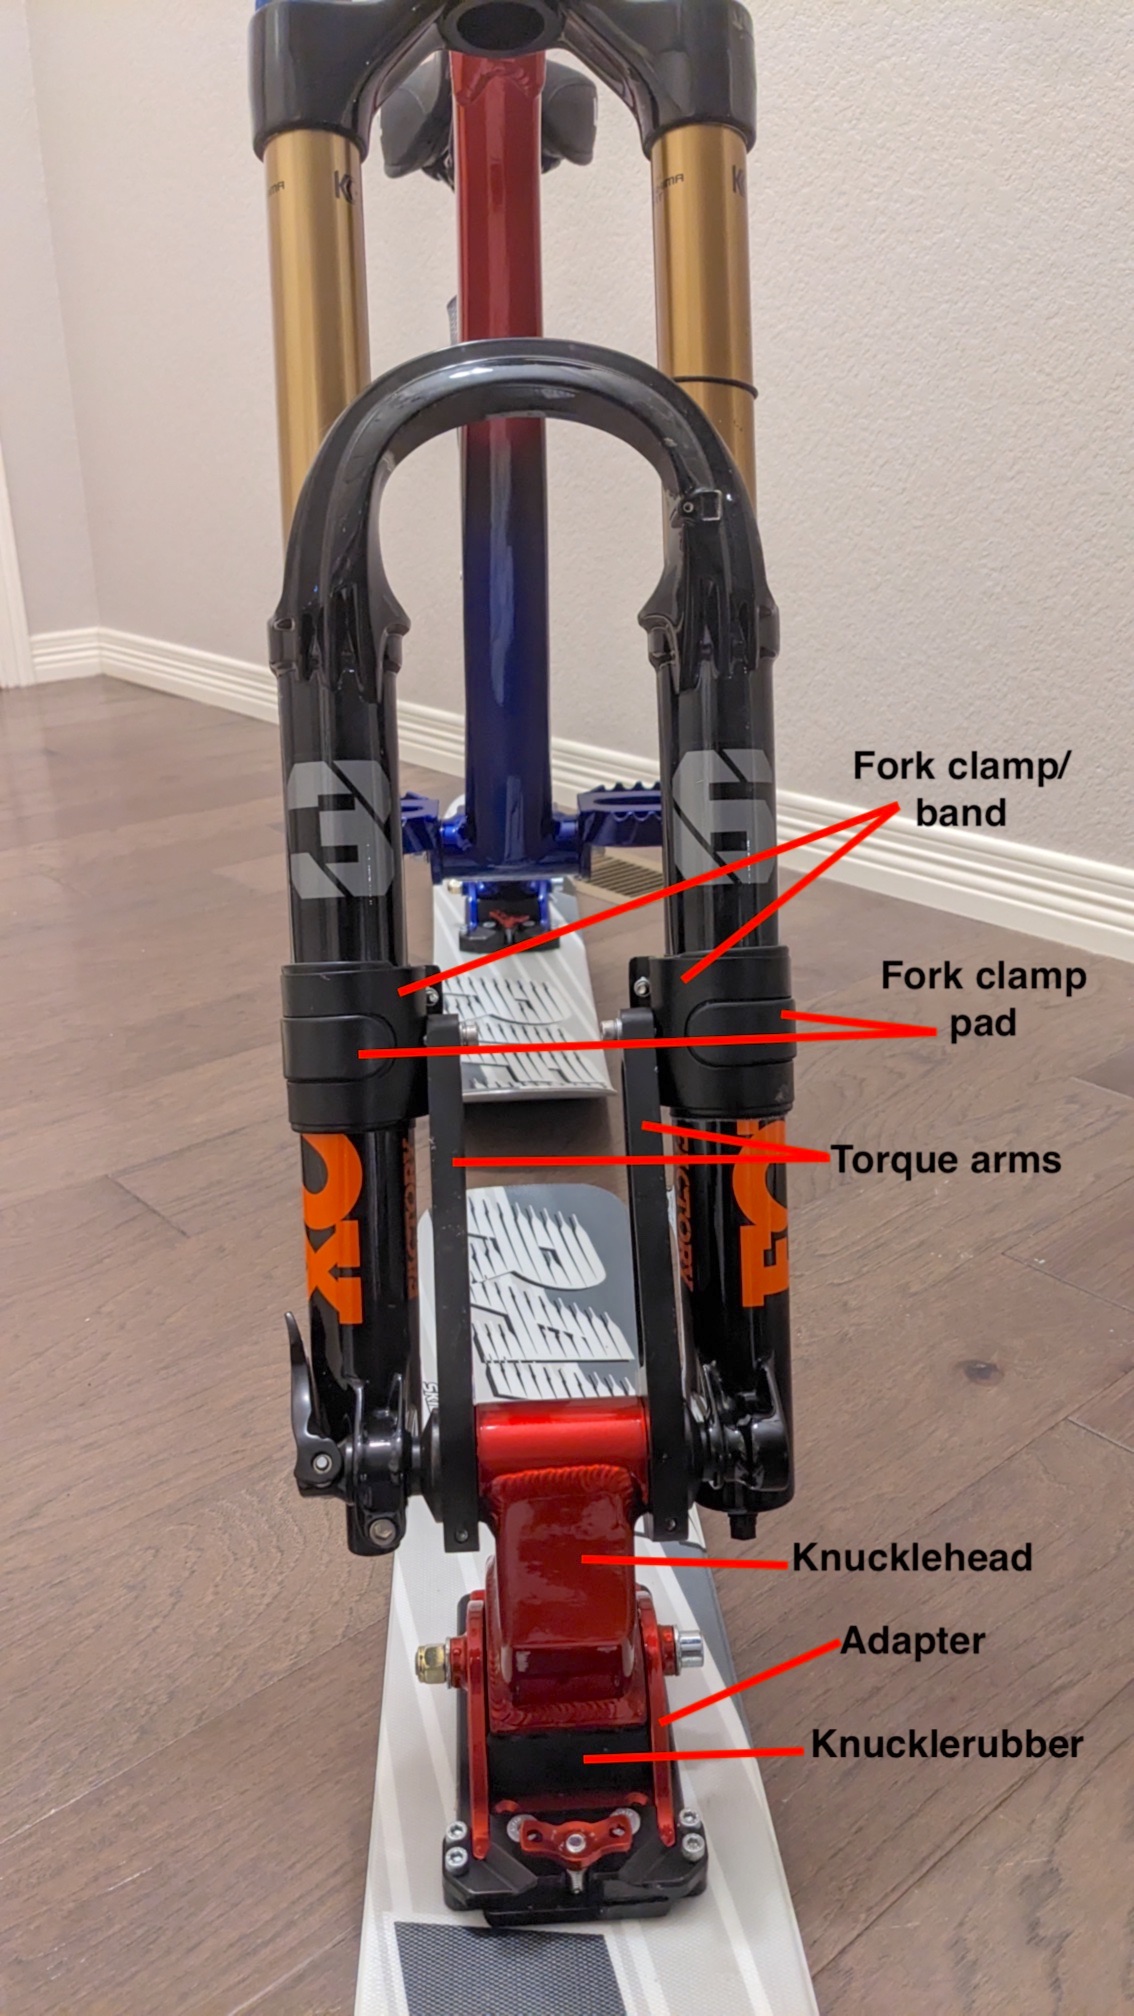
*Fork torque arm bolts — 5mm hex allen wrench
*Fork torque arm bolts @ fork clamp — 4mm hex allen wrench
*Fork clamp bolts — 4mm hex allen wrench
**NOTE: When tightening/loosening bolts with nuts, you can help avoid stripping the bolt head by using the hex wrench to hold the bolt stationary and loosening/tightening the nut.
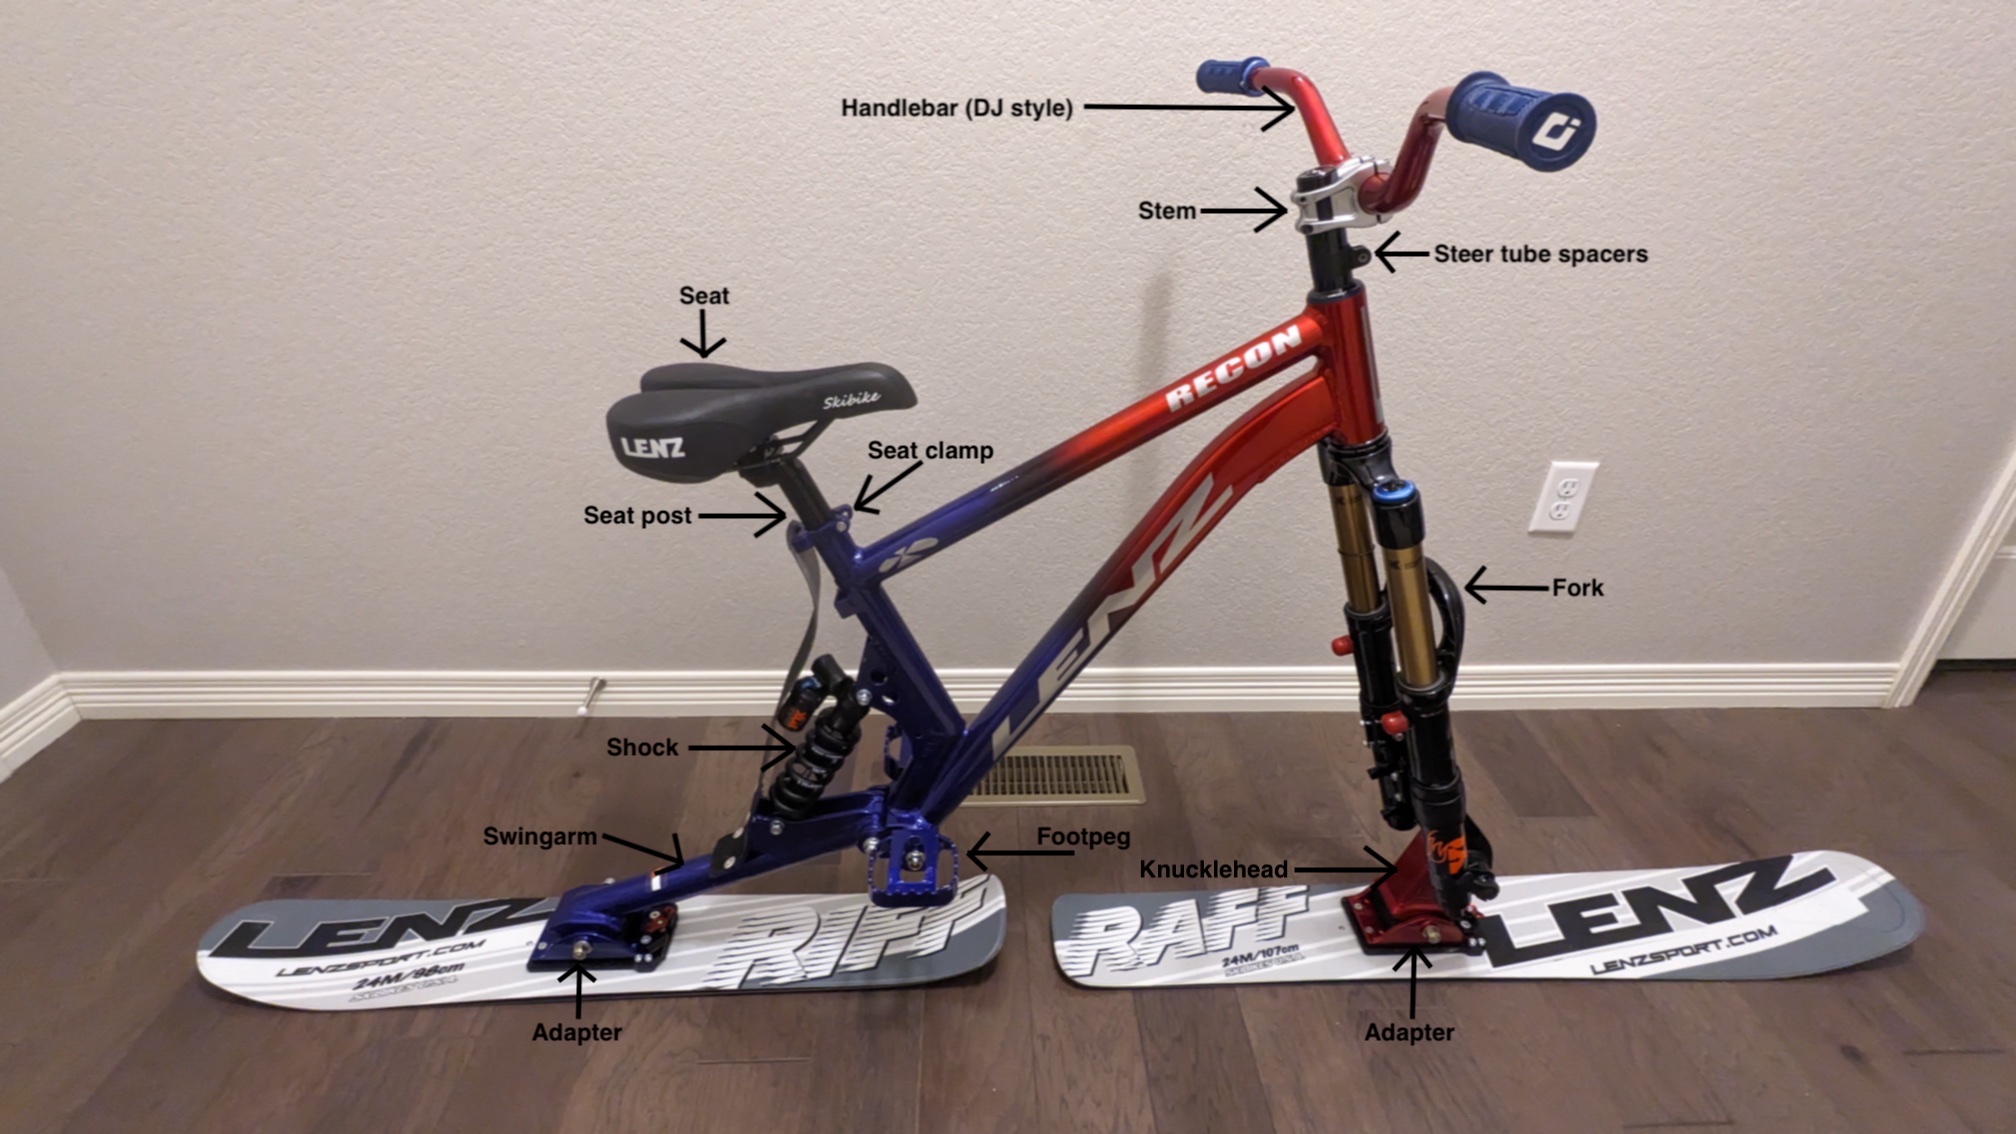
CLICK ON PHOTOS TO ENLARGE
While you are free to wear whatever you want while enjoying your skibike, here is a list of gear that we recommend you ride with. The items on this list are worn by our most seasoned and experienced riders and beginners alike (including Devin himself).
- Full face helmet. We HIGHLY recommend you wear a full face helmet because, well, skis and handlebars will win every time. Many riders have taken either a ski to the face while getting on the lift or during a good crash, and others have tried to see just how tasty the handlebar really is. Needless to say, the end result was less than desired. We suggest using a downhill mountain bike helmet; a motocross helmet can be worn as well but keep in mind they will be heavier. If you are concerned about the size and number of vents, you can use Duct or Gaffers tape to cover them up. As with any helmet, fit is of the utmost importance and the brand you decide to go with is entirely up to you. What fits one persons head may not fit yours. If possible, take your goggles with when shopping for a helmet to ensure a good seal to avoid fogging. Not all goggles play nicely with all helmets, so take your time. (One of the biggest advantages to a full face helmet is that your head will be warmer and when you fall you usually do not eat a lot of snow.)
- Knee/Shin Pads. Face it..you have a metal frame between your lower legs. The first time you whack your shin or knee on the frame or foot peg and you will know why we wear shin pads. They are also helpful in situating your bike when getting on the lift if you need to rest your foot peg on your shin. Hard plastic ones are the best, whether it be a motocross or downhill mountain bike style. If you have to wear a knee brace, you can always opt for a soccer shin pad under your base layer. A good place to start is looking for something like these Leatt 3.0 EXT knee/shin
- Boots. There is no one type of boot that is better than another. Some wear snowboard boots, others wear snowmobile boots, while some yet wear regular snow boots. The most important thing is that the tread pattern is relatively close and not too far apart. This allows you to optimize traction on our Whopper and Big Mac foot pegs by getting quick, consistent foot placement. Because you do not have to be concerned with heel-to-toe weight distribution like you do on a snowboard, you can go with a snowboard boot that has a neutral back angle. The best part about skibiking and boots is that because you don’t have to worry about edge control through your feet, you can wear your boots as tight or as loose as you want…that means you will have warm, cozy feet all day long.
- Other gear items. Some riders are starting to put a seat pack or small frame pack on their bike so they have quick access to their leash, tools, hand warmers, snacks, etc. Whether or not you ride with a backpack/hydration pack, a seat pack on your frame is a great way to have quick access to those items you might need quickly. Plus it saves a little bit of weight on your back over the course of the day if you can have your bike carry a little of the load. (It’s not like you have to pedal up hill!)
**You will need a 5mm hex allen wrench for the ski bolts. A long T-handle with a ball end is best.**
It may seem like a no-brainer, but there is a slight trick to easily mounting your skis. Some skis and adapters may have a slightly imperfect bolt pattern; in order for the adapters to “self correct”, follow these steps:
1. Place the adapter on the ski and over the bolt holes. If you are mounting the Riff Raff or Zig Zag, you will notice two sets of mounting holes on the rear ski. Most riders use the forward most set of holes, but it is personal preference.
2. Start each bolt in each hole, only turning each bolt a couple of turns so that the threads catch.
3. Working in a circular pattern, gradually tighten the bolts until they are all tight. There is no torque setting as you can only get them so tight.
If you are running our Riff Raff or Zig Zag skis, we HIGHLY RECOMMEND that you orient the knucklehead tower (the big block looking thing that attaches the front ski to the fork) so that the angled side is facing forward and the flat side is facing backward. For detailed information and instructions on how to do this, please check out the “Turning the knucklehead around” on our “How To” videos for Lenz Skibikes.
DISCLAIMER: The intended purpose of the following information is solely for explaining why it is a good idea to have a weight rated leash with you at all times, regardless of the rules and requirements of the mountain you are riding at. This information does not express our view on whether or not leashes should or should not be used while riding, or if they should be worn while on the lift.
One of the hottest debates today with skibikes gaining popularity is the requirement and use of leashes. There are pros and cons to wearing a leash while you are riding the bike just as there are with using one while riding the chair lift. We are not discussing that here. We want you to think about a different scenario.
Let’s say you are having an awesome day riding. You’re relaxing on the lift for another run when suddenly the lift stops. As the minutes pass it becomes clear that there is something wrong with the lift and it’s broken. It won’t be turning again today. Every single skier and rider must now be evacuated by ski patrol, being safely lowered to the ground with a special repel system that you sit on to lower you from the chair. Skiers and snowboarders have their equipment strapped to their feet and they get lowered with their boards still attached. If you have never seen this done, check out the video IN THIS LINK . What about your bike? How are they going to get that down? If you drop your bike you will probably damage it, not to mention run the risk of it hitting somebody and hurting them.
If you have a leash that is weight rated (like the ones we sell that are made of rock climbing tube webbing and an actual rock climbing carabiner), you can attach one end of the leash to your bike and the other end to the rope that is used to lower the person down. Once your bike is safely lowered and resting below you, Ski Patrol can now safely lower you. The key here is having a leash strong enough to hold the weight of your bike without fear of it snapping or breaking. Our bikes weigh, on average, 30 LBS. If you are using a retractable dog leash with a carabiner that is only rated for 5 LBS, guess what? Your bike might go crashing to the ground once it leaves your grip. Would you rather spend $25 for a solid weight rated leash that you yourself could repel with, or $1000 fixing your broken bike?
Here are some other general tips and things to consider as the season moves along. Some of them are tips to make things easier on you; others are tips to keep your bike running smoothly.
1. FORK AIR PRESSURE. As stated earlier, chances are the fork on your bike is an air fork. If you remember much from physics class, air volume and pressure decrease with cold air. On colder days, you will need to add more air to your fork so it feels the same as on a warmer day. Please remember to only use a bicycle shock pump to adjust the air pressure…NEVER USE AN AIR COMPRESSOR. A good reliable pump for the price is one made by Fox. Fox Shock Pump
2. REMOVING SKIS FOR TRANSPORTATION. If you need to remove the one for both skis for transportation to and from the slopes, make life easier on yourself and put a piece of tape over the ski bolt heads after you mount the skis before you start riding. This will prevent ice and snow from building up in the holes on the bolt heads, which can take a while to get rid of in the parking lot at the end of the day. We recommend either Gaffers Tape or Gorilla Tape. You can store a few extra lengths of tape on one of the tubes of your bike in case it falls off.
3. PRE-SEASON CHECK. Before the snow starts to fly to signal the beginning of the season, it’s a good idea to give your bike a once-over. Check all of the bolts to make sure they are all tight. (When tightening/loosening bolts with nuts, you can help avoid stripping the bolt head by using the hex wrench to hold the bolt stationary and loosening/tightening the nut.) Aside from the bolts, here are a few of the bigger things to check:
A. If you can, remove the skis and ski adapters to check the brass bushings that the big bolts go through. If one or both are not intact, contact us for replacement bushings. You can watch the video on how to remove and lubricate the adapters/bolts/bushings/knuckle rubber pads at the bottom of this page; it’s called “Lenz Sport skibike adapter maintenance”.
B. Remove your shock from the swingarm by removing the lower shock bolt and see that the swing arm (the back part of the bike that attaches just behind the foot pegs) still moves freely. If it feels stiff or sticky your bearings may be seized and need to be replaced.
C. Remove your handlebar and fork so you can check the bearings in the headset. There is a big one on the bottom and a small one on the top. If they feel gritty or sticky, they might need to be replaced.
4. GET YOUR SUSPENSION SERVICED. To keep your fork and shock operating optimally, you should get them serviced at the service intervals suggested by the manufacturer. For example, Fox recommends every 100 hours of riding; Rock Shox recommends every 50 hours. Spending $250 every so often to have your suspension serviced is cheaper than buying a new one.
If you notice that the fork is not holding air or there is oil on the upper legs (stanchions), the shock is leaking oil, or they are making noise that they didn’t used to make, you should cease riding immediately and get them serviced. Unless you are a skilled mechanic who has the proper tools and like making messes, we suggest having an authorized service center perform the service. If you need help finding a place to send your fork and/or shock, let us know.
5. CHECK YOUR BOLTS. We cannot emphasize this enough. It is a good idea to check all of the bolts on your bike at least a few times throughout the season. The more you ride, the more often you should check them. The bolts on the handlebar stem and head set, ski adapters and skis (if you don’t remove them for transportation) are the most common ones that can come loose. As with anything, 5 minutes of preventative maintenance could prevent a day ending in disaster.
6. KEEP YOUR SKIS TUNED AND WAXED. If you have ever owned skis or a snowboard, you know how important it is to keep them properly tuned and waxed. Not only do tuned and waxed skis perform better but in some cases they last longer. If your edges are full of rust, knicks and burrs it may be hard to maintain a solid edge in less-than-ideal conditions (i.e. ice), which could cause you to fall or crash. Skis that are not waxed can feel slow and sluggish, and may be more prone to cracking/weathering. Please see the SkiBike FAQ page for info about tuning and waxing questions.
7. PROTECT YOUR SWINGARM FROM THE CHAIR LIFT. The top of your swingarm will take a beating from loading the chair lift. You can protect it and keep it from getting beat up by applying a piece of protective tape. We are a fan of ISC 2″ helicopter tape because of its thickness and the perfect width.