CHECK OUT THE VIDEOS ALONG THE SIDE OF THIS PAGE ON HOW TO TUNE YOUR SKIS (AT THE END OF EACH BLOCK IF YOU ARE ON A MOBILE DEVICE). Check out the SkiBike FAQ page for info on frequency of tuning and waxing.
Why is it important to tune your skis? Just like regular skis and snowboards, the skis on our bikes have edges that need to be tuned and de-tuned to allow them to perform properly. By doing so you will be able to turn the bike easier by getting it to hold a proper edge, and the skis won’t be as “grabby” when you don’t want them to be. Waxing the base is like applying lotion to your skin; it keeps the base “hydrated” if you will and helps protect it from weathering and becoming damaged. Before we start, here are a few terms you will hear while tuning skis:
The following is a tuning guide for our skis. Please keep in mind that the following information is intended to be a guide…a starting point if you will. The specifications listed are what we use when we tune skis in our shop and are not in any way set in stone. Below is a list of the tools we use in our shop, and they are the same tools used in the “How To” videos. Please keep in mind some of these are professional tools and may not be available to the public for purchase.
RIFF RAFF & ZIG ZAG (must be tuned prior to being ridden)
*Side edges–2 degrees.
*Base edges–1.5 degrees
*Tips and tails — Aggressive and progressive De-tune (dulling) so that it is most dull at the very center of the tip/tail and progressively lessens as you work in to the effective edge

CONNIPTION STYX (should be tuned prior to being ridden)
*Side and base edges — 1 degree
*Tips and tails — Progressive De-tune (dulling) so that it is most dull at the very center of the tip/tail and progressively lessens as you work in to the effective edge

Please watch the corresponding video, “How to tune Lenz skibike skis Part 1: Tuning the edges”
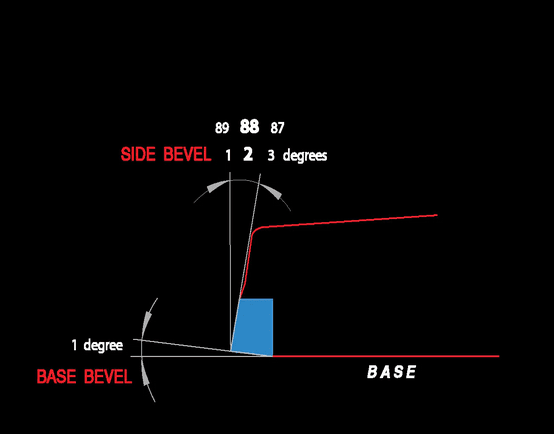
The first step in tuning skis is to tune, or put a bevel, on the side and base edges. On hard and icy snow conditions an increased bevel angle enables the base edge to be in immediate contact with the snow surface and side edges to penetrate deeper for better grip. This diagram might help explain what a bevel is:
Tools needed (reference the list above in the introduction section):
Please watch the corresponding video, “How to tune Lenz skibike skis Part 2: Sharpening the edges”
Sharpening the side and base edges is the second step in tuning skis. Skis that are properly sharpened will grip hard-packed snow and give you stability as you engage a turn. Even when a ski is perfectly tuned, some skiers use a stone to dull the edges a few centimeters from the tip and tail. Here’s why: Tips that are too sharp yank the ski into the turn too suddenly, resulting in a wobbly turn. Tails that are too sharp get hung up and run too straight out of the turn. How sharp you make your edges is entirely up to you as it is personal preference. If you are riding in powder it won’t matter as much as it does if you are on hard pack or ice. A good gauge to determine if your skis need to be sharpened is if you rub a fingernail perpendicular to the edge and if no nail comes off, it’s time to sharpen them. Be sure to run your fingernail in both directions to test both the side and base edge, and test in several spots along the edges. This will also tell you what areas need to be sharpened more than others, and also which side is your strong side in turns as it will be more dull.
Tools needed (reference the list above in the introduction section):
Please watch the corresponding video, “How to tune Lenz skibike skis Part 3: De-tuning the tips and tails”
De-tuning the tips and tails is the third step in tuning your skibike skis. De-tuning the sharp tip and tail edges on skis has the added benefit of reducing the chance that they’ll cut you in a fall, or cut someone else in a collision. Traditionally, this has been the typical method to finish a ski or snowboard edge after sharpening and polishing. Slight increases of base bevel geometry, called feathering, at the tips and tails can be used instead to control the transitions into and out of a turn…we call this feathering a “progressive and aggressive de-tune” and is described in the video. De-tuning also helps if the tips and tails catch or to make initiating and ending turns easier. After you finish the entire tuning process and you feel that the skis are still “grabby” you can de-tune the tips and tails more, or you can de-tune further down into the effect side and base edge.
Tools needed (reference the list above in the introduction section):
Please watch the corresponding video, “How to tune Lenz skibike skis Part 4: Applying the hot wax”
Waxing your skis is the fourth step in the tuning process. Wax acts as a slippery lubricant that helps your skis glide faster and more consistently on the snow’s surface. It also helps protect your base and edges. In more detail, skis dry out, just like our skin. Besides dragging down the mountain, bases that are dried out are discolored, white, or chalky looking. Dried out skis will run poorly and won’t glide as smoothly or as fast. If the bases have gouges in them from running over rocks or trees, a good coat of hot wax will help fill the gouges to create a smooth surface, which increases glide and performance. The important thing to remember is that you use the appropriate wax for the days you will be riding. THIS ARTICLE can explain the different waxes a lot better than we can.
There are a few different kinds of wax: hot wax, spray on wax, and rub-on wax. We use hot wax at the shop, which is what we show in the video. Each type of wax will have pros and cons, and what you end up using is going to be personal preference. Do your homework, try some out, and make the best educated decision you can.
Pro Tip: Aside from waxing them throughout the season it is recommended to wax them after the season ends to help prevent them from drying out in the off-season, especially if you are in a dry climate.
Another reason to keep your skis waxed is because it helps protect the edges from rusting. Wax keeps your skis moist, but they also protect the edges from moisture. Excess moisture can cause the edges to rust, which can cause all sorts of performance and ride problems on the slopes. Rusty edges are also more prone to ding and chip, which can cause your skis to catch awkwardly or skid unexpectedly. Keep your skis well waxed so you’ll always be ready to speed down the mountain.
Lastly, waxed skis are more fun. More than anything, well-tuned and properly waxed skis are just more fun! Wax makes your skis hydrophobic, or water resistant. The more hydrophobic your skis, the faster they will be down the slopes. Keeping your skis waxed will also make them easier to make smoother turns.
Tools needed (reference the list above in the introduction section):
Please watch the corresponding video, “How to tune Lenz skibike skis Part 5: Scraping the hot wax”
The fifth and final step in tuning your skibike skis is to scrape off the excess hot wax. When you apply hot wax with an iron it is very difficult to apply the wax so that it creates a perfectly smooth surface. By scraping off the excess wax after it cools you will create a smoother surface by scraping off any bumps, ridges or uneven areas. You will also be scraping the wax off the edges, which will allow the edges to properly grip the snow. By using a paper towel (demonstrated in the video) or using a wax brush (not demonstrated) to wipe down the surface of the wax on the skis after the excess is removed, you are creating “micro-channels” in the wax that allow the snow to run down, decreasing the amount of drag and increasing the amount of glide/speed.
Tools needed (reference the list above in the introduction section):